Whether you're reporting on Revenue, Booking information, or even Tasks, Event Temple has many pre-built lists & reports to use.
Within each list and report, users have the ability to customize, save, and export. Event Temple includes specific report types such as One-Sheet Event Reference for concise summaries and Multi-week/Monthly Event Details for broader event information.
Building and Saving Custom Views & Reports It's possible to create custom reports by manipulating your data tables to give you the information you wish to see:
Modify Columns Once you have manipulated your filters and columns to your liking, you can Save the View:
Set the parameters you wish to Save in your custom view
Scroll to the top of the table and select the purple Save View Button at the top right side
Select if you wish to Save changes to the Current View or Create a New View
Click Next
Click Save The video below will walk you through the ins-and-outs of Filtering your data, manipulating your Columns and saving your Views:
Specific Report Types and Customization Options
One-Sheet Event Reference: Use this for single event summaries, including booking notes, event notes, and financial summaries.
Multi-week/Monthly Event Details: Employ this for capturing event information over a specified date range with customization options like column display (e.g., team-specific data).- Line Item List (Booking) Report: Create detailed reports on specific packages by adding columns such as "Packages" and applying filters like date ranges along with exporting options.
Line Item (Events) Report: Focus on financial categories including "Food revenue," "Beverage revenue," and "Service fees" by customizing columns and filtering specific date ranges or categories.
Steps for Customizing Reports
Access the Reporting Tool within Event Temple.
Select a report type based on your needs (e.g., 'Daily Events with Details' or 'Event List Report').
Apply relevant filters like a date range or event-specific criteria.
Modify data columns or adjust customization options based on your objective.
Save your setup using the 'Save View' feature to reuse configurations.6. For package-specific reports, navigate to the Line Item List (Booking) Report, add a "Packages" column, apply filters, and export data for further manipulation.
For financial analysis, use the Line Item (Events) Report and add columns such as "Food revenue," "Beverage revenue," "Service fees," and more. Adjust filters for item categories or specific dates, and export data as needed.
Viewing & Managing Reports
Viewing & Managing Reports
Accessing Custom View
If Saving a custom View from List from the left hand side bar, it will be saved under the Views heading.
Click the Cog Icon to select whether to used modify or delete the view.
For multi-property Organizations, shared views can be Organization or Chain level. This means creating a view shared with Everyone will make it available to view by all users, across all Organizations. Chain Administrators have permission to delete any view in the system, regardless of the owner.

Accessing a Custom Report
If Saving a custom Report from the Reports header, it will be saved under Reports and grouped next to the report's name.

By Clicking on the Saved Report the list will display and it can be selected to be used, modified or deleted.

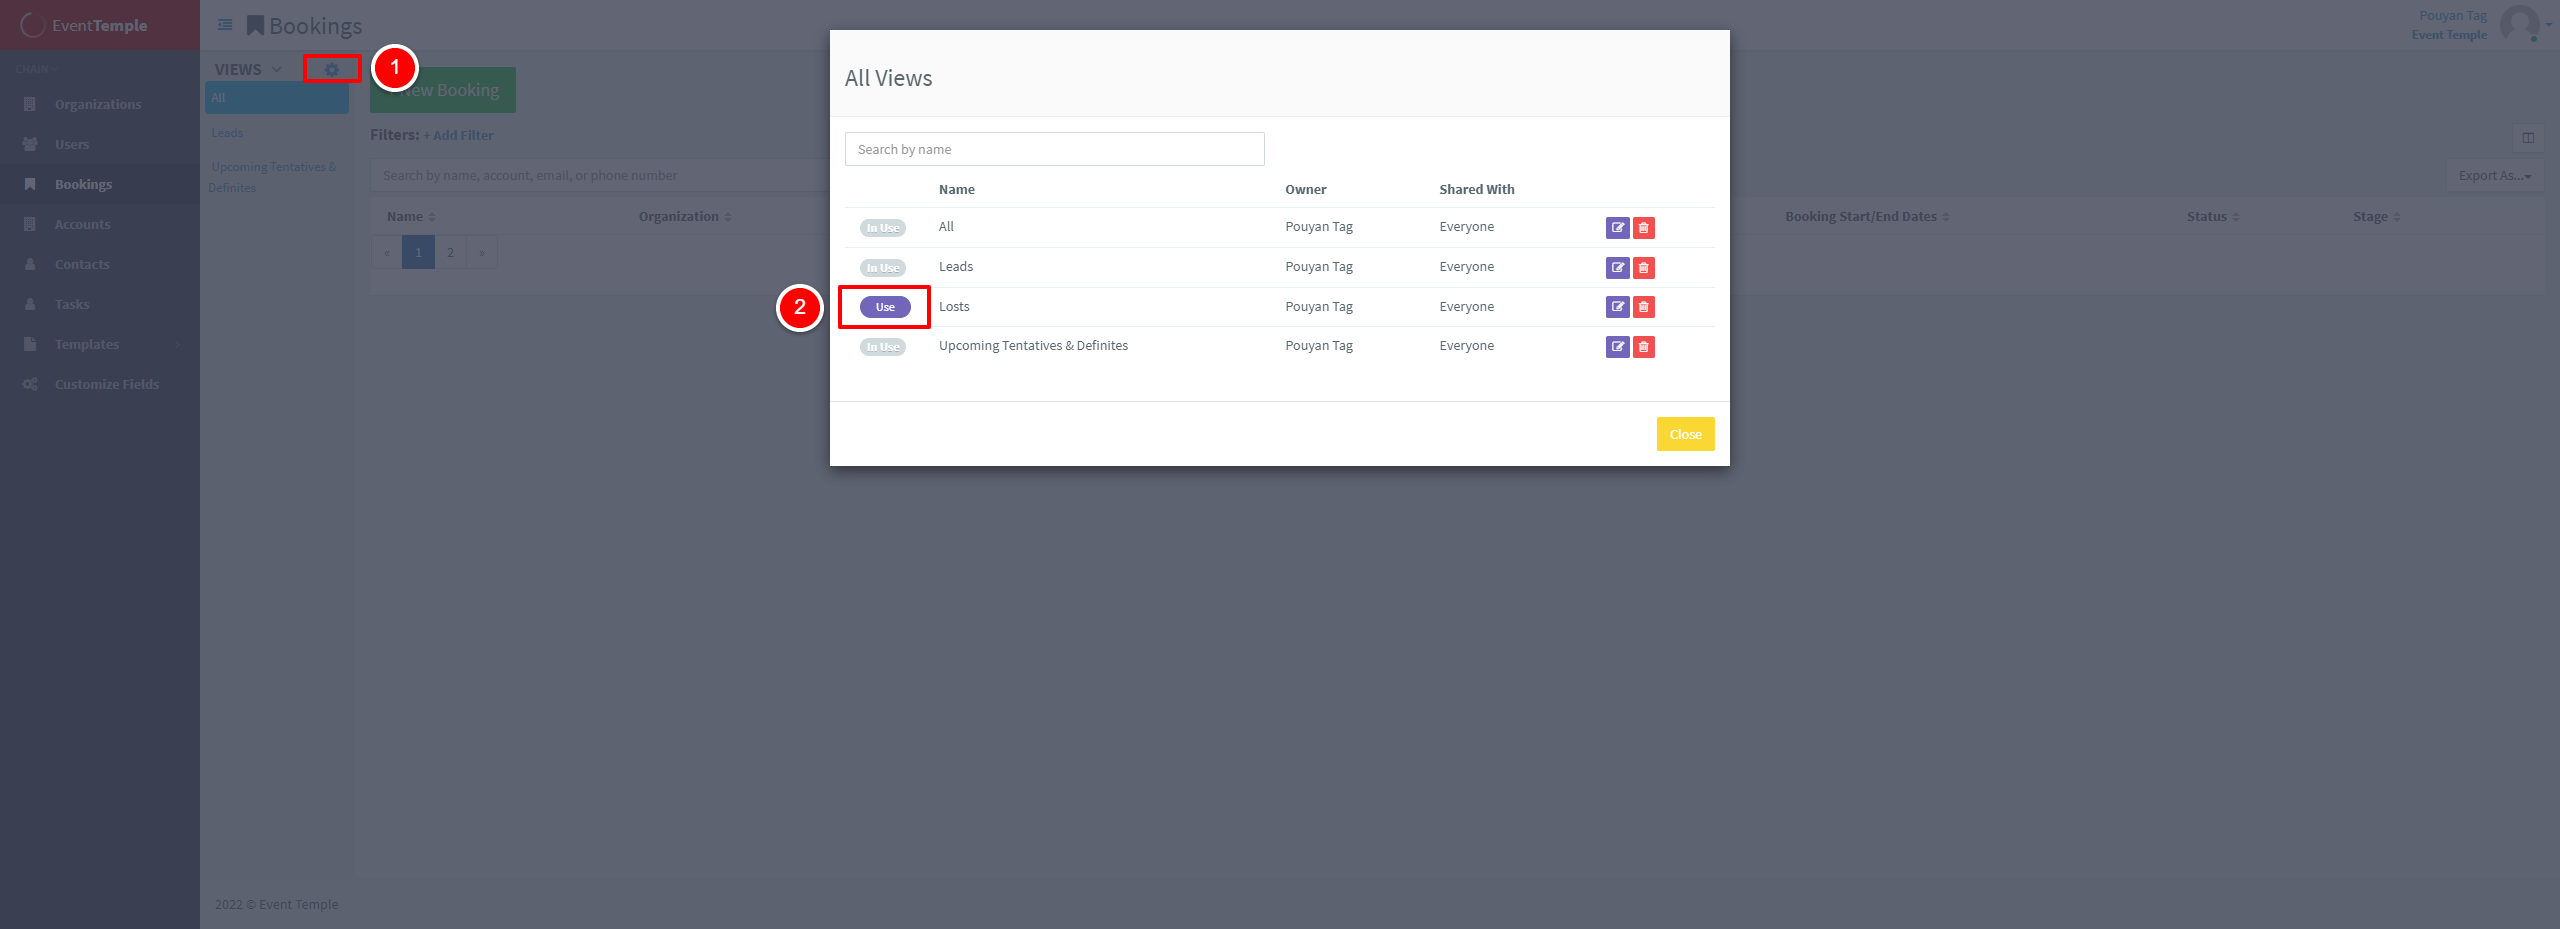
Pinned Views
By default, a new shared view will not automatically be In Use by all users. Each user can select which Views to Pin.
To Pin a View
1. Click the cog icon on the right of the views bar
2. Click Use on the relevant view
To unpin a view
Hover on that view and click unpin

Toggling the View column
Most list views (Bookings, Events, Tasks, etc.) and even reports have the ability to save the current selection of filters, columns, and sort order. When the view selector —the thin column shown below — is collapsed it will show the currently selected view.

Click it to expand and change which view you are displaying:

Exporting Reports On your chosen report:
Click Export as in the upper right-hand side
Select the Format you wish to export to
Once you choose your format, it may take a moment before the data is ready depending on how much data you're exporting
When it's complete you'll be presented with the option to download your export, at which point you will have accomplished your task! All exporting in Event Temple follows the same simple process. Most often you'll have 3 options CSV, HTML, and PDF (some reports cannot be exported as CSV due to format).Exported reports are ideal for performing calculations, aggregating totals for packages, and adapting data into charts for presentations. These options enable comprehensive audits and deeper analyses.
HTML and PDF work well for view-only options but if you wish to manipulate the data at all, CSV will allow you to view your data in a spreadsheet. This option is most common when needing to build a custom report that isn't available in Event Temple. In the example below Bookings are being exported as CSV from the Pipeline view.At this time, it is not possible to automate the exporting of your reports.
Troubleshooting Reports
Issue: Only Seeing Your Data in Reports
If reports are restricted to personal data only, follow these steps:
Check for active filters limiting data to your user.
Adjust or remove filter criteria to broaden the dataset.
Confirm with team settings to ensure permissions for accessing additional data. For One-Sheet Event Reference, export options include PDF for shareable, concise event summaries. Multi-week/Monthly Event Details can be exported as CSV for analytics or HTML/PDF for presentations.
Batch Actions
Batch Actions
When viewing various lists in Event Temple, such as the Document List or Events List, each item in the list will have a checkbox next to it. Selecting multiple options will allow you to bulk update the selected items.
Available options from the batch action dropdown will change depending on what List you are working with. In the below example, the selected Events are going to be Cloned.

Training Video
Related Resources
For further learning and support, explore: