Having an issue when printing your labels for Demo Clubs, Rentals, Club Repairs or Member/Guest Shaft Labels? In this article, we will discuss the following scenarios and their resolutions:
Improving Print Quality
Paper Size is incorrect or not available (Add a Customer Paper Size)
Misaligned Labels
Error Message "Could not find club/component for the scanned barcode" (Barcode Only)
Label not scanning with barcode scanner
Improving Print Quality
If the printed copy is a bit fuzzy or needs improvement, setting your print quality to the highest quality can sometimes enhance the overall print quality. Depending on your OS and where you are printing from (i.e., Browser or Native PDF reader (e.g., Adobe PDF)) will determine how you can set your print quality. In most cases, the print quality can be set from the "Printer Preferences."
Since there are several ways to access printer preferences, this article will focus on setting the print quality when downloading a PDF to your computer and printing from the native PDF Reader (i.e., Adobe PDF). The instructions differ slightly between Mac and PC and are outlined below.
Set Print Quality on a PC from the Native PDF Reader
Download your labels to the computer.
Open the PDF file from the native PDF Reader, not the browser.
Click "Print."
Select the appropriate printer from the drop-down and then click "Properties."
Find the option for "Print Quality" and select "Best" or "High" (whatever value denotes the best quality for your device). Note: The location varies based on the printer brand, so a more detailed description is complex.
Click "Okay".
Make other adjustments as necessary and click "Print."
Set Print Quality on a MAC from the Native PDF Reader
Download your labels to the computer.
Open the PDF file from the native PDF Reader, not the browser.
Click "Print."
Select the appropriate printer from the drop-down and then click "Printer...".
If a dialog box pops up, click "Yes."
Find the section "Media & Quality" and open it up.
Set the "Quality" option to "Best."
Click "Print."
Make other adjustments as necessary and click "Print."
Paper Size Incorrect or Not Available
The "Paper Size Incorrect" or "Paper Size Not Available" errors occur when the media (e.g., paper, envelopes, etc.) loaded in the printer tray or feeder is different from the paper selected in the print settings. This safeguard is pre-programmed into your printer to prevent ink from being wasted.
Some printers have an option that allows you to ignore the error. However, if you ignore the error, the margins on your printout might not be proportional to the edges of the paper, and the labels will not print correctly.
Because of this, when printing, we need to ensure the document's page size, the paper loaded in the printer tray, and the print settings all match. In the example below, we are printing Greenbriar 14 labels, a sheet measuring approximately 4.125" x 9.375" in size. In our print settings, we have chosen the paper size to match.
A custom paper size must be specified if no matching paper size is available. The instructions differ slightly between Mac and PC and are outlined below.
Add Custom Paper Size to a PC:
Note: The process of adding a custom paper size to a PC is dependent on your operating system and printer. If the directions below do not work for you, search the web for directions on adding a paper size to your operating system. Additionally, you can visit your operating system or printer help center to find directions as well.
To define a new page size on a PC, follow these steps:
Click the "Start" button.
Search and open the Control Panel.
Select the option to view devices and printers. Note: This is dependent on your OS.
This step depends on your operating system:
Windows 10: Click your printer in the list, then click the "Print Server properties " menu option.
Windows 11: Click "Printers & Scanners. Scroll down to "Related settings," and click the "Print Server Properties" option.
Select the "Create a new form" option in the dialog box that appears.
Give the new page size a unique and descriptive Form name, such as' Greenbriar 10 or 14′ or 'Avery 5160'.
Select Metric or English units as required.
Define the page size.
Click "Save Form" and then click "OK."
The new sizes should now appear in the page size selector in the Printing Preferences. You may need to close the program and re-open it if it does not appear. For a short video on how to do this, Click Here.
Add Custom Paper Size to a Mac:
To define a new page size on a Mac, you must be in a program that allows you to define a page size (e.g., Office, Pages, Safari, etc.). Once in a program, follow these instructions:
Choose File > Page Setup (from the File menu at the top of the screen).
Click the Paper Size pop-up menu, then choose Manage Custom Sizes.
Click
 to add your custom size.
Click Untitled in the list above (it's added when you click
 ), then type a name for your custom size.
Type the width and height of the paper in the Width and Height fields.
Make print margin settings, then click OK.
Click OK to close the Page Setup window.
The new sizes should now appear in the page size selector in the Printing Preferences. You may need to close the program and re-open it if it does not appear. For a short video on how to do this, Click Here.
Misaligned Labels
If you are printing labels and they are printing across the label lines, you may be printing at the wrong scale. Typically, if the report prints at the wrong scale, the page size is set to something other than the default or actual, such as "print to fit," "shrink," or even a custom size.
When printing labels, you can either print from your browser or download it and print from the native PDF Reader. Both options will be discussed below.
Printing from Browser:
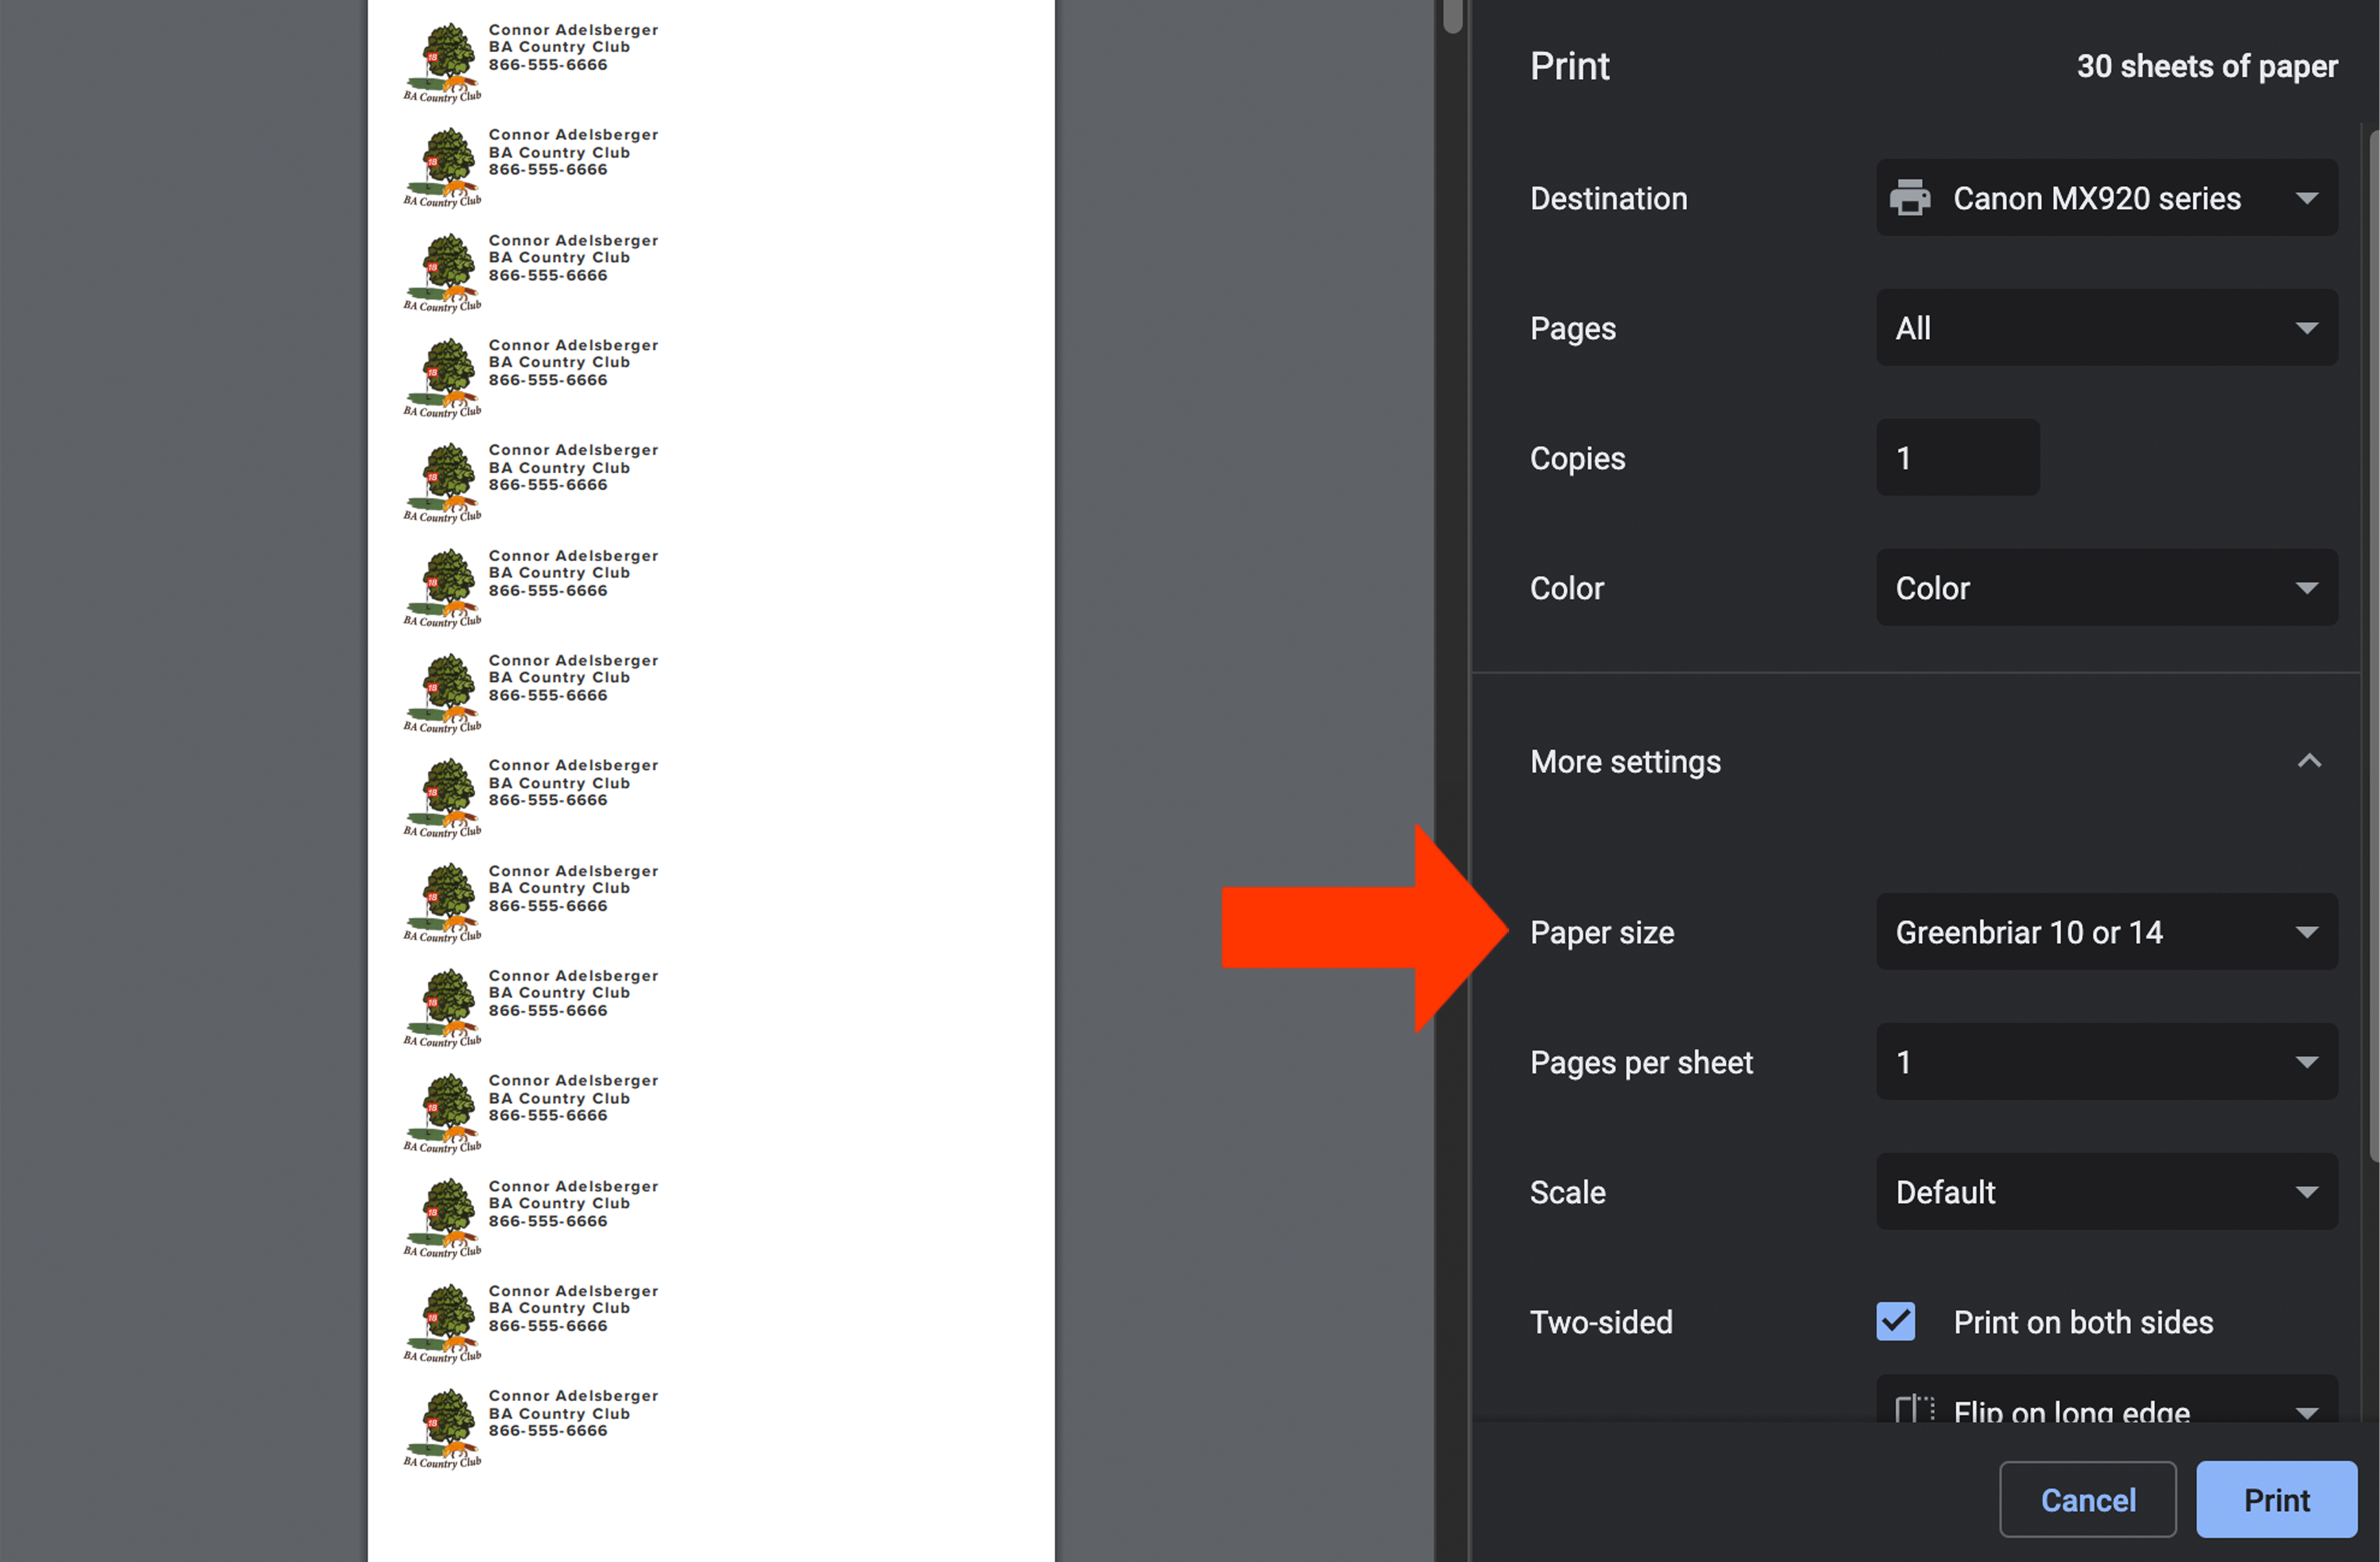
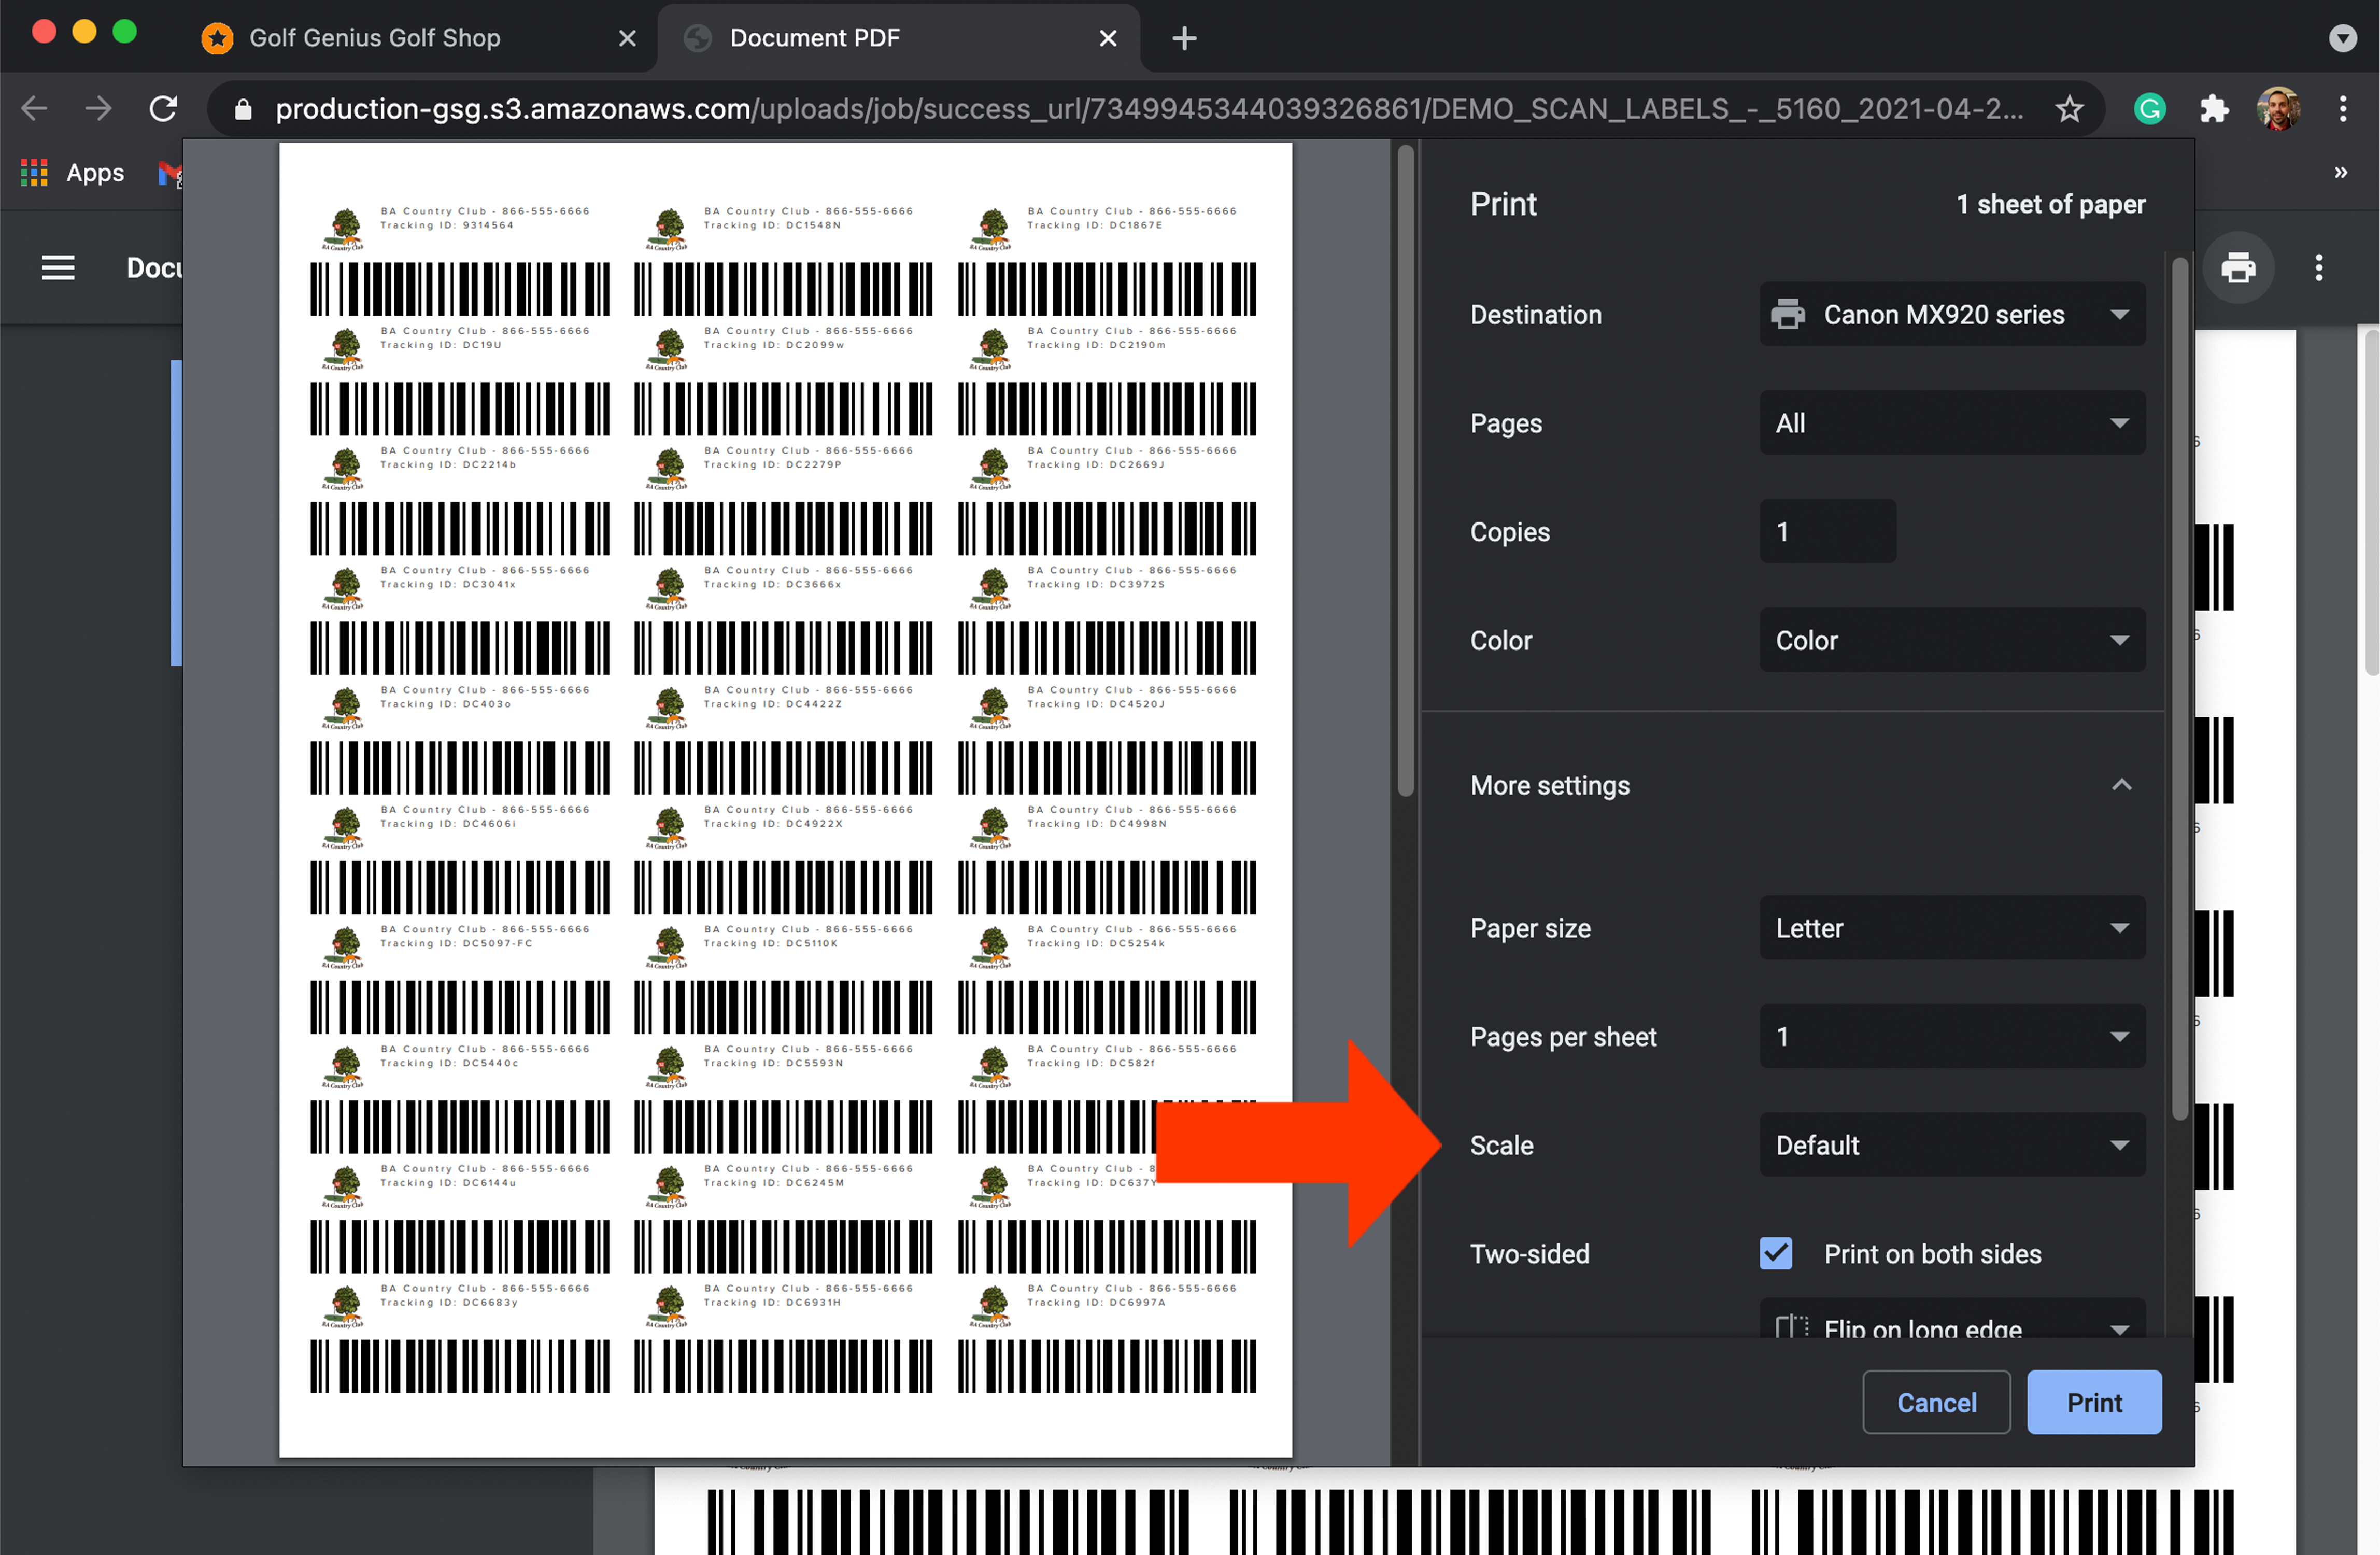
If you are printing the PDF from a browser page, click the print button, and set the scale to "Default" (as shown below).
Printing from Native PDF Reader
If you have downloaded the file to your computer and are printing the labels from your native PDF Reader, click the print button, and set the Page Size/Handing to "Actual Size" or default size (as shown below).
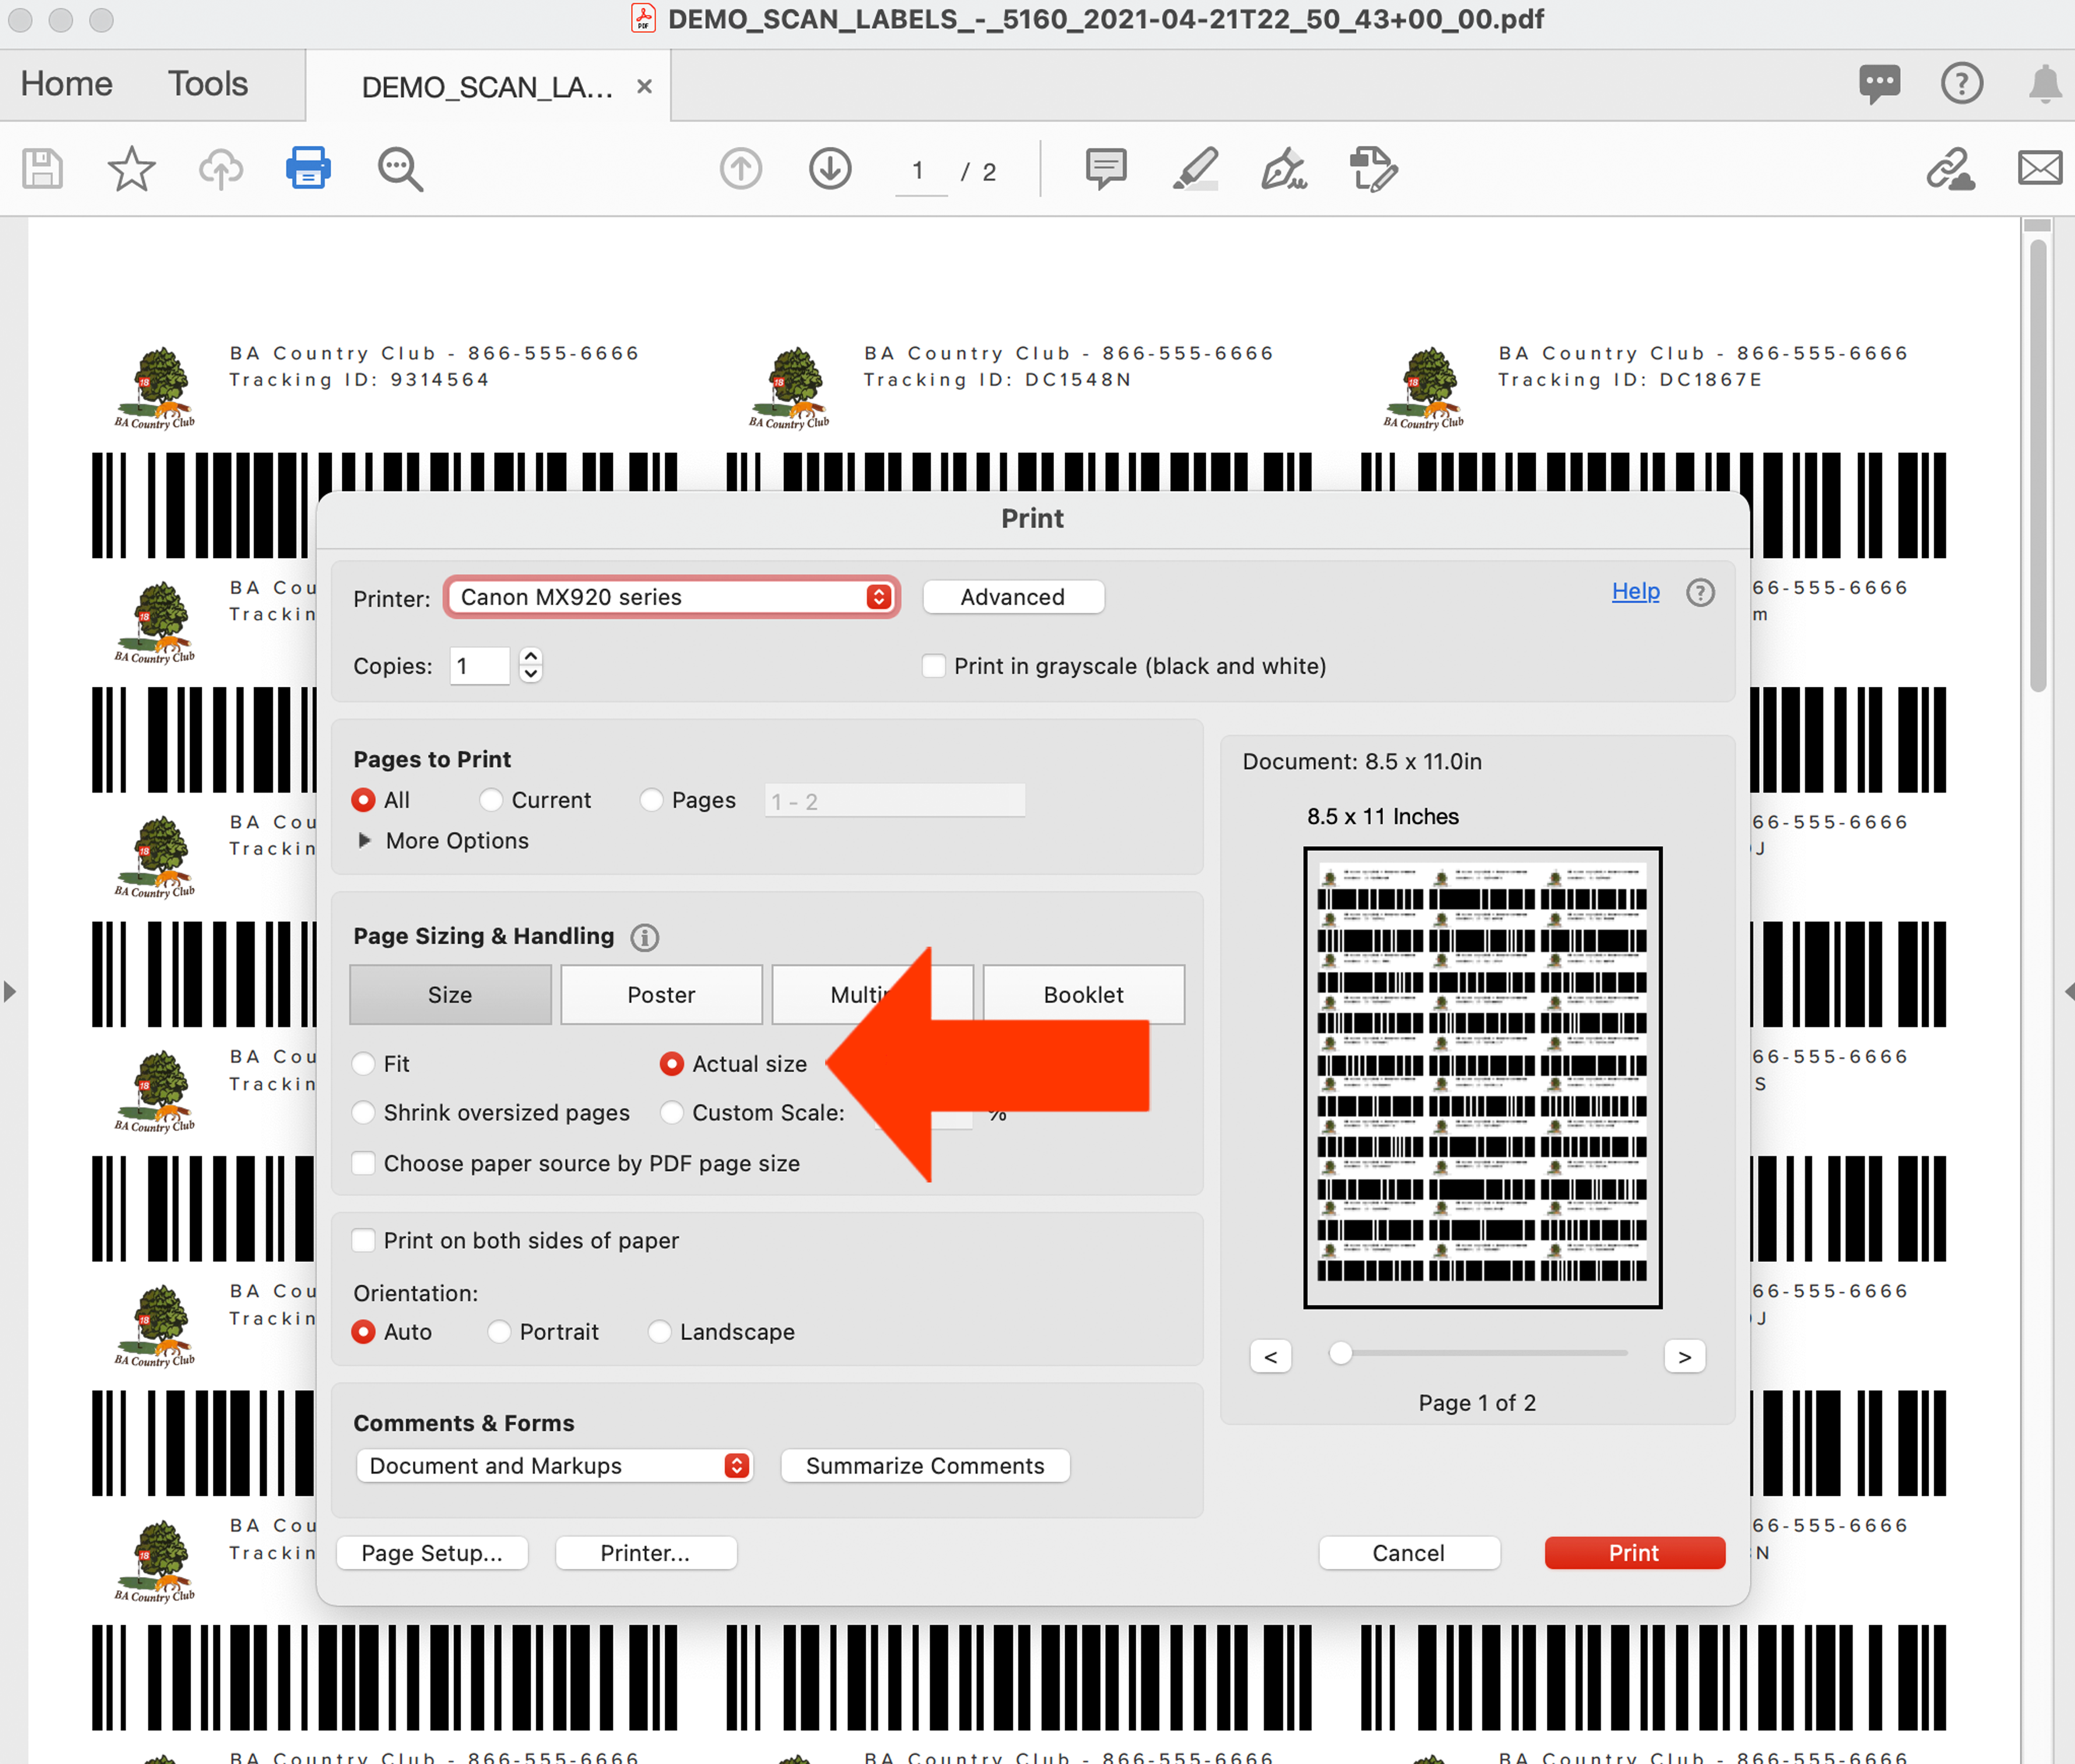
Ensuring you use the original document scale and not shrinking to the printable area or using a custom size are the keys to ensuring the report is printed to the original size.
Error Message: "Could not find club/component for the scanned barcode"
When scanning a printed barcode and you receive a message "Could not find club/component for the scanned barcode," your barcode may be too small or distorted. In this case, you may need to increase the size of the barcode on the report to ensure that the lines and spaces of the barcode are printed correctly. To increase the size of your barcode, follow these directions:
Go to Report Center > Page Composer.
Find the document you are trying to print and click "Edit."
Click "Design."
Increase the size of the barcode placeholder by dragging one of its edges wider.
Press "Apply."
Click "Save and Print" to test the barcode again.
When creating a label with a barcode, use as much area as possible to ensure the barcode is as wide as possible for optimal results. In the graphic below, we are increasing the area of the barcode placeholder.

Label not scanning with barcode scanner:
Suppose you have attached the barcode label to a club shaft and are having issues when scanning a barcode. In that case, consider the label's orientation and verify that nothing is covering a portion of it.
When applying the barcode label, ensure it is adhered so that the barcode is parallel to the shaft (as shown below). This will ensure your barcode scanner sees the entire barcode.
Secondly, ensure that no stickers cover the barcode or there is no damage to the barcode, so that the barcode scanner can read the entire barcode.