
This feature is available for the following products:

(Note: If you are a Golf Genius TM Club Premium or TM Club Association user and want to use Premium registration with your Golf Hub Page, Click Here for details.)
It is not uncommon for a manager to take registration in another program and then manually upload a roster via spreadsheet. However, there may be cases where you want to allow players to sign up themselves by simply clicking a registration link on the Golf Hub Page. With Golf Hub registration, players will sign up and add themselves to the roster automatically.
If you would like to collect payments (fee) from players onsite (offline) or online during registration, please read this article thoroughly on setting up registration. If you plan on collecting payment during registration, Click Here to read the article about setting up the payment system.
In this article, we will discuss:
Registration setup
Enable Entry Free (i.e., online or offline)
Disabling registration
Editing registration
Registration reports
Registration Setup:
Before setting up your registration form, you must first create your Golf Hub Page. For details on building your Golf Hub Page, Click Here.
Once you have created your Golf Hub Page, you can start setting up your Golf Hub registration. To do this, follow these instructions:
Go to App > Add Registration (as shown below).

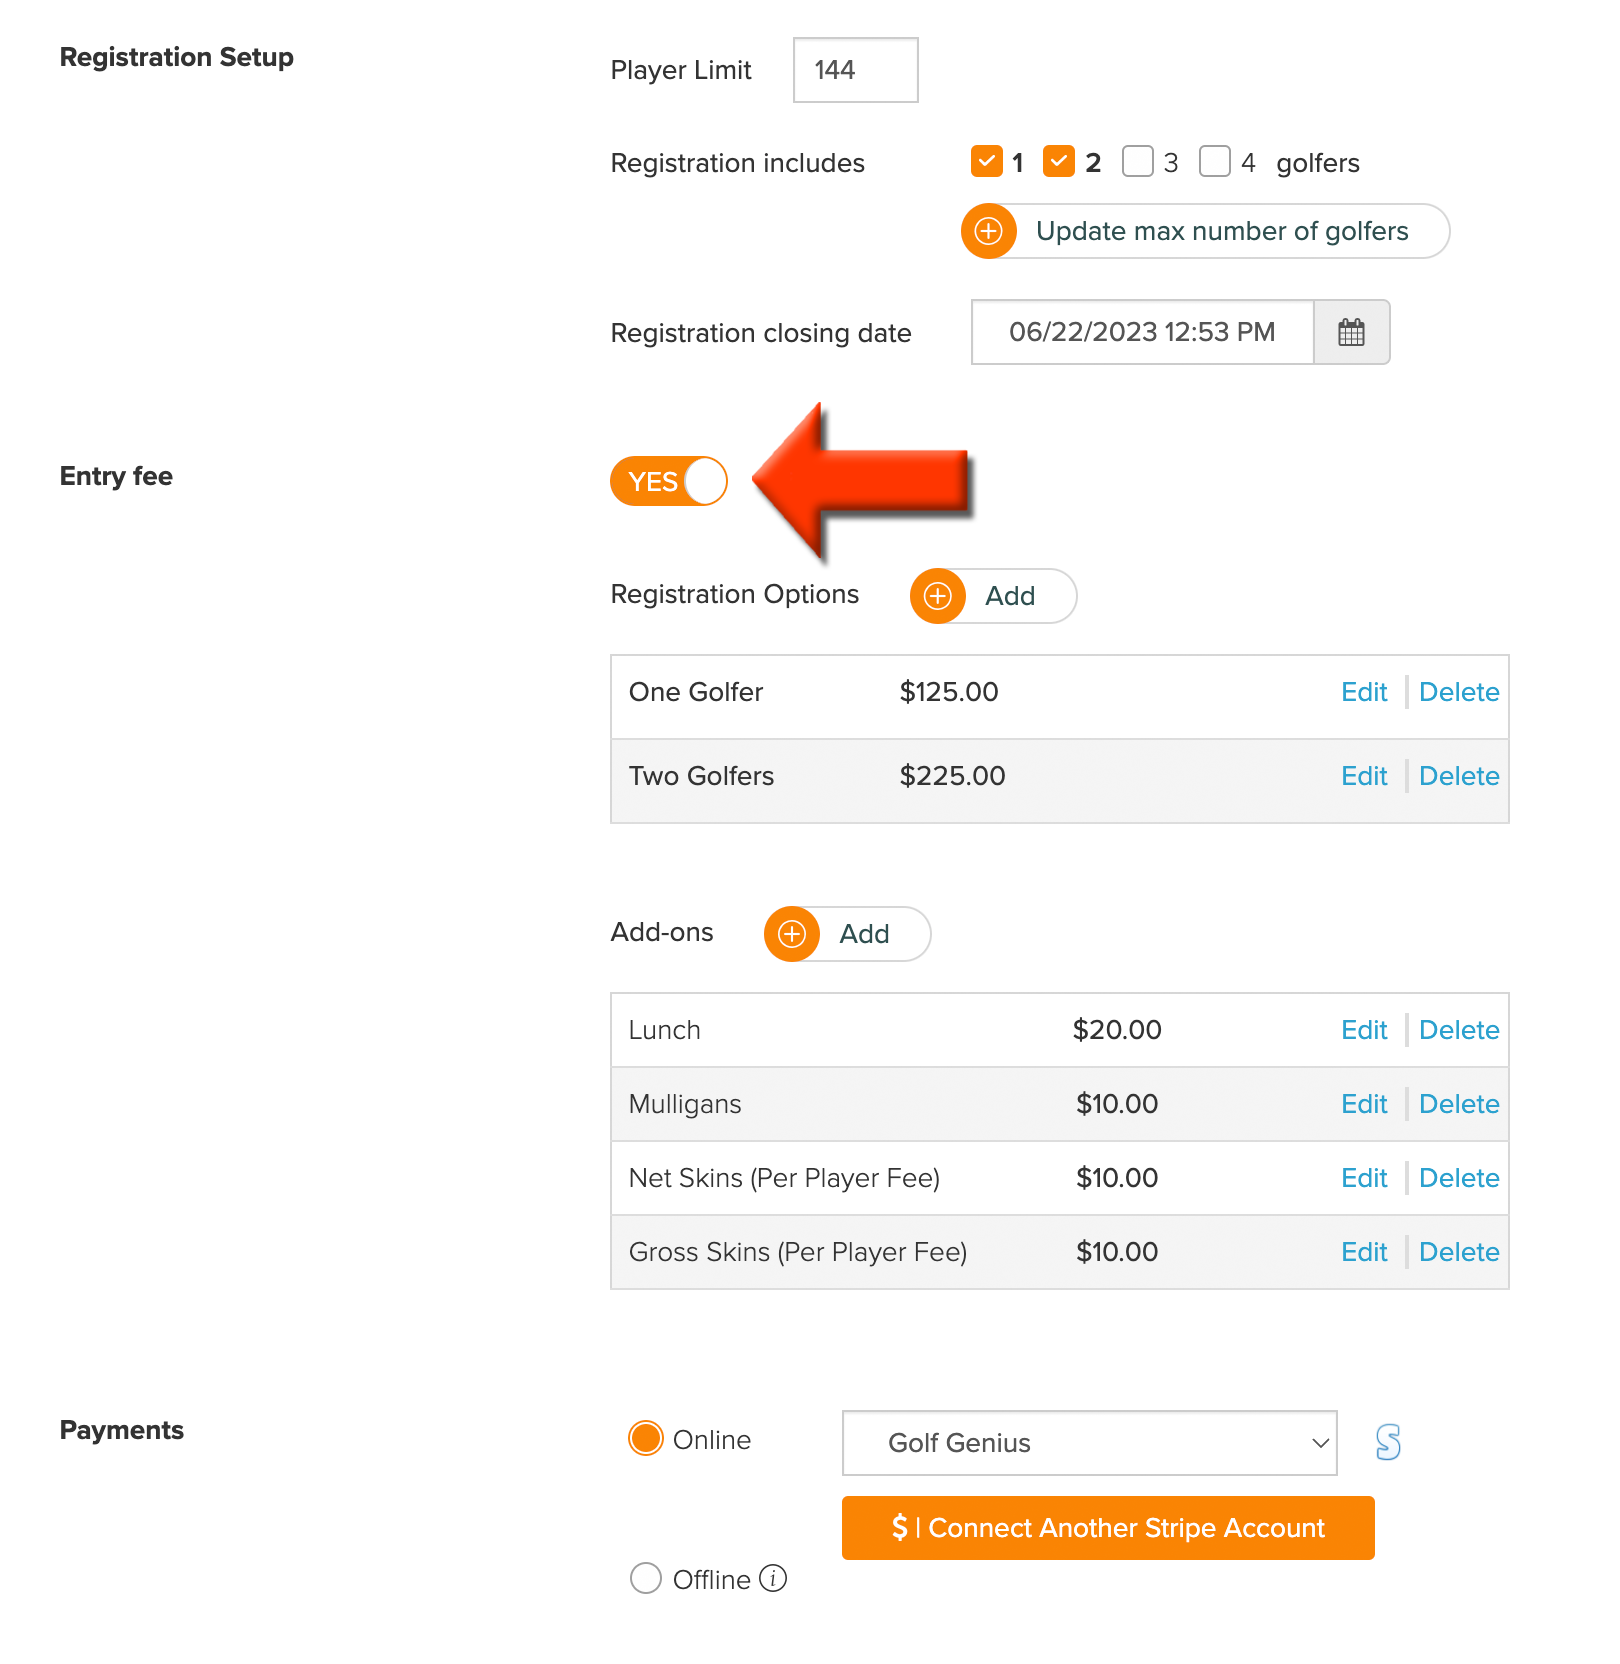
Fill in the following:
Player Limit: Set a maximum number of players that can register.
Registration Includes: Select the number of possible registrants per registration. For example, for a two-person team event requiring both players to register simultaneously, only check the two.
Registration Closing Date: Select the date and time when registration will close.
Click "Save."

If you are taking registration with payment, follow the additional details below.
Enable Entry Fee:
If you are collecting a fee for the event with registration online or onsite (i.e., offline), follow these directions:
Complete steps 1& 2 as outlined in the previous section.
Enable entry free by setting the toggle to "Yes" for "Entry fee" (as shown below).

Next to Registration Options, click "Add." In the pop-up, set the following:
Name: Name of the Registration Option.
Registrations: Set the permissible number of golfers per the registration option. Note: If you allow multiple golfers per registration, you must set a registration payment option for each "Registration Includes" option. For example, if you allow registration in teams of two and four, you will need two registration options.
Pricing: Set the Registration amount for the team size of the registration option.
Description (Optional): Display a short description of the registration option in Golf Hub.
Click "Save." If you need additional registration options, repeat the previous step. Note: If you are allowing golfers to register in multiple team sizes (e.g., 1 Player, 2 Players, etc.), you need to create a registration option for each team size.
Add optional add-ons (e.g., skins, mulligans, lunch, etc.). Next to Add-ons, click "Add." In the pop-up, set the following:
Name: Name of the Add-on option.
Price: Price of the Add-on option.
Description (Optional): Display a short description of the Add-on option.
Click "Save." If you need additional Add-on options, repeat the previous step.
Select how you will collect the registration fee:
Online: Select an existing Stripe account or connect a new Stripe Account. For more details about setting up a Stripe account, Click Here.
Offline: When selecting "Offline," registrants will not be required to pay online during the registration process. You can use the text box provided to display a message about the intended payment method. This message will be shown during the registration process.
Review the registration setup and click "Save" once completed.
To view your registration report, go to Apps > Registration Report. For complete details of the registration report, Click Here.
Enable Registration:
Registration can be enabled at any time for the event/league, regardless of the published status of the Golf Hub Page. To enable registration, go to Apps > Registration and click the toggle to show "Open" (as shown below).
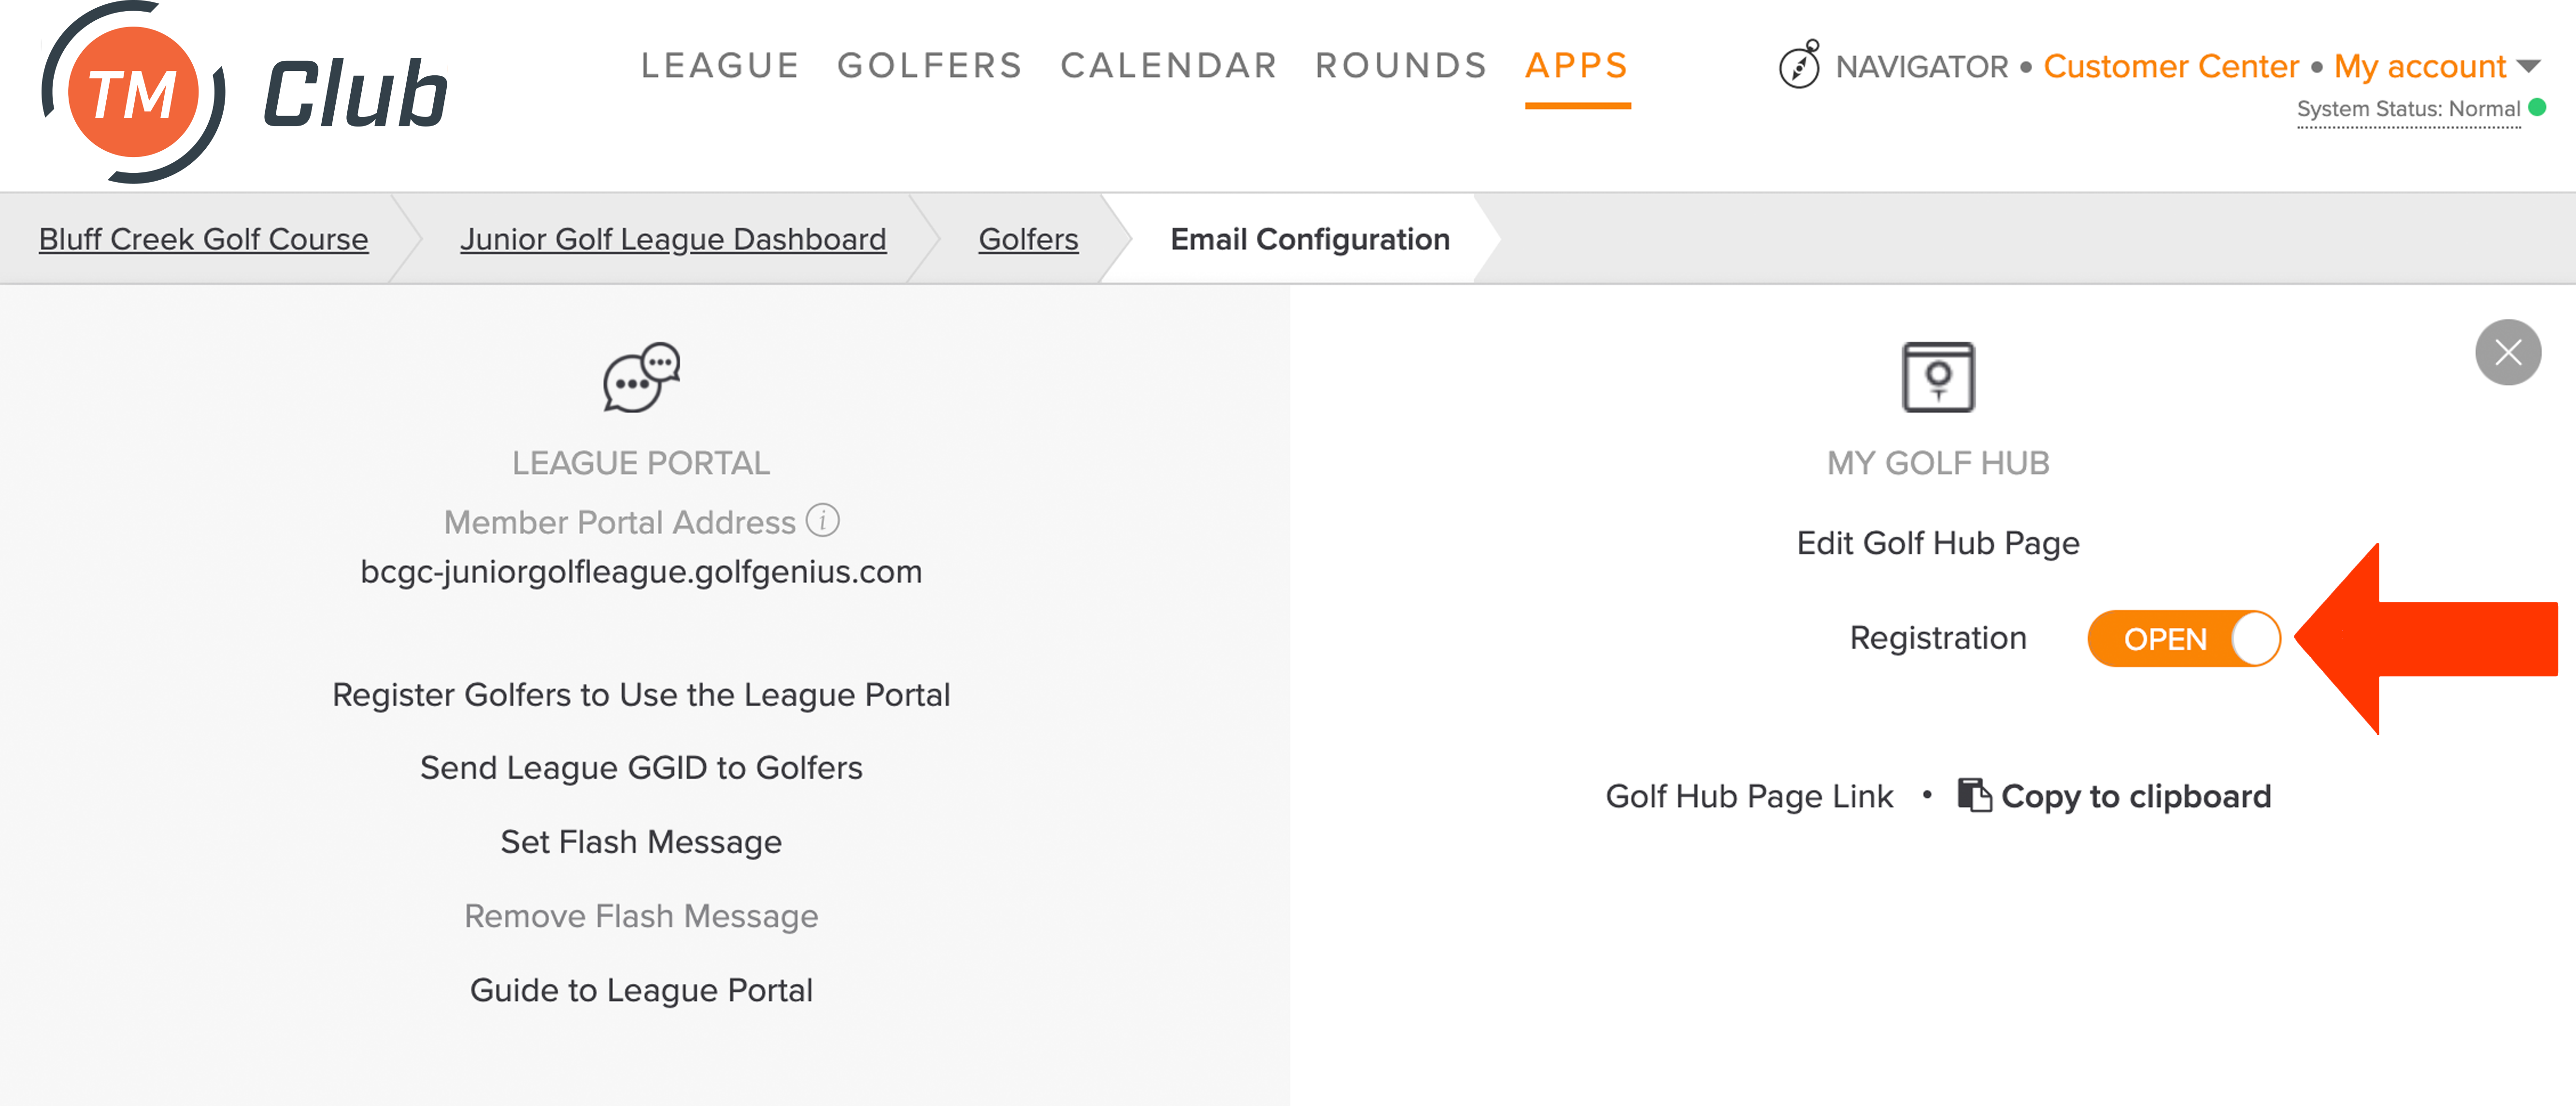
Disabling Registration:
When setting up registration and using a registration close date, registration will automatically be disabled on that day and time. If you need to disable registration manually for any reason, go to Apps > Registration and click the toggle so it shows "Closed" (as shown below).

Editing Registration:
If you need to edit your registration for any reason, you can do so at any time by going to Apps > Registration. Make the edits and click "Save."
Registration Reports:
If you are collecting a fee with your Golf Hub registration, you can view a registration report that includes who has registered, add-ons, additional players (multi-player registration), and more. To view the registration report, go to Apps > Registration Report. For completed details about registration reports, Click Here.