
This feature is available for the following products:

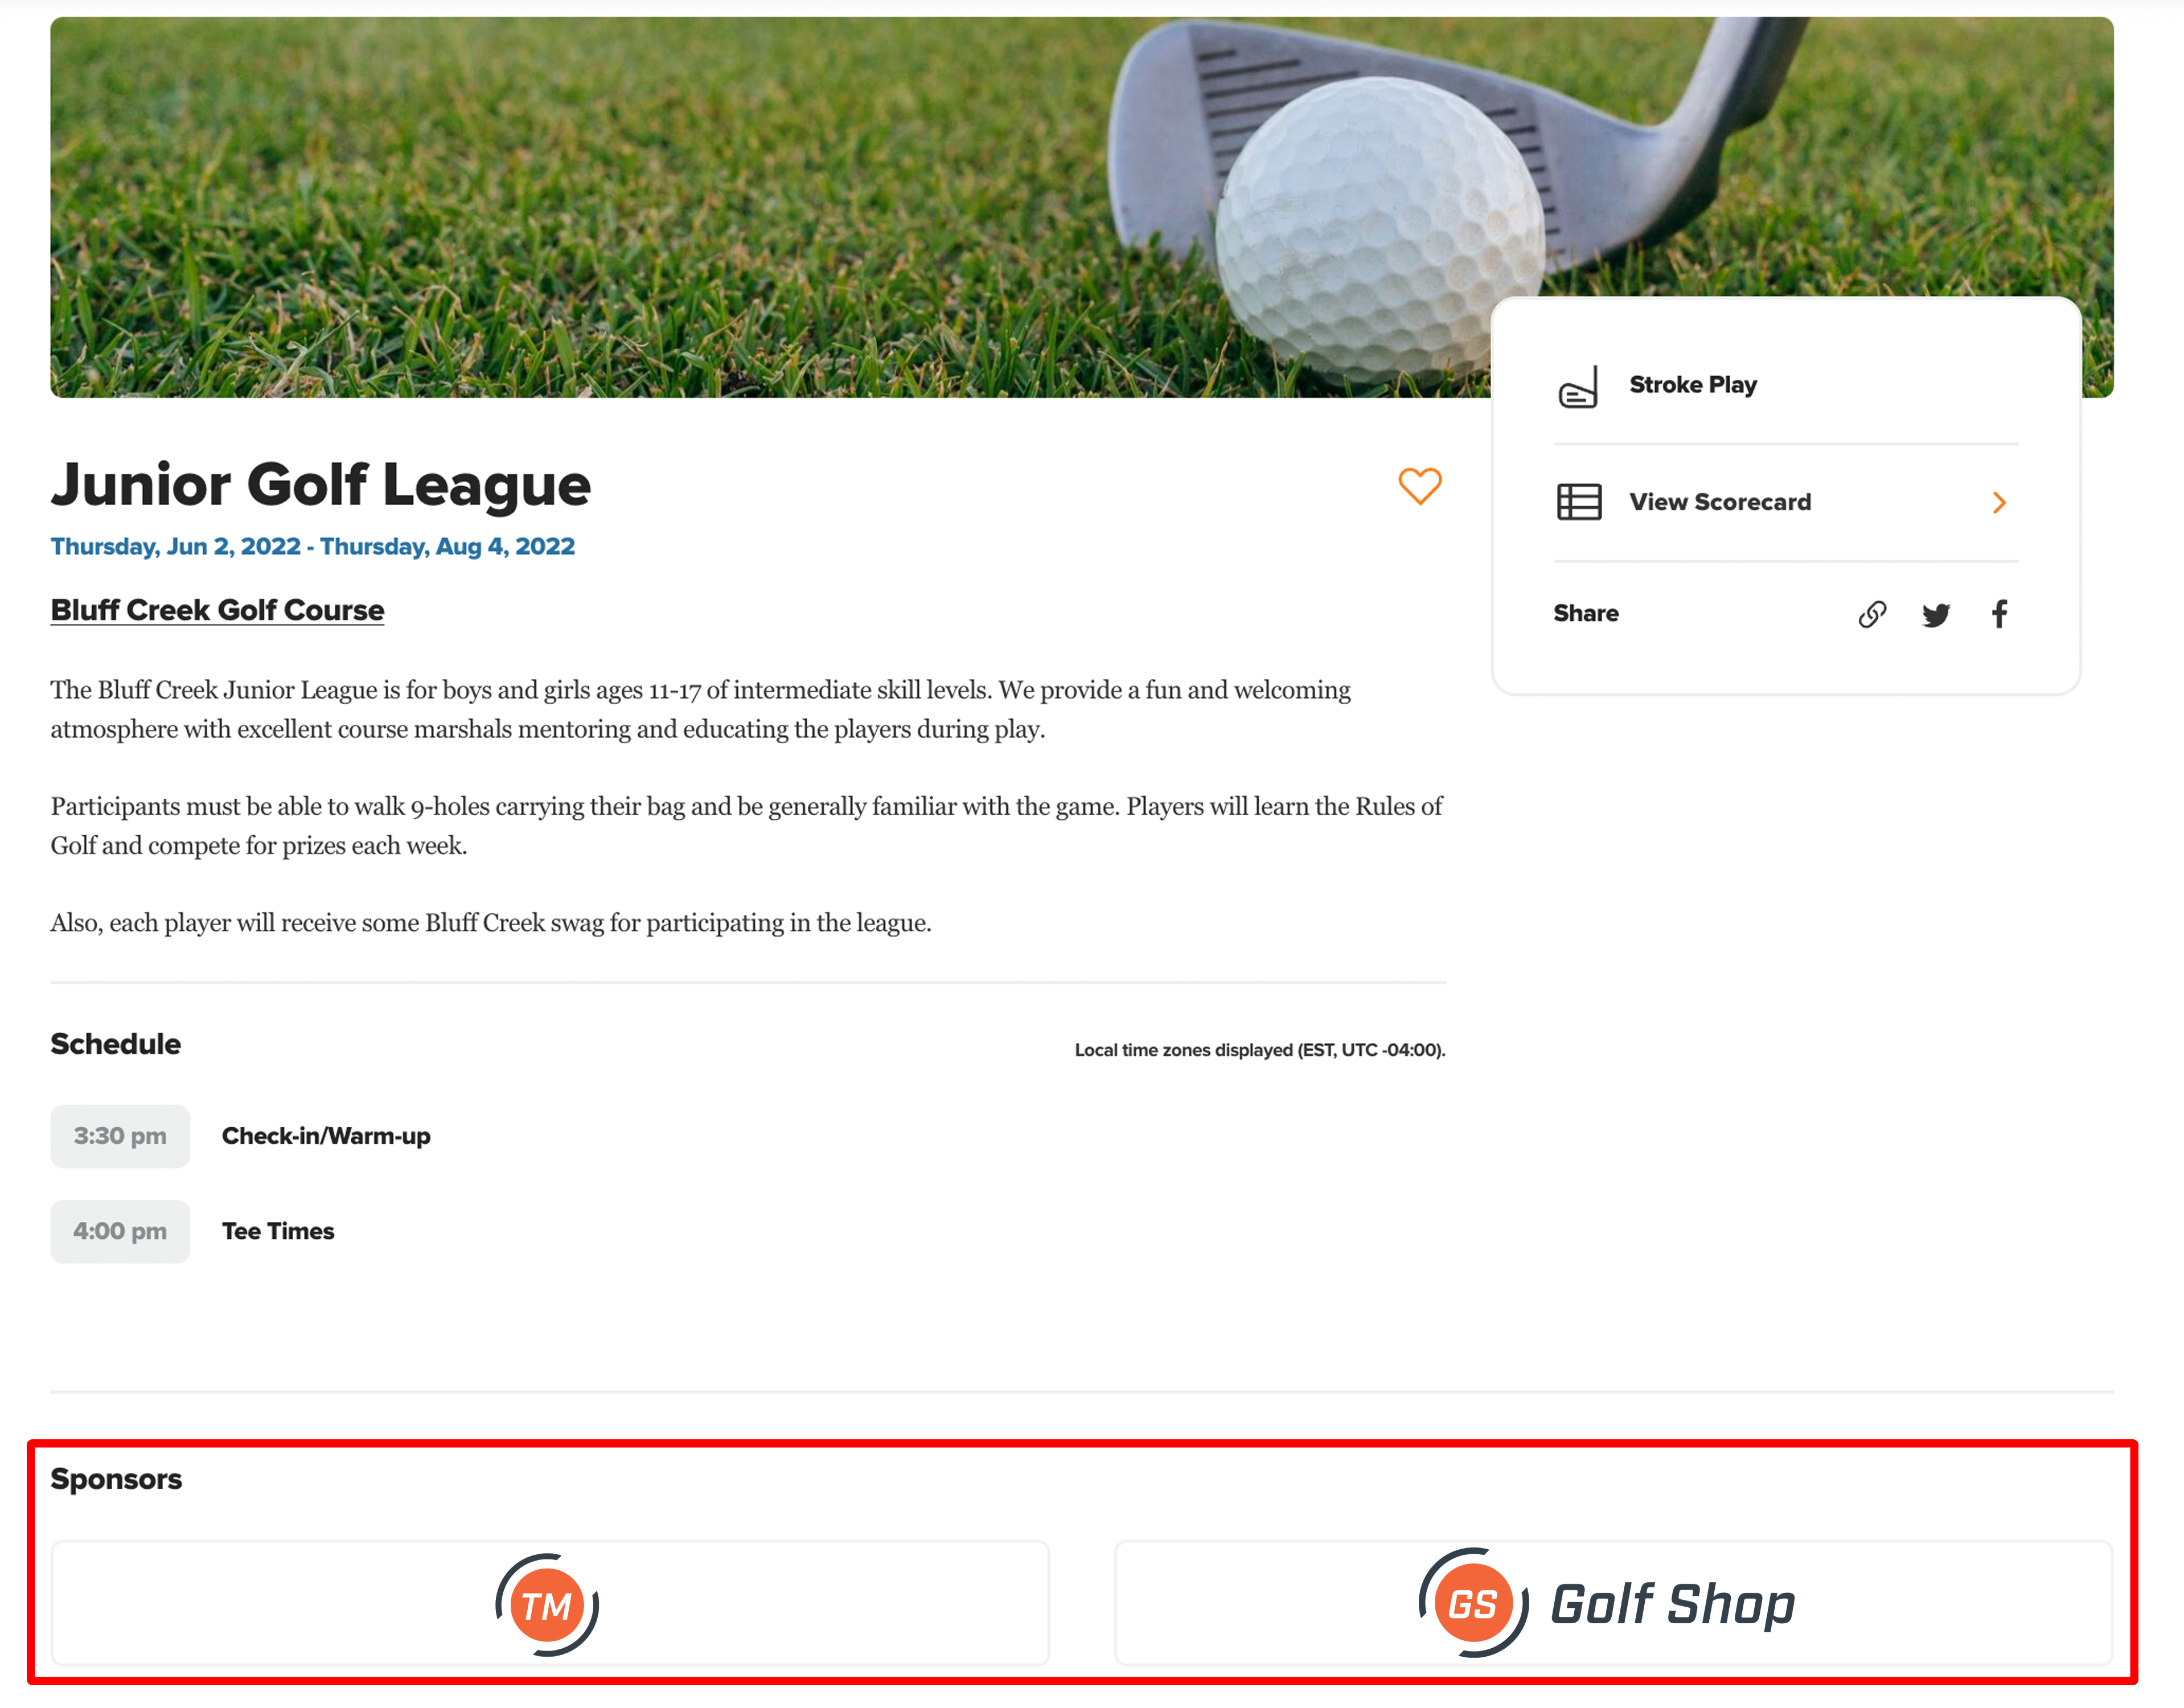
Your Golf Hub Pages setup within an event/eague populate your Golf Hubs. These Golf Hub Pages act as digital flyers, summarizing the event/league and allowing players to share the page with others, register for the event, and submit payments (as shown below).

Use Golf Hub Flyers to display your Golf Hub Pages on bulletin boards, in printed ads, or anywhere else with this robust design editor. For complete details on Golf Hub Flyers, Click Here.
In this article, we will discuss how to set up and maintain your Golf Hub Pages. To get assistance setting up a Golf Hub Page from an event coordinator, allowing them to upload an event description and images (e.g., banners, logos, sponsors), Click Here.
Creating Golf Hub Pages:
To set up your Golf Hub page, create a new event/league or edit an existing event/league as you normally would. Once you have created your event/league or within an existing event/league, you can create a Golf Hub Page (as shown below).
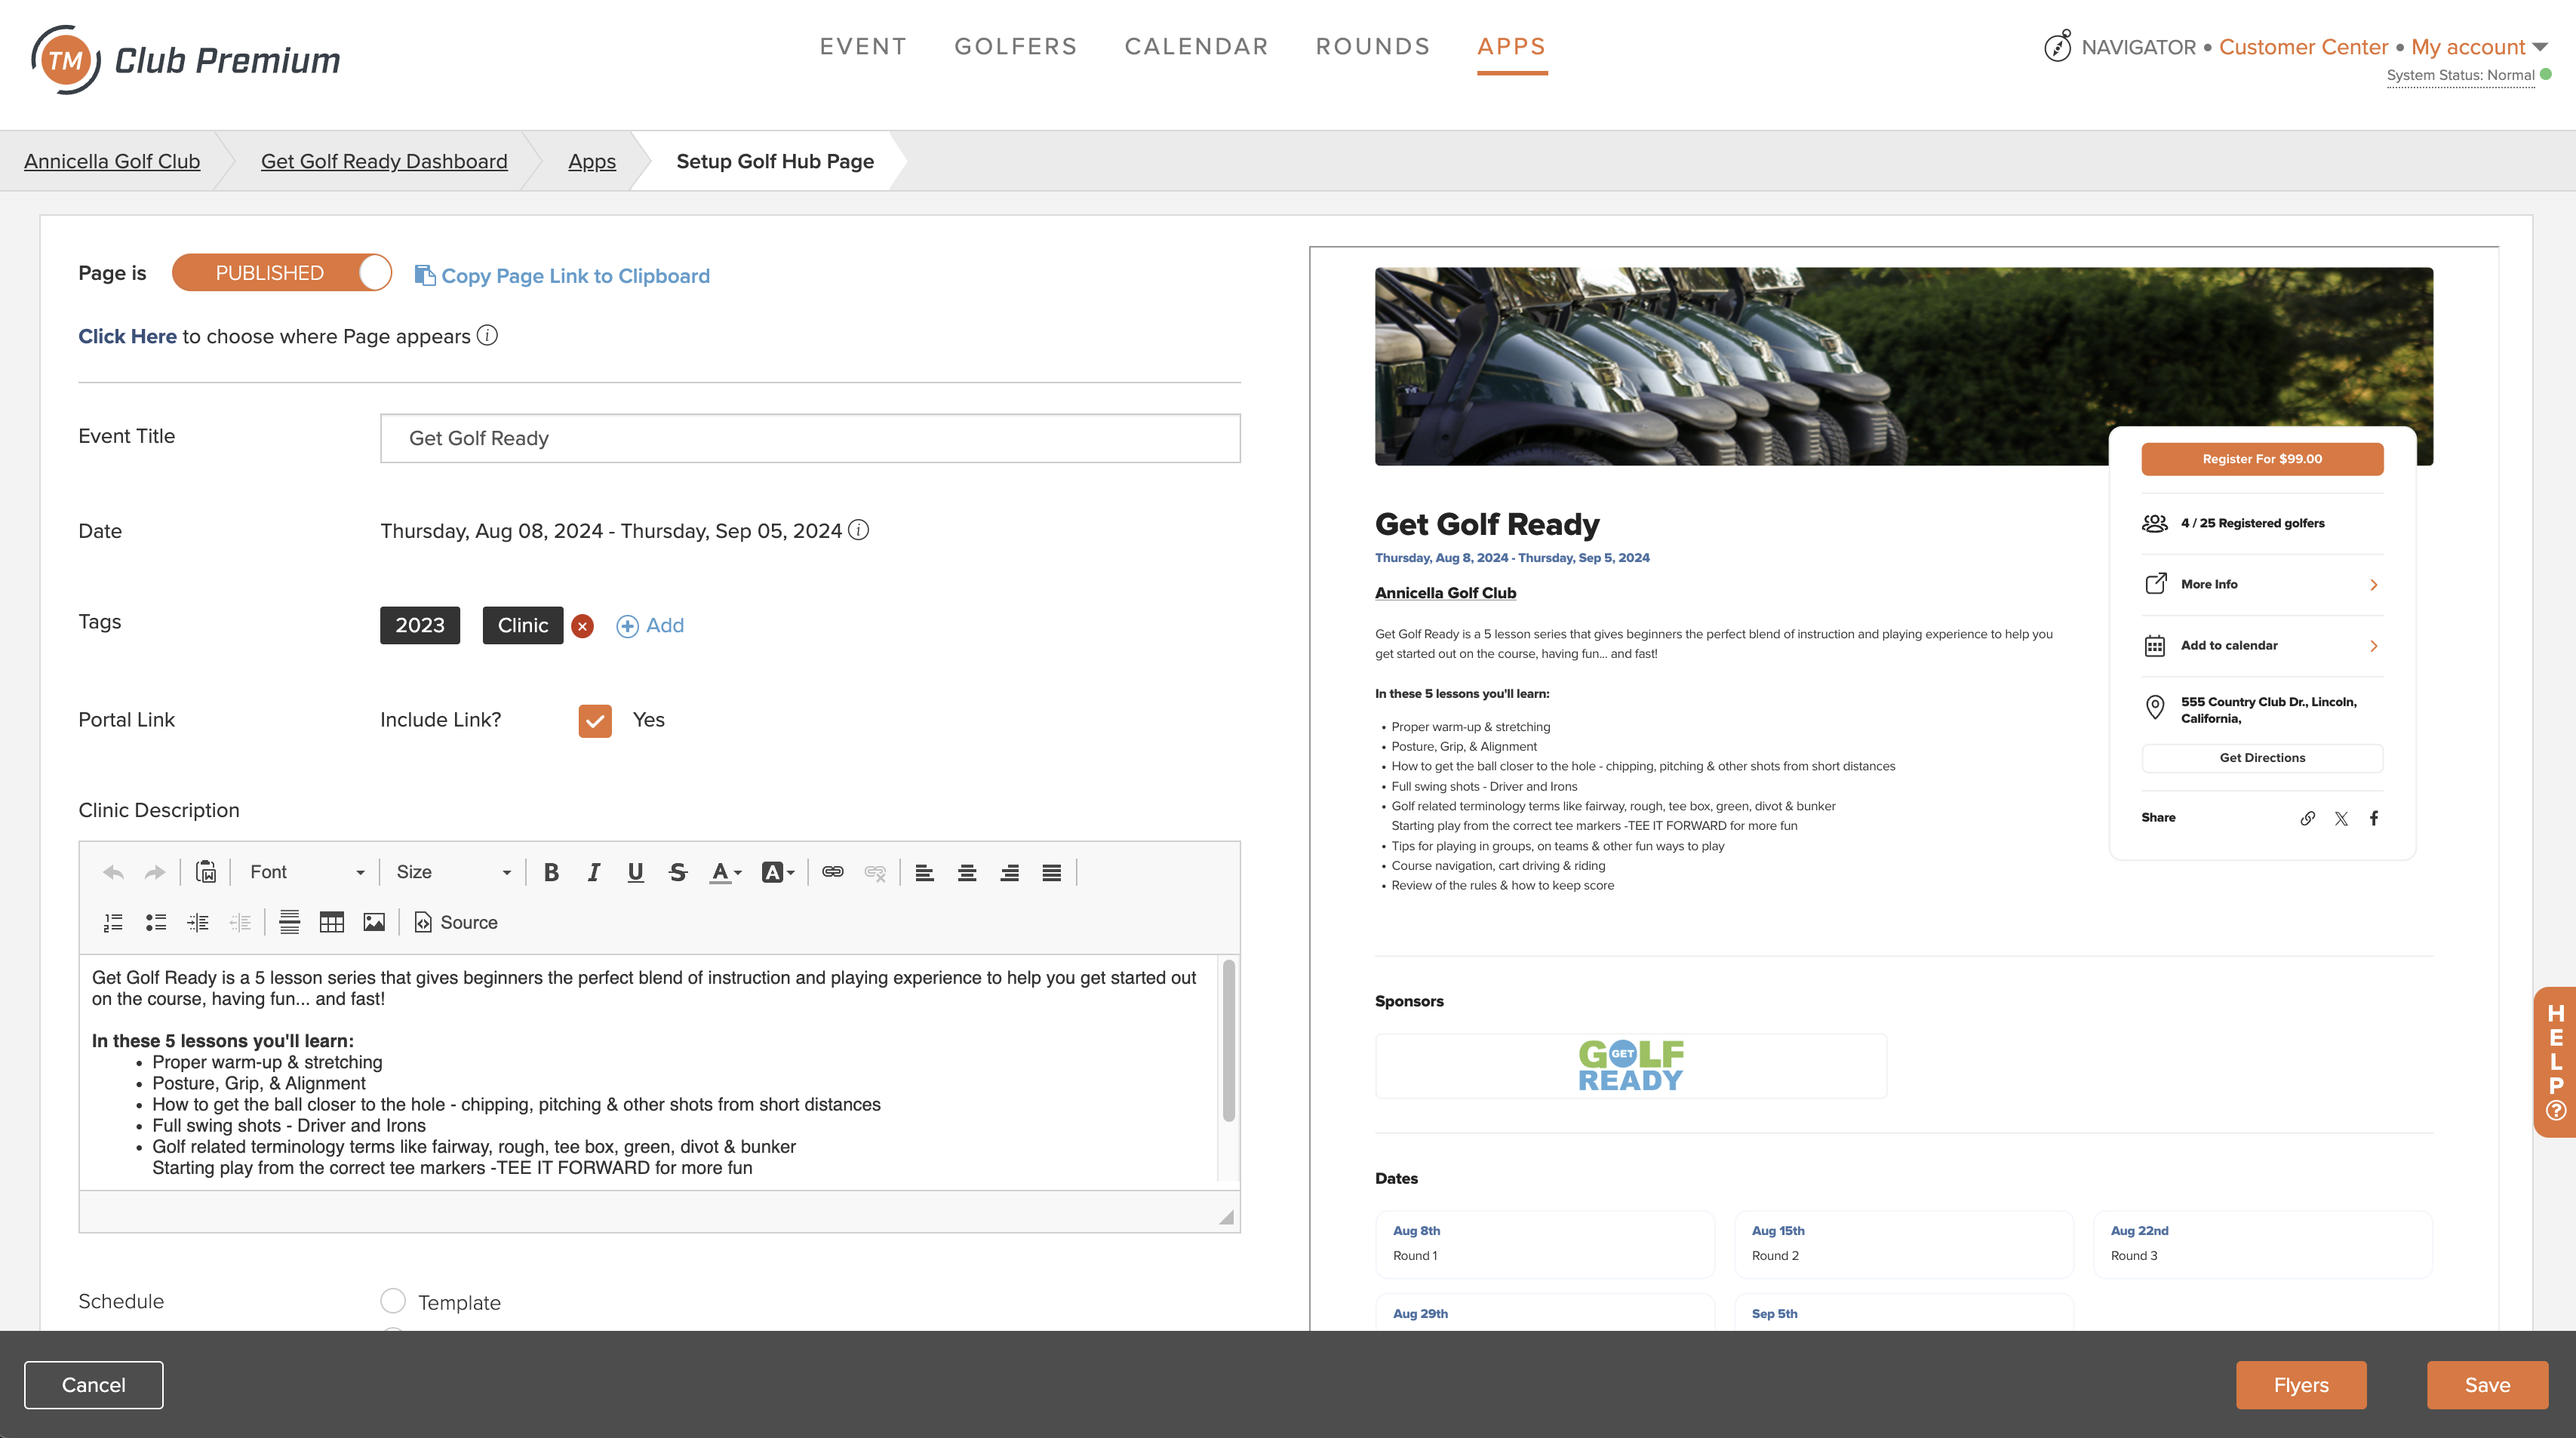
For more details about each item on a Golf Hub Page, please refer to the section later in this article.
Note: As you set up your Golf Hub Pages, make sure you click "Save" to ensure all changes have been saved to the page.
Event/League Title
Provide the name that you would like displayed in Golf Hub. Note: This may be the same as the name you gave to the event/league when creating it.
Date
This represents the range of the event/league dates and is automatically pulled in from the defined rounds. If there are no defined rounds, an option to "Add Rounds" will take you to the calendar view page. For more details about adding rounds, Click Here.
Tags
Tags can be configured when a Golf Hub Page is created and are primarily used to offer the ability to filter events by tags when creating custom Golf Hubs. Custom Golf Hubs can be created to show Golf Hub pages with a specific tag or a collection of specifically tagged Golf Hub Pages. To apply a tag, click "Add," select a category and choose one of the available options. The following are the available tag categories with their options:
Season: Automatically applied based on the season selected for the event/league. For more details about organizing your event/leagues into seasons, Click Here.
Customer Center Category: Automatically applied based on the Customer Center Category the event/league is assigned to. For more details about organizing your events/leagues into Customer Center Categories, Click Here.
Gender:
Male
Female
Mixed
Age:
Senior
Adult
Junior
Event Type: Is this event/league a clinic, competitive, social, charity, simulator, etc.? If so, including an Event Type will enable you to create Golf Hubs that are collections of each Event Type. Furthermore, this will enable golfers to filter by the available event types on your Golf Hubs to view events that match a specific type. The available event types include:
Clinic (Events Only)
Competitive
Championship
Social
Charity
Outing
Adaptive
Doubles Golf
Simulator
Note: Tags are not eligibility criteria settings.
As you create and publish your Golf Hub Pages, they will automatically populate into the proper Golf Hub based on if you set it us as an event, event assigned as a clinic, or league. The Pages will also futher get filtered into Custom Golf Hubs based on the available tags (i.e., season, category, gender, age, type) (as shown below).
For example, a published League Golf Hub Page will populate the primary Club Hub and League Hub and could potentially populate custom hubs based on a tag.

Portal Link
If you have customized or included additional details on your Portal, include a link by checking the box here. This will also allow your golfers easy access to the portal to see pairing, tournament results, and more. For more details about portals, Click Here.
Tournament Name (Event/League Only) (Optional)
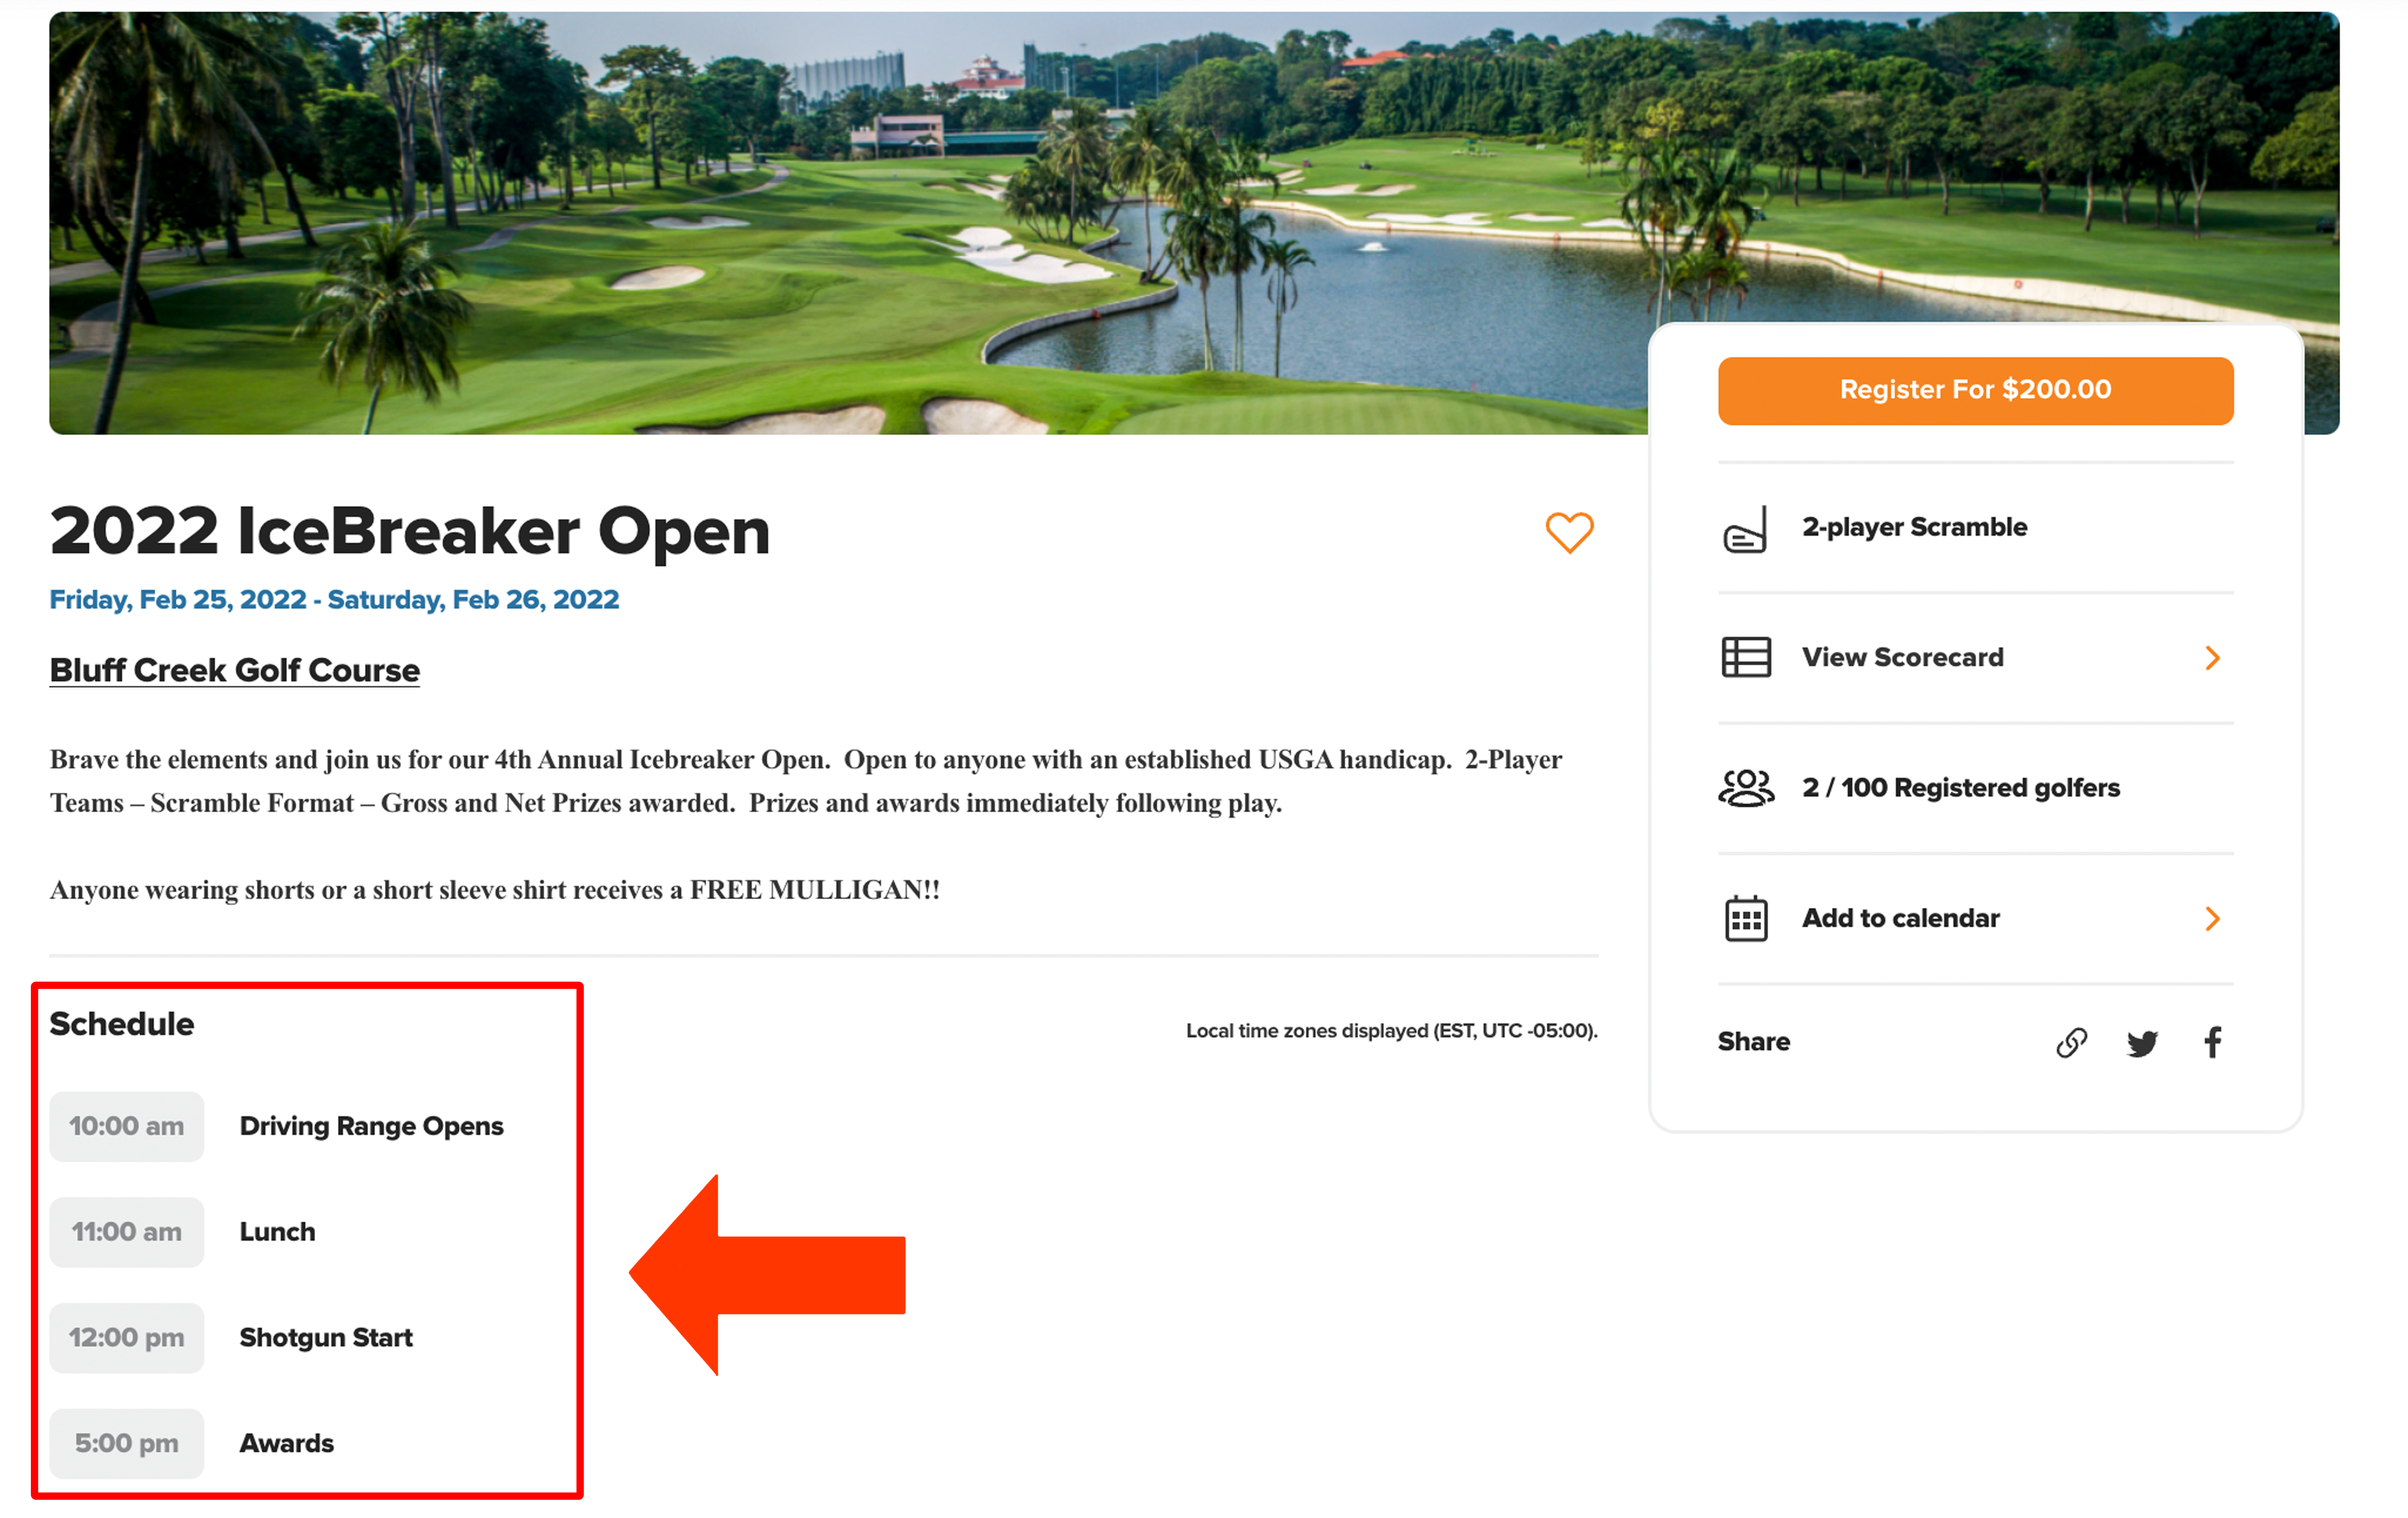
Optionally, provide a name for the tournament format. For example, if it is a two-person scramble, a good name would be "2-Person Scramble." This tournament name will show on the Golf Hub Page (as shown below).
Note: If you have created tournaments in the first round before creating your Golf Hub Page, this field will prefill with the first tournament from round one (Rounds > Tournament).
Course/Location
It is important that your event/league Location is set, as this can be displayed on your Golf Hub Page (as shown below), and the city can be displayed on Golf Hubs as well. Further, potential golfers unfamiliar with your facility can click on the "Get Directions" button for directions to your event.

The event location is established when setting a Course. If no course is used, the event location is set using the Event/League location. If a course is selected, the course location is used (and overrides the Event/League location). When setting the course, and no location is available, you will have a link to set the location (as shown below).

When using "No Course," the location is set using the "Location" in the Event/League Profile. Follow these directions to set the location:
Click the link to add a location to the event. This link directs you to the Event/League Profile - General Settings (Event/League > Event/League Profile > General Settings).
In the section "Location," include the following:
Country
State
City
Street
Zip Code
Click "Save."
Navigate back to Apps > Edit Golf Hub Page to continue setting up the Golf Hub Page.
When using a course, the location is set using the "Location" in the course details. Follow these directions to set the location:
Click the link to add a location to the course. This link directs you to the Course Details (Event/League > Course Details > Edit > Edit this Course).
In the section "Location," include the following:
Country
State
City
Street
Zip Code
Click "Save."
Navigate back to Apps > Edit Golf Hub Page to continue setting up the Golf Hub Page.
Description
Fill out the description to provide a unique touch to each page. As a best practice, keep the description short, 2-3 paragraphs, so you are not overwhelming the page with text but provide enough detail to engage your players.
Schedule
If you have a schedule of events, you can add it to your Golf Hub Page (as shown below).
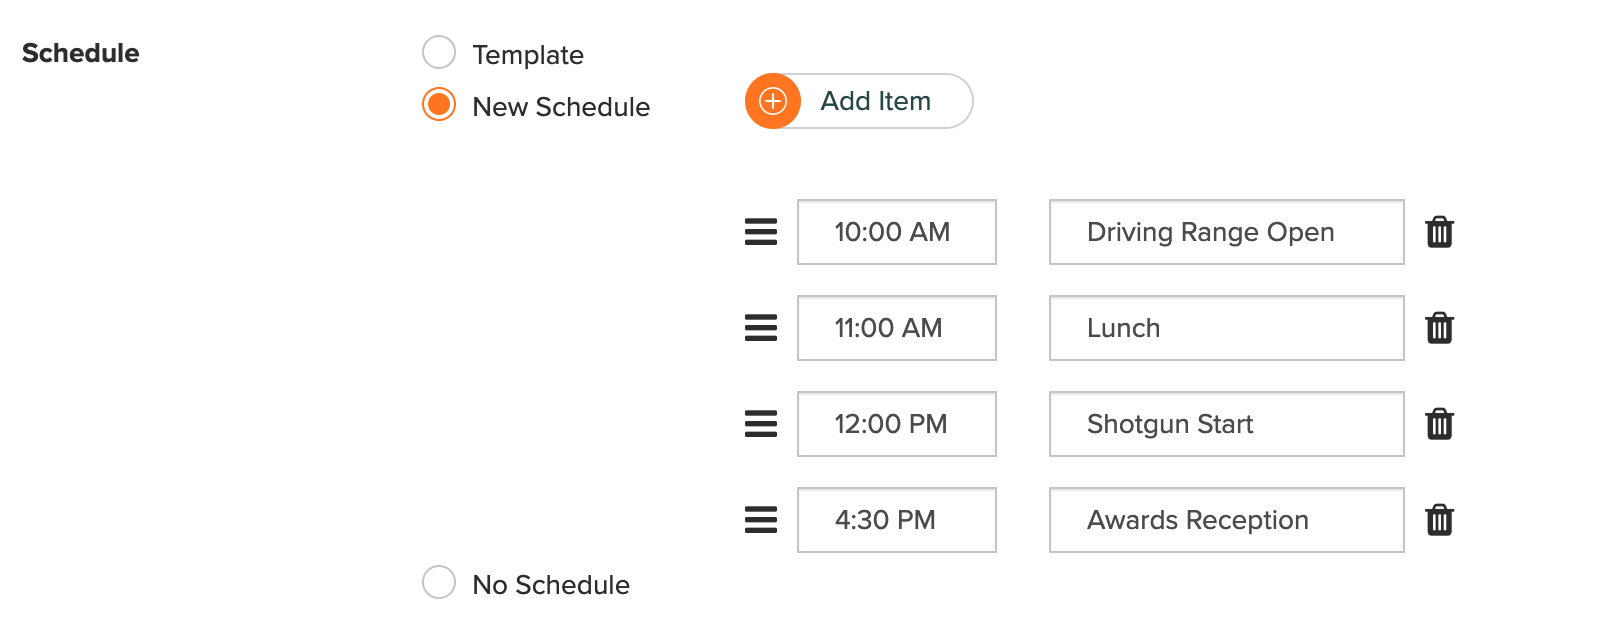
In this section, you will have three options (as shown below):
Template: Select an Existing schedule template. If you have an established default template, this option will be selected, and the template will be prefilled in the dropdown. For more details about creating schedule templates, Click Here.
New Schedule: Add a new schedule template by selecting this option.
No Schedule: No Schedule will be displayed.
You can add one or many items to the Golf Hub page when adding a new schedule. To add a new schedule, follow these directions:
Click the button for "Add Item."
Set the time and give the new item a description.
Repeat sets 1-2 to add multiple items.
Sort the items (if necessary).
Below, we have added a new schedule to this Golf Hub page.
If you must remove an item from the schedule, click the trash can symbol next to the description.
Sponsor
If you have a club sponsor, add them to your Golf Hub Pages (as shown below).
In this section, you will have three options (as shown below):
Template: Select an Existing sponsor template. If you have an established default template, this option will be selected, and the template will be prefilled in the dropdown. For more details about creating sponsor templates, Click Here.
New Sponsor: Add a new sponsor template by selecting this option.
No Sponsor: No Sponsors will be shown.
You can add one or many sponsors to the Golf Hub Page when adding new sponsors. To add new sponsors, follow these directions:
Click "Add Sponsor."
Click "Choose File" in the popup and navigate to the sponsor logo you wish to upload.
Click on the file and press open.
Click "Save."
Enter the sponsor URL to include a direct link to that sponsor's website.
Repeat steps 1-5 to add multiple sponsors.
Sort the uploaded sponsor images (if necessary).
Below, we have added two sponsors to this Golf Hub page.

If you need to remove an uploaded sponsor, click the trash can symbol next to the sponsor URL.
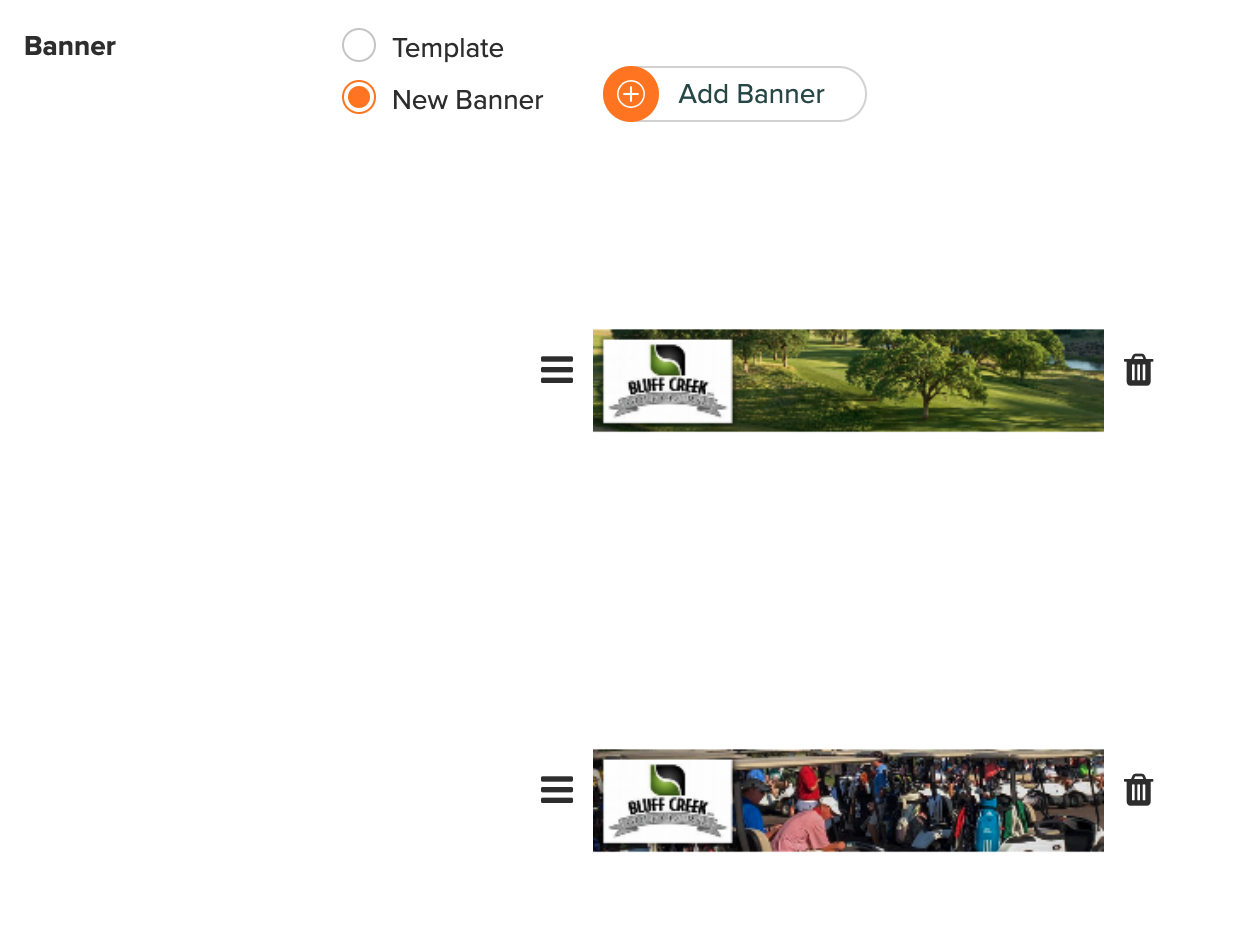
Banner
Unique banners will add some character and color to your Golf Hub Page. In this section, you will have two options (as shown below):
Template: Select an Existing banner template from the dropdown. If you have an established default template, this option will be selected, and the template will be prefilled in the dropdown. For more details about creating banner templates, Click Here.
New Banner: Add a new banner by selecting this option.
When adding a new banner, you can add one or many banner images that "scroll" while a golfer is visiting the page. To add a new banner, follow these directions:
Click "Add Banner."
Click "Choose File" in the popup and navigate to the banner you wish to upload.
Click on the file and press open.
Adjust the banner to fit within the gray bounding box. The area in white will determine how much of the uploaded image is displayed, and any content in the gray area will be clipped.
Click "Save," and repeat sets 1-4 to add multiple banners to one page.
Sort the uploaded banner (if necessary).
Below, you can see that we have added two banners to this Hub that will "scroll" when a golfer is viewing this page.
If you need to remove an uploaded banner, click the trash can symbol next to the image.
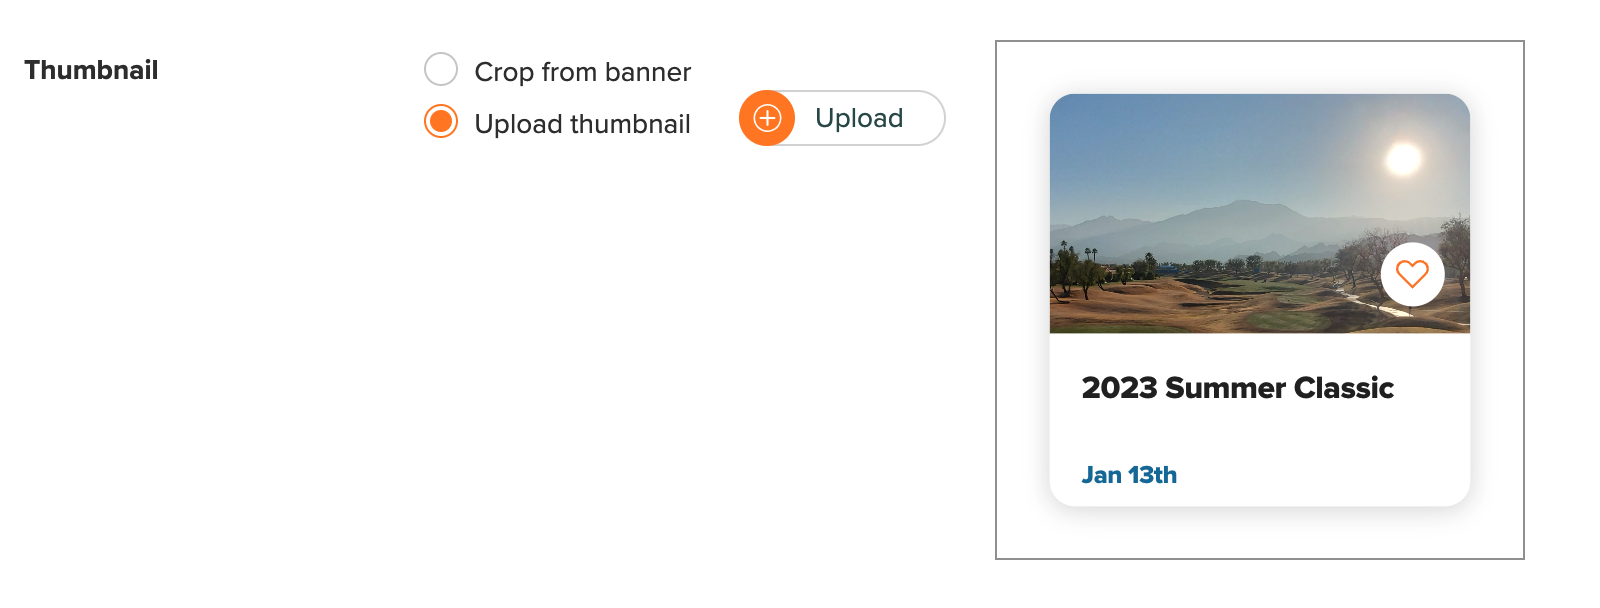
Thumbnails
Thumbnail images are used when viewing event cards on Golf Hubs. The default thumbnail is cropped from the center of the selected banner. Sometimes this is not ideal, so you have two options to update the thumbnail:
Crop from Banner: Click "Crop," and you can move and zoom the image using your mouse to get the ideal thumbnail from your banner. Then click "Save."
Upload thumbnail: Alternatively, you can upload a thumbnail from your computer. Click "Upload" and choose a file from your computer. You can move and zoom the image using your mouse to get the ideal thumbnail from your uploaded image. Then click "Save."
Updating a Golf Hub Page
If, for any reason, you need to edit your Golf Hub Page, you can do so at any time by going to Apps > Edit Golf Hub Page. Make the edits and click "Save." The update will immediately propagate to the live web page.
Publishing a Golf Hub Page
For details on publishing a Golf Hub Page, Click Here.
Taking Registration with a Golf Hub Page
(Note: If you are a Golf Genius TM Club Premium user and want to use Premium registration with your Event, League, or Clinic Golf Hub Page, Click Here for details.)
Registration with and without payment can be used with your Golf Hub Page. To enable registration, go to Apps > Enable Registration. For complete details on using Golf Hub Registration, Click Here.
Sharing your Golf Hub Page
Along with sharing your Golf Hub site, you can also share specific Golf Hub Pages with golfers after it has been set up. You will have several options when sharing your Golf Hub Pages:
Email
Linked on a Website
Facebook
Twitter
Below are the steps for each method.
To share your Golf Hub Page via email, follow the direction below:
To share your Golf Hub Page within the event/league, go to Apps > Golf Hub Page Link.
Click "Copy to Clipboard" for the Golf Hub Page Link.
Share this link via personal email or send it to your Master Roster by going to Customer Center > Master Roster > Manage Emails > Compose Email. For more details about emailing your Master Roster, Click Here.
Linked on a Website
To share your Golf Hub Page on an existing website, follow the direction below:
Get the link to share your Golf Hub Page within the event/league by going to Apps > Golf Hub Page Link.
Click "Copy to Clipboard" for the Golf Hub Page Link.
Provide this link to your webmaster to be added to your website.
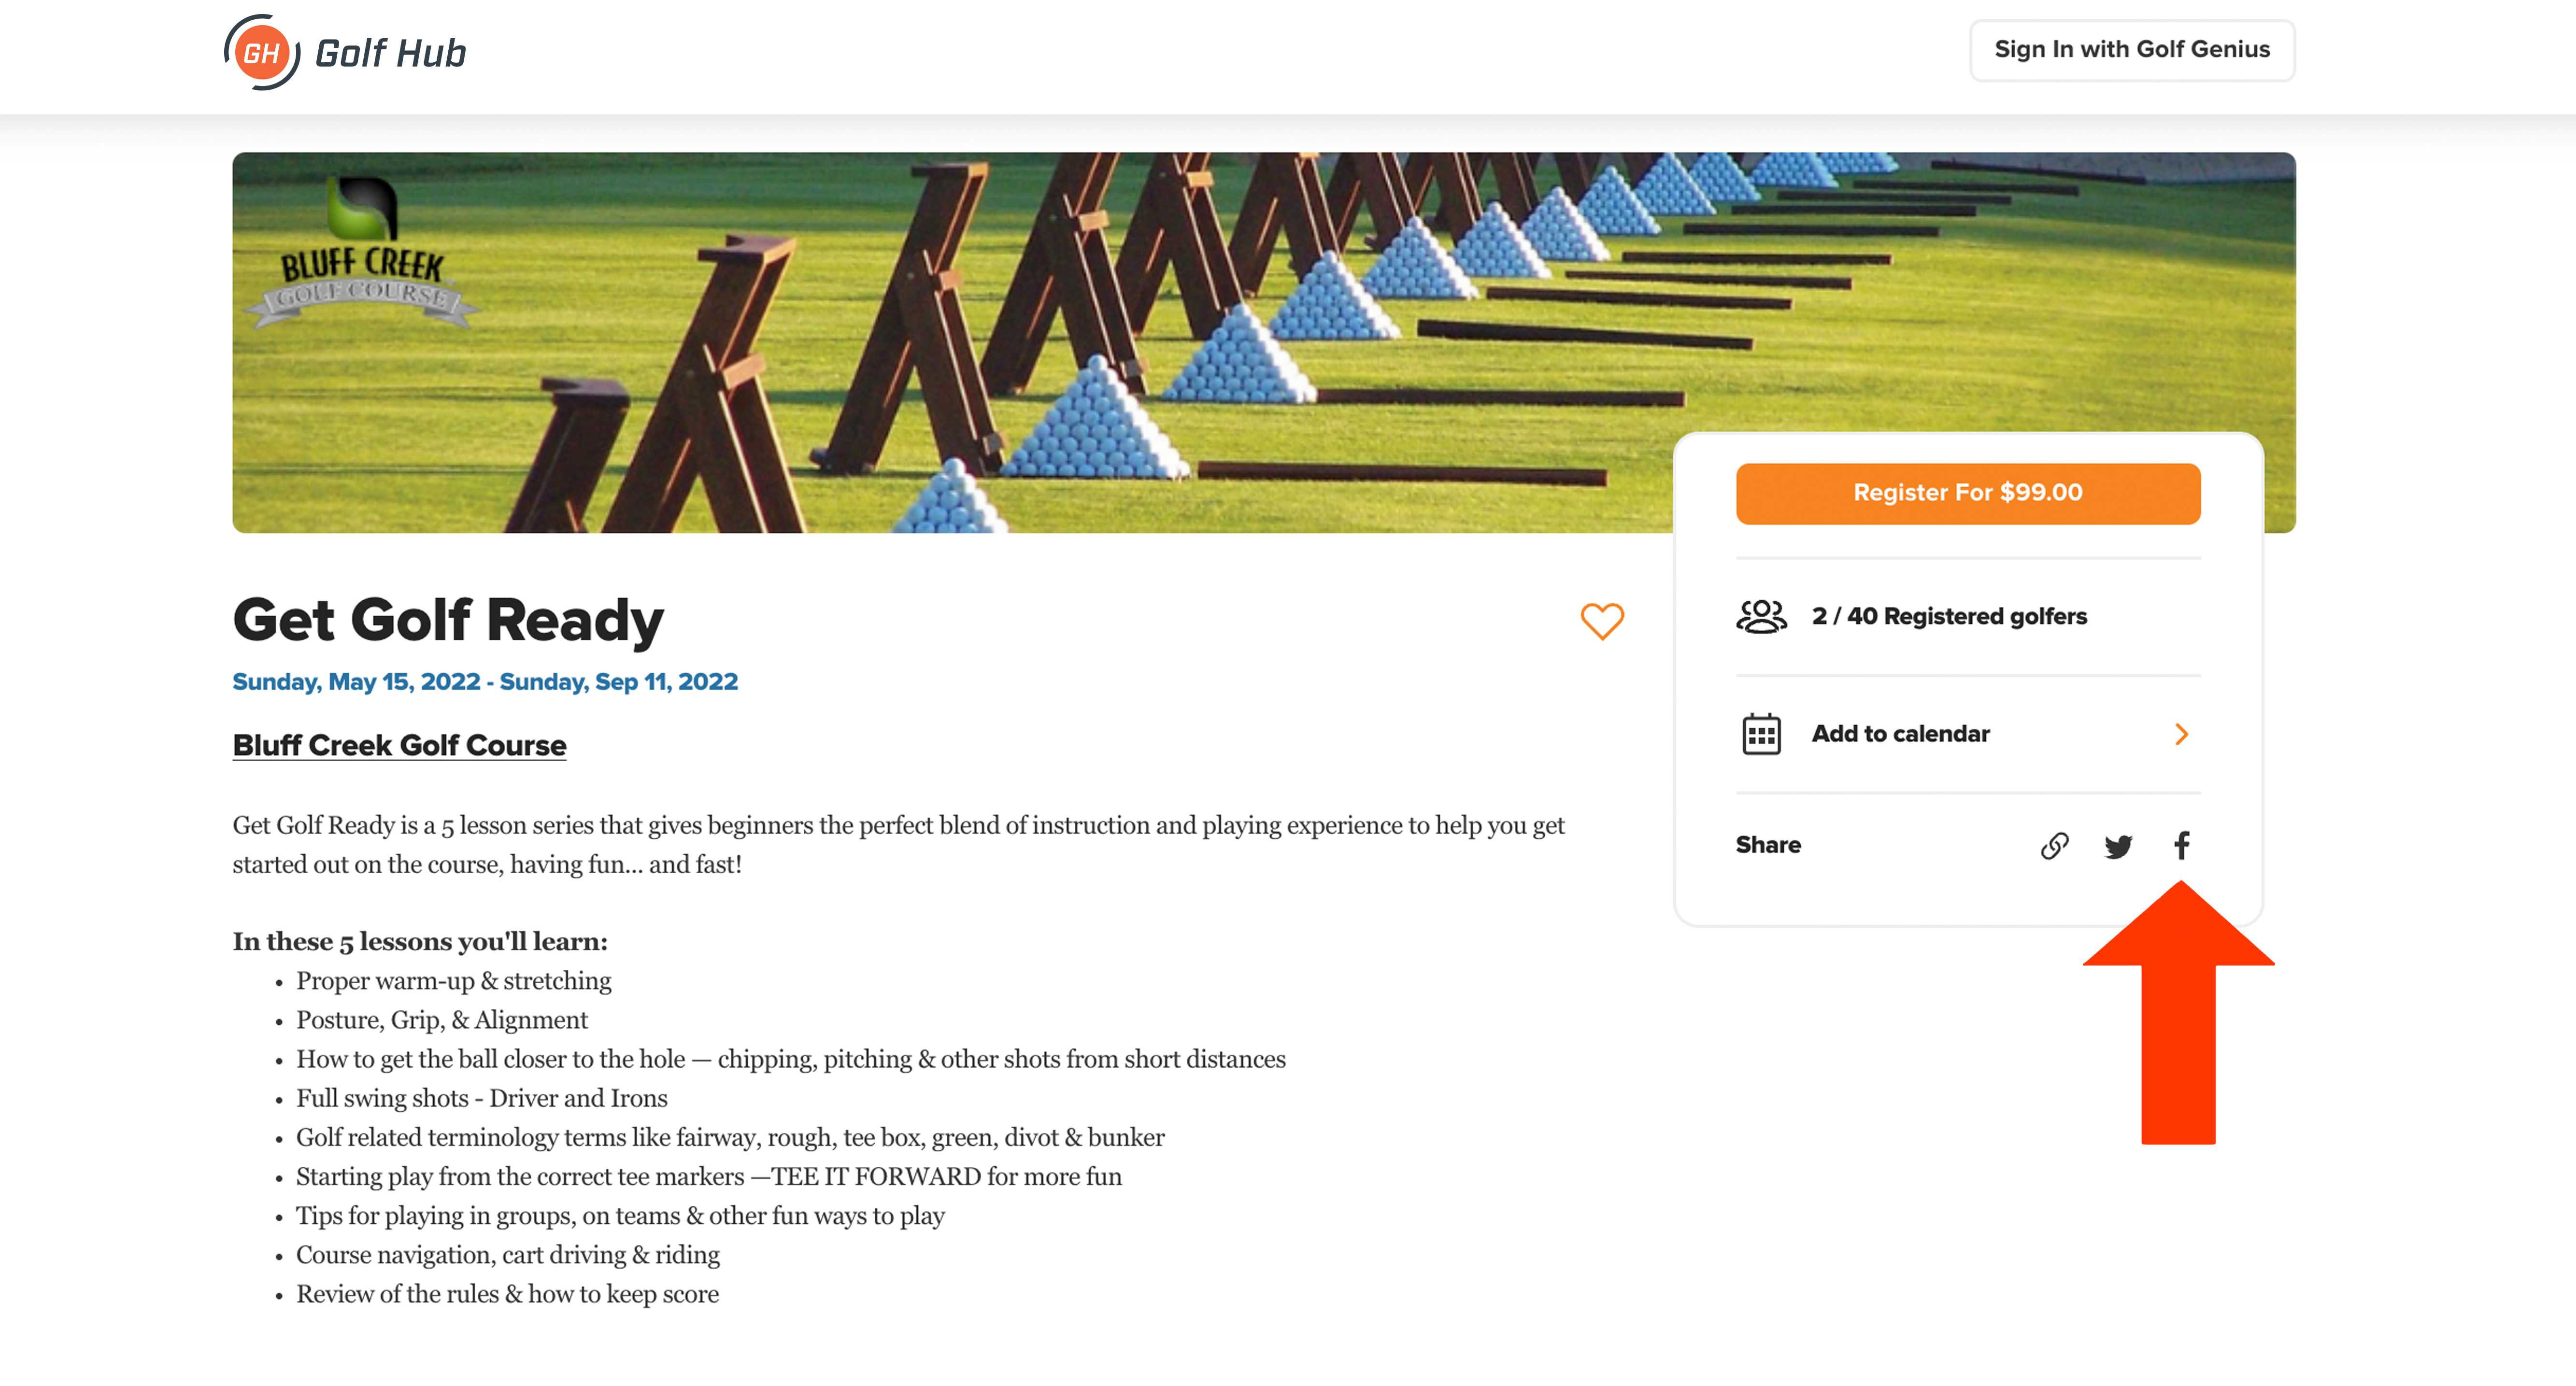
To share your Golf Hub Page on Facebook, follow the direction below:
Visit your Golf Hub Page by going to Apps > Golf Hub Page Link within your event/league.
Click "Copy to Clipboard" for the Golf Hub Page Link.
Paste the link in your web browser.
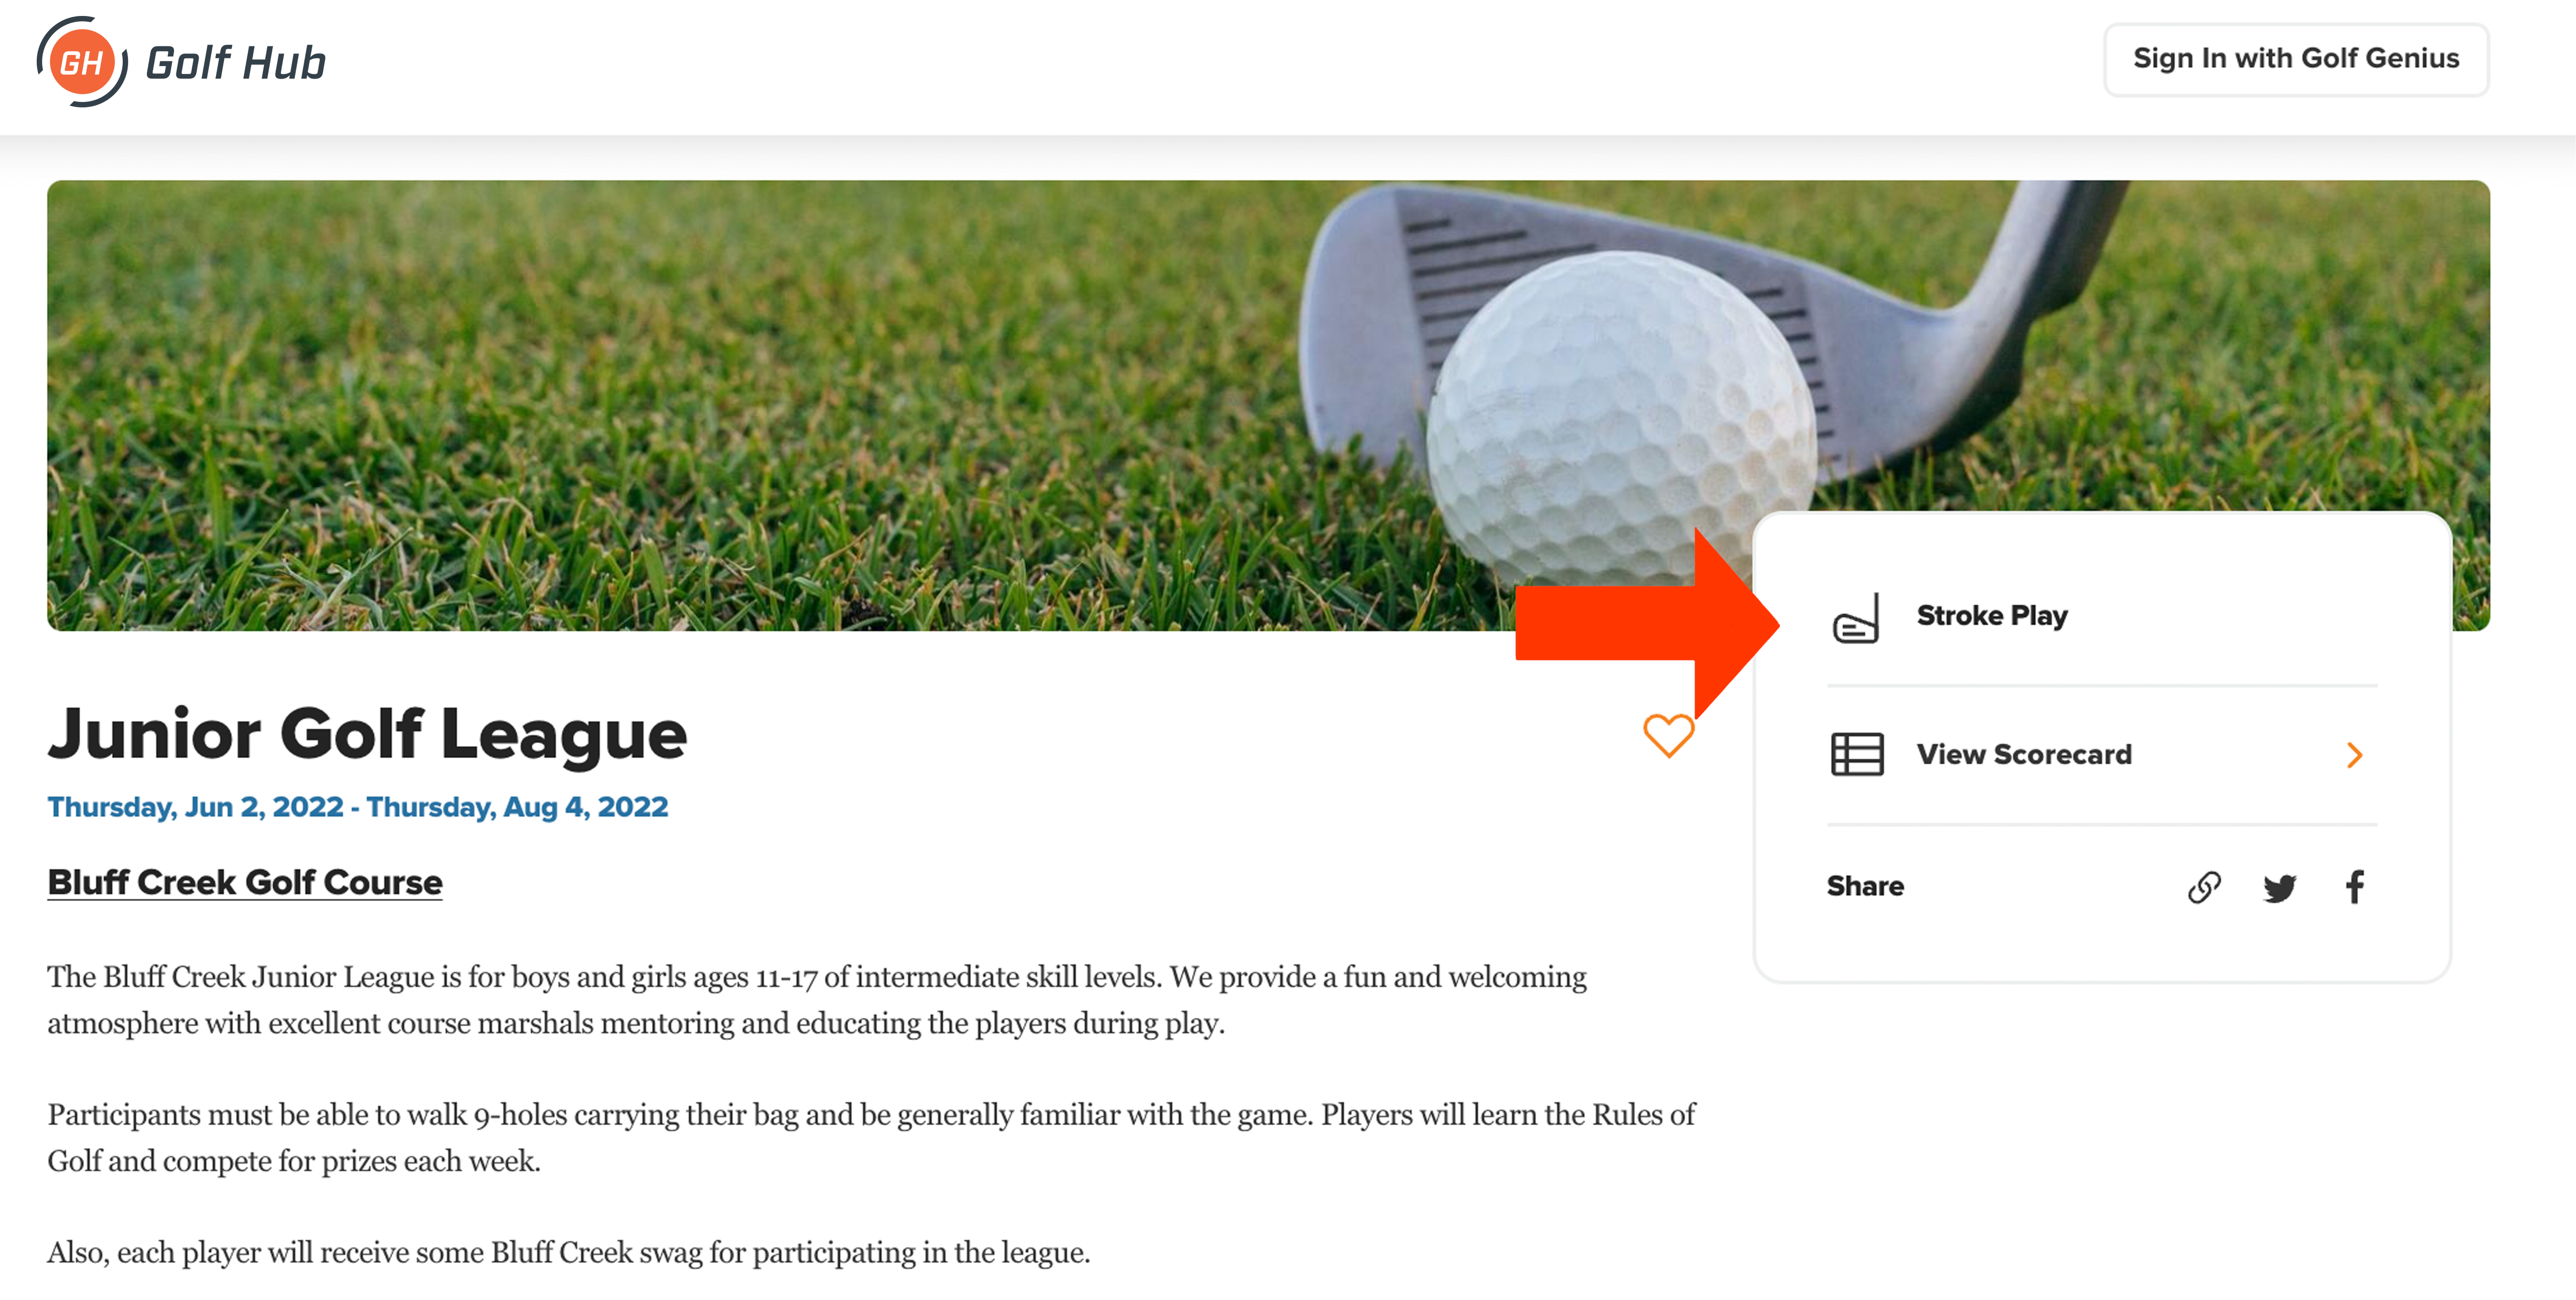
Click the Facebook icon on the Golf Hub Page (as shown below).

Sign in to Facebook (if necessary).
Click "Post to Facebook."
To share your Golf Hub Page on Twitter, follow the direction below:
Visit your Golf Hub Page by going to Apps > Golf Hub Page Link within your event/league.
Click "Copy to Clipboard" for the Golf Hub Page Link.
Paste the link in your web browser.
On the Golf Hub Page, click the Twitter icon (as shown below).

Sign in to Twitter (if necessary).
Click "Tweet."

Creating Golf Hub Page Flyers (Paper Leaflets)
Golf Hub Flyers is a robust design editor. This intuitive editing tool allows you to create captivating marketing materials for your events, leagues, and clinics. Build from scratch or utilize a template to capture your reader's attention, turning them into registered players in a few simple steps (as shown below).
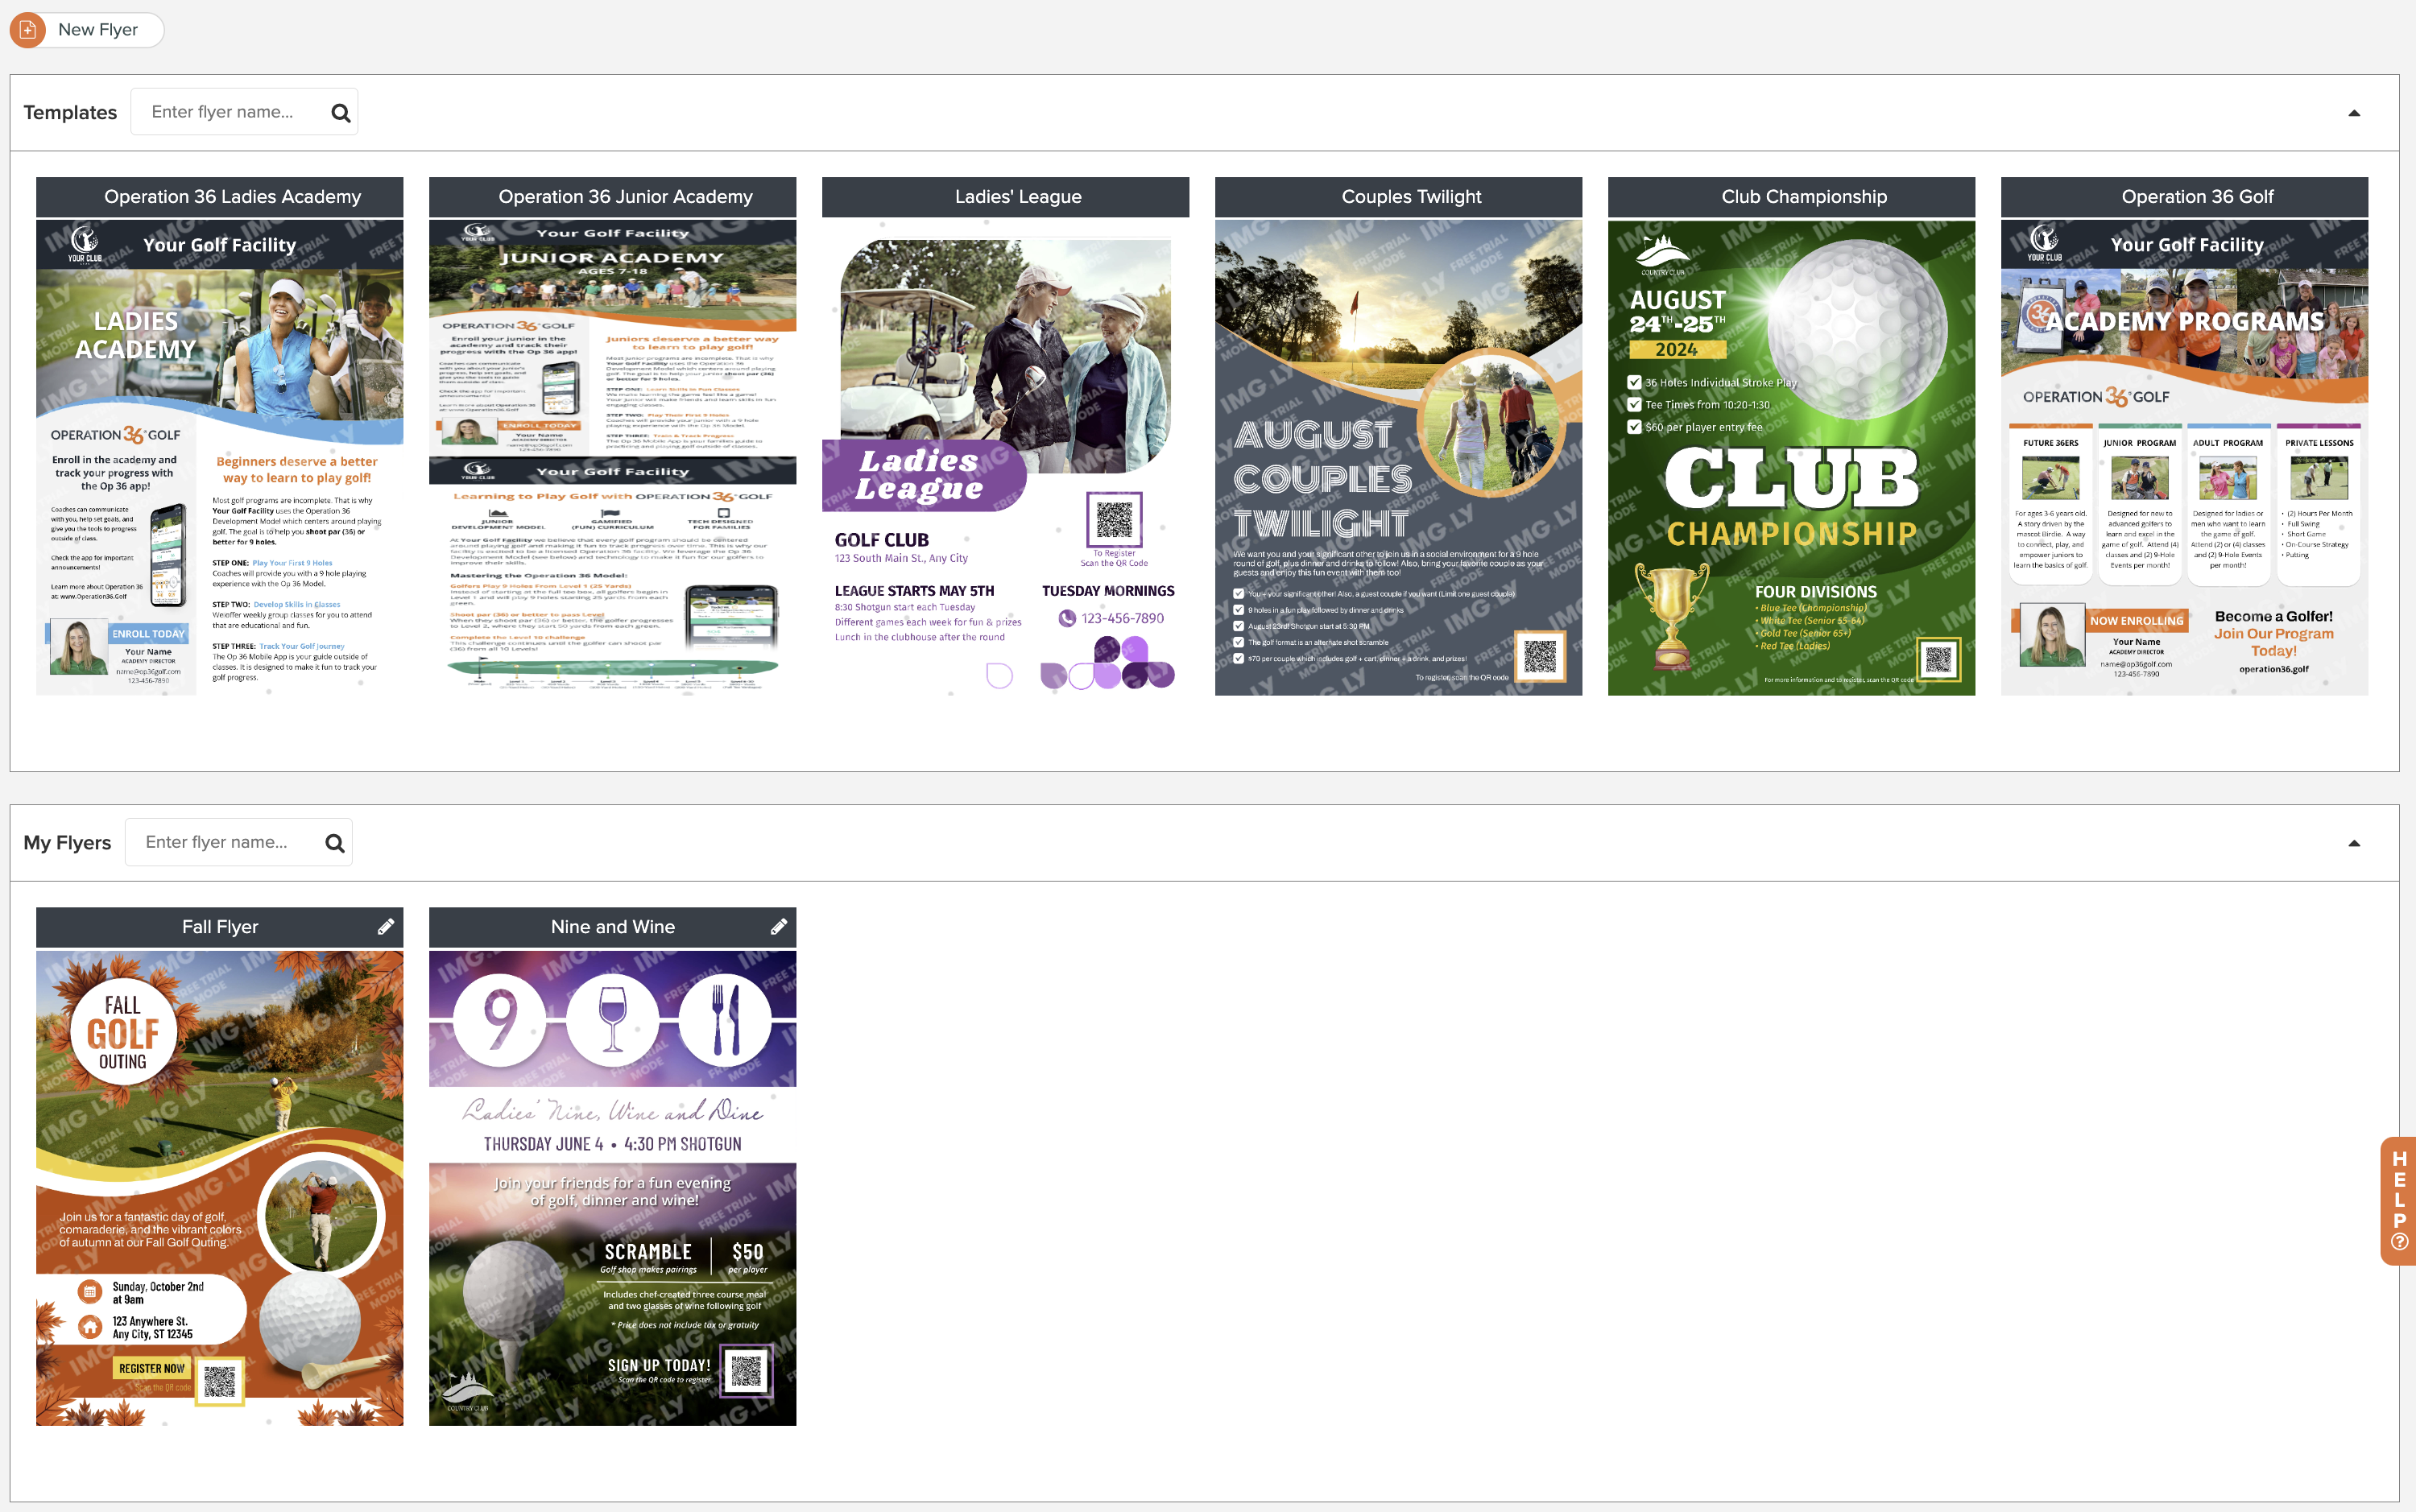
The Flyers page contains two main sections:
Templates: Designed Flyers that are ready to customized with event details. Note: When adding event details to a template, you can utilize dynamic fields to use the template for more events without any additional work. More Details can be found later in this article.
My Flyers: These are flyers you have created from scratch or templates you have customized further for your event. More Details can be found later in this article.
For complete details on Golf Hub Flyers, Click Here.