Two-way calendar syncing enables seamless synchronisation between your Halaxy calendar and Google Calendar.
With this feature, your Halaxy appointments will appear in your Google Calendar and you can manage your Halaxy appointments directly from your Google Calendar. Any changes you make—whether adding or canceling appointments—will automatically update in Halaxy.
Two-way calendar syncing is available as an add-on feature with Halaxy, which requires a monthly subscription of 25 credits. The subscription renews automatically every 30 days and can be canceled at any time.
Please reach out to the Halaxy Support Team for further confirmation on the total costs.
If multiple practitioners work at your venue, you will need to do these steps for each practitioner.
1. Set up Two-Way Calendar Sync
1. Set up Two-Way Calendar Sync
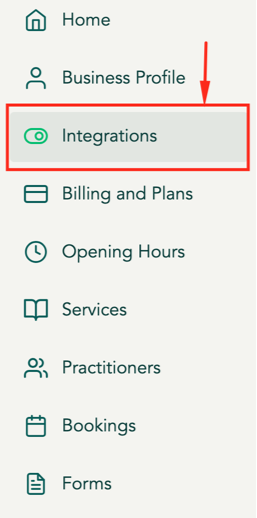
Click Settings > Integrations
Under the Calendar Integration section, click Buy Calendar Synchronisation.
In the pop-up, your current credit balance and the cost of the subscription is displayed. Click Purchase to buy the subscription
Now that you've purchased the subscription, you must now set up the two-way sync. Back in the Settings > Integrations page, under the Calendar Integration section, click Add Calendar Integration. (Note: Administrators can purchase subscriptions on behalf of practitioners, but only practitioners can set up the two-way calendar sync.)
Click the calendar service you wish to sync with Halaxy and follow the prompts to complete the set-up process.
After you've completed the set-up, you will see a new calendar label on your external calendar application named HX_(Practice Group Name). This is your Halaxy calendar.
2. Set the Google calendar sharing settings
2. Set the Google calendar sharing settings
To ensure Avaana can read the Google calendar's availability and correctly block out your already booked appointments, you will need to share this calendar with our admin@avaana.com.au email address. Please follow instructions below on how to do so.
Open Google Calendar settings via: https://calendar.google.com/calendar/u/0/r/settings
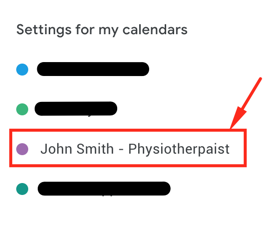
In the left side-menu under “Settings for my calendars” select the calendar you want are syncing with Avaana
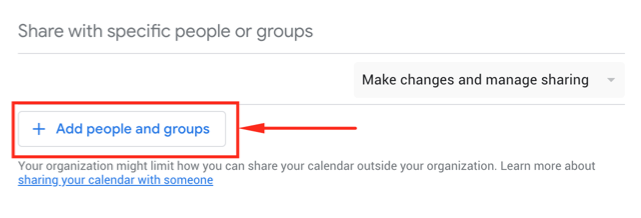
Click “+ Add people and groups” button
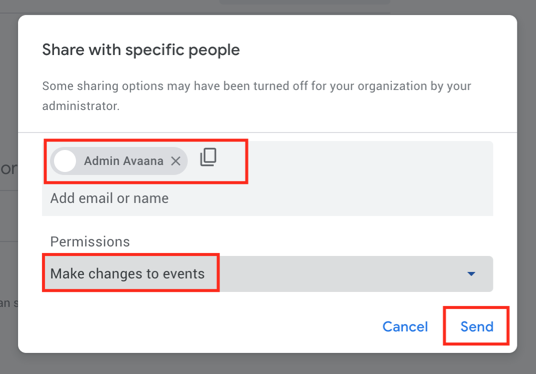
In the email field, enter admin@avaana.com.au
In the permissions field, select Make changes to events
Click Send
3. Adding the Google calendar into Avaana
3. Adding the Google calendar into Avaana
Now that your calendar is connected and syncing with Google, we will connect this Google calendar with the practitioner it belongs to in Avaana.
Open Google Calendar settings via: https://calendar.google.com/calendar/u/0/r/settings
In the left side-menu under “Settings for my calendars” select the calendar you want to sync
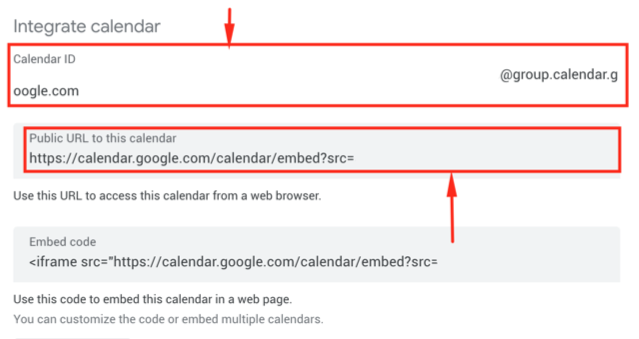
Scroll down to the heading “Integrate calendar”, this will have the Calendar ID and Public URL fields required to sync into Avaana.
Open your Avaana provider dashboard in another tab or window, and go to the “Integrations” page
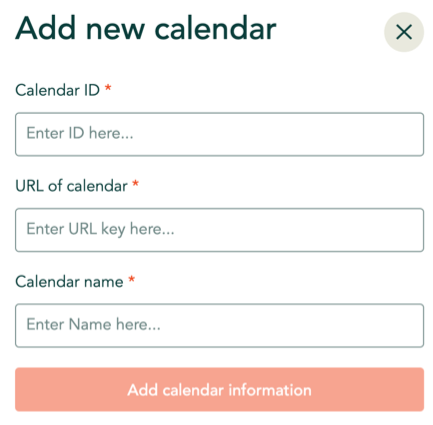
Click the “+ Add … Calendar” button in the Calendars section
A popup window will appear with the following fields
Calendar ID
URL of Calendar
Calendar Name
Copy and paste the Calendar ID from Google calendar into the Calendar ID field
Copy and paste the Public URL to this calendar from Google calendar into the URL of calendar field
Enter the practitioner’s name this calendar belongs to into the Calendar name field
Click “Add calendar information”
The calendar will now appear in the Calendars section

5. Connecting the calendar to the Practitioner
5. Connecting the calendar to the Practitioner
Now go into the Practitioners page of your dashboard
Select the practitioner this calendar belongs to by clicking the pencil icon next to the practitioner's name.
Once in the practitioner's profile page, click the field Link calendar from Google
Select the calendar name that matches this practitioner
Click Save

