
When a member or guest places a special order, they may want the order shipped directly to them or to someone else, rather than having the item delivered to the golf shop. This process is called Drop Shipping and allows you to ship merchandise directly to the customers without handling the item in the golf shop.
Drop Shipping is integrated into the Special Order process. More specifically, an order can be designated as Drop Ship when Entering a Special Order on a computer or when using the Mobile and iPad apps. Drop Ship addresses are stored in the Member Profiles, allowing you to manage one or many addresses for each member.
In this article, we will discuss the following:
Drop Ship a Special Order
Notifications
Use Existing Address to populate Drop Ship Address
Adding Drop Ship Address Manually
Drop Ship a Special Order:
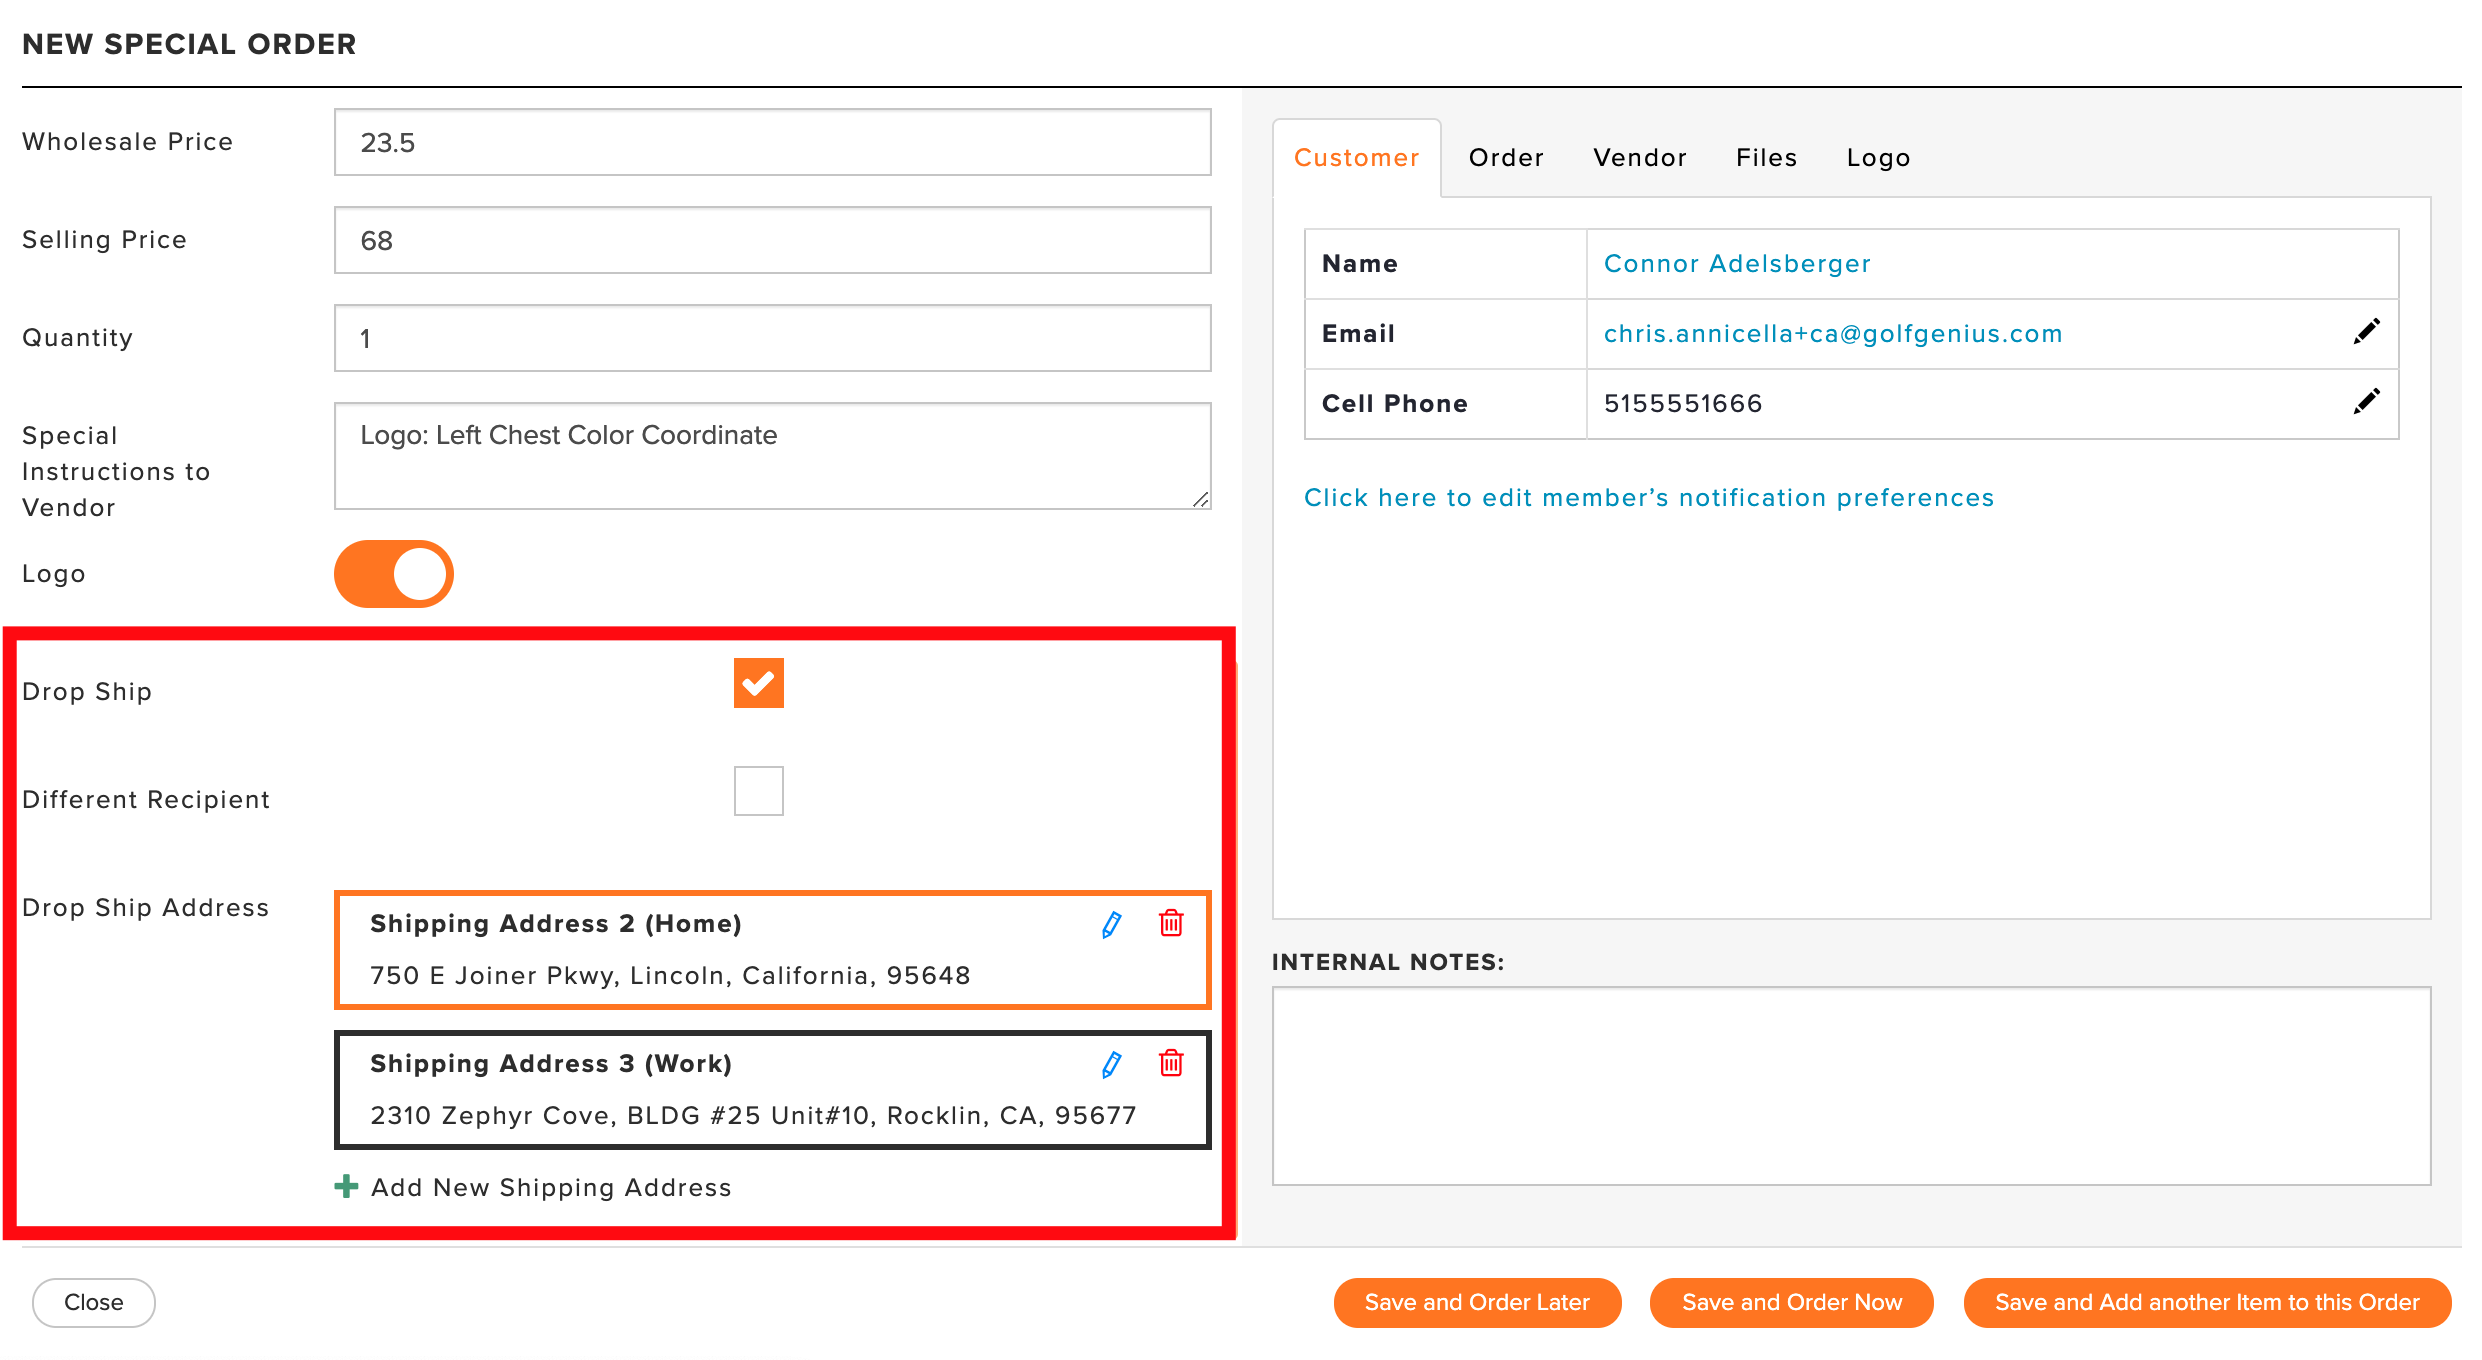
When Entering a Special Order, you can Drop Ship orders for members and guests (as shown below).
To Drop Ship a special order, follow these instructions:
Start the order process by navigating to Orders > Special Order > Dashboard > New Special Order.
Enter or select the special order details (e.g., Vendor, Customer, SKU, Product Category, etc.).
Select "Drop Ship."
Select an existing Drop Ship Address. More details on using existing addresses are provided later in this article.
If there are no Drop Ship addresses, click "Add New Shipping Address."
If the recipient is someone other than the member/guest, select "Other Recipient."
Choose the Recipient Type "member" or "guest."
Form members: select their current Drop Ship address, or click "Add New Shipping Address" if there is none.
For guests, enter their details (e.g., name, email, phone, address). Note: Guest details will not be stored in the member profile.
Make any other adjustments to the order as necessary, then click to save it.
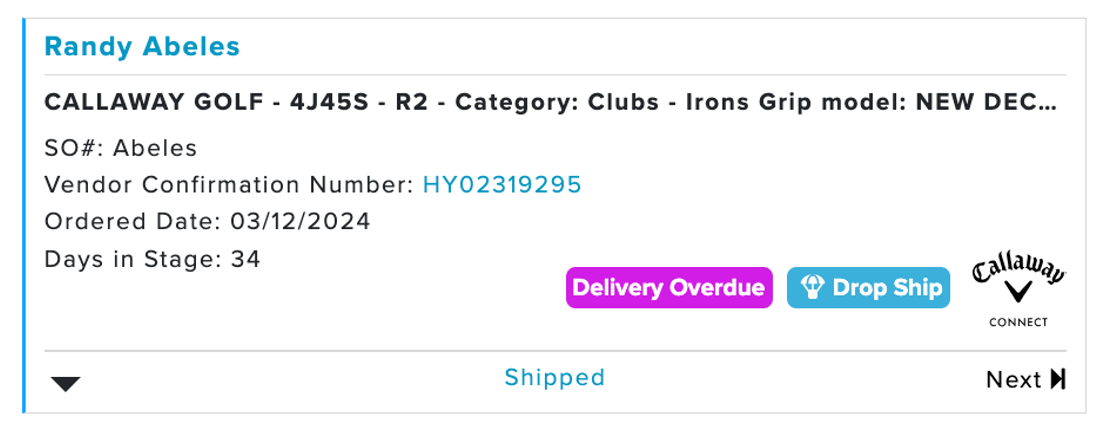
The order will be placed on the special order dashboard and flagged as "Drop Shipped" as shown below).
Notifications:
There are instances when automated text and email notifications are sent to vendors, members/guests, and "different recipients" during the special order process.
When dealing with automated text and email notifications for Drop Ship orders, keep in mind the following:
The settings for member/guest and vendor automated text and email notifications are defined in the account-level and member notification settings. There are multiple email and text notifications specific to drop ship orders (as shown below). For more details about automated email notifications, Click Here.
Email Notification related to Drop Shipping.
Text Notification related to Drop Shipping.
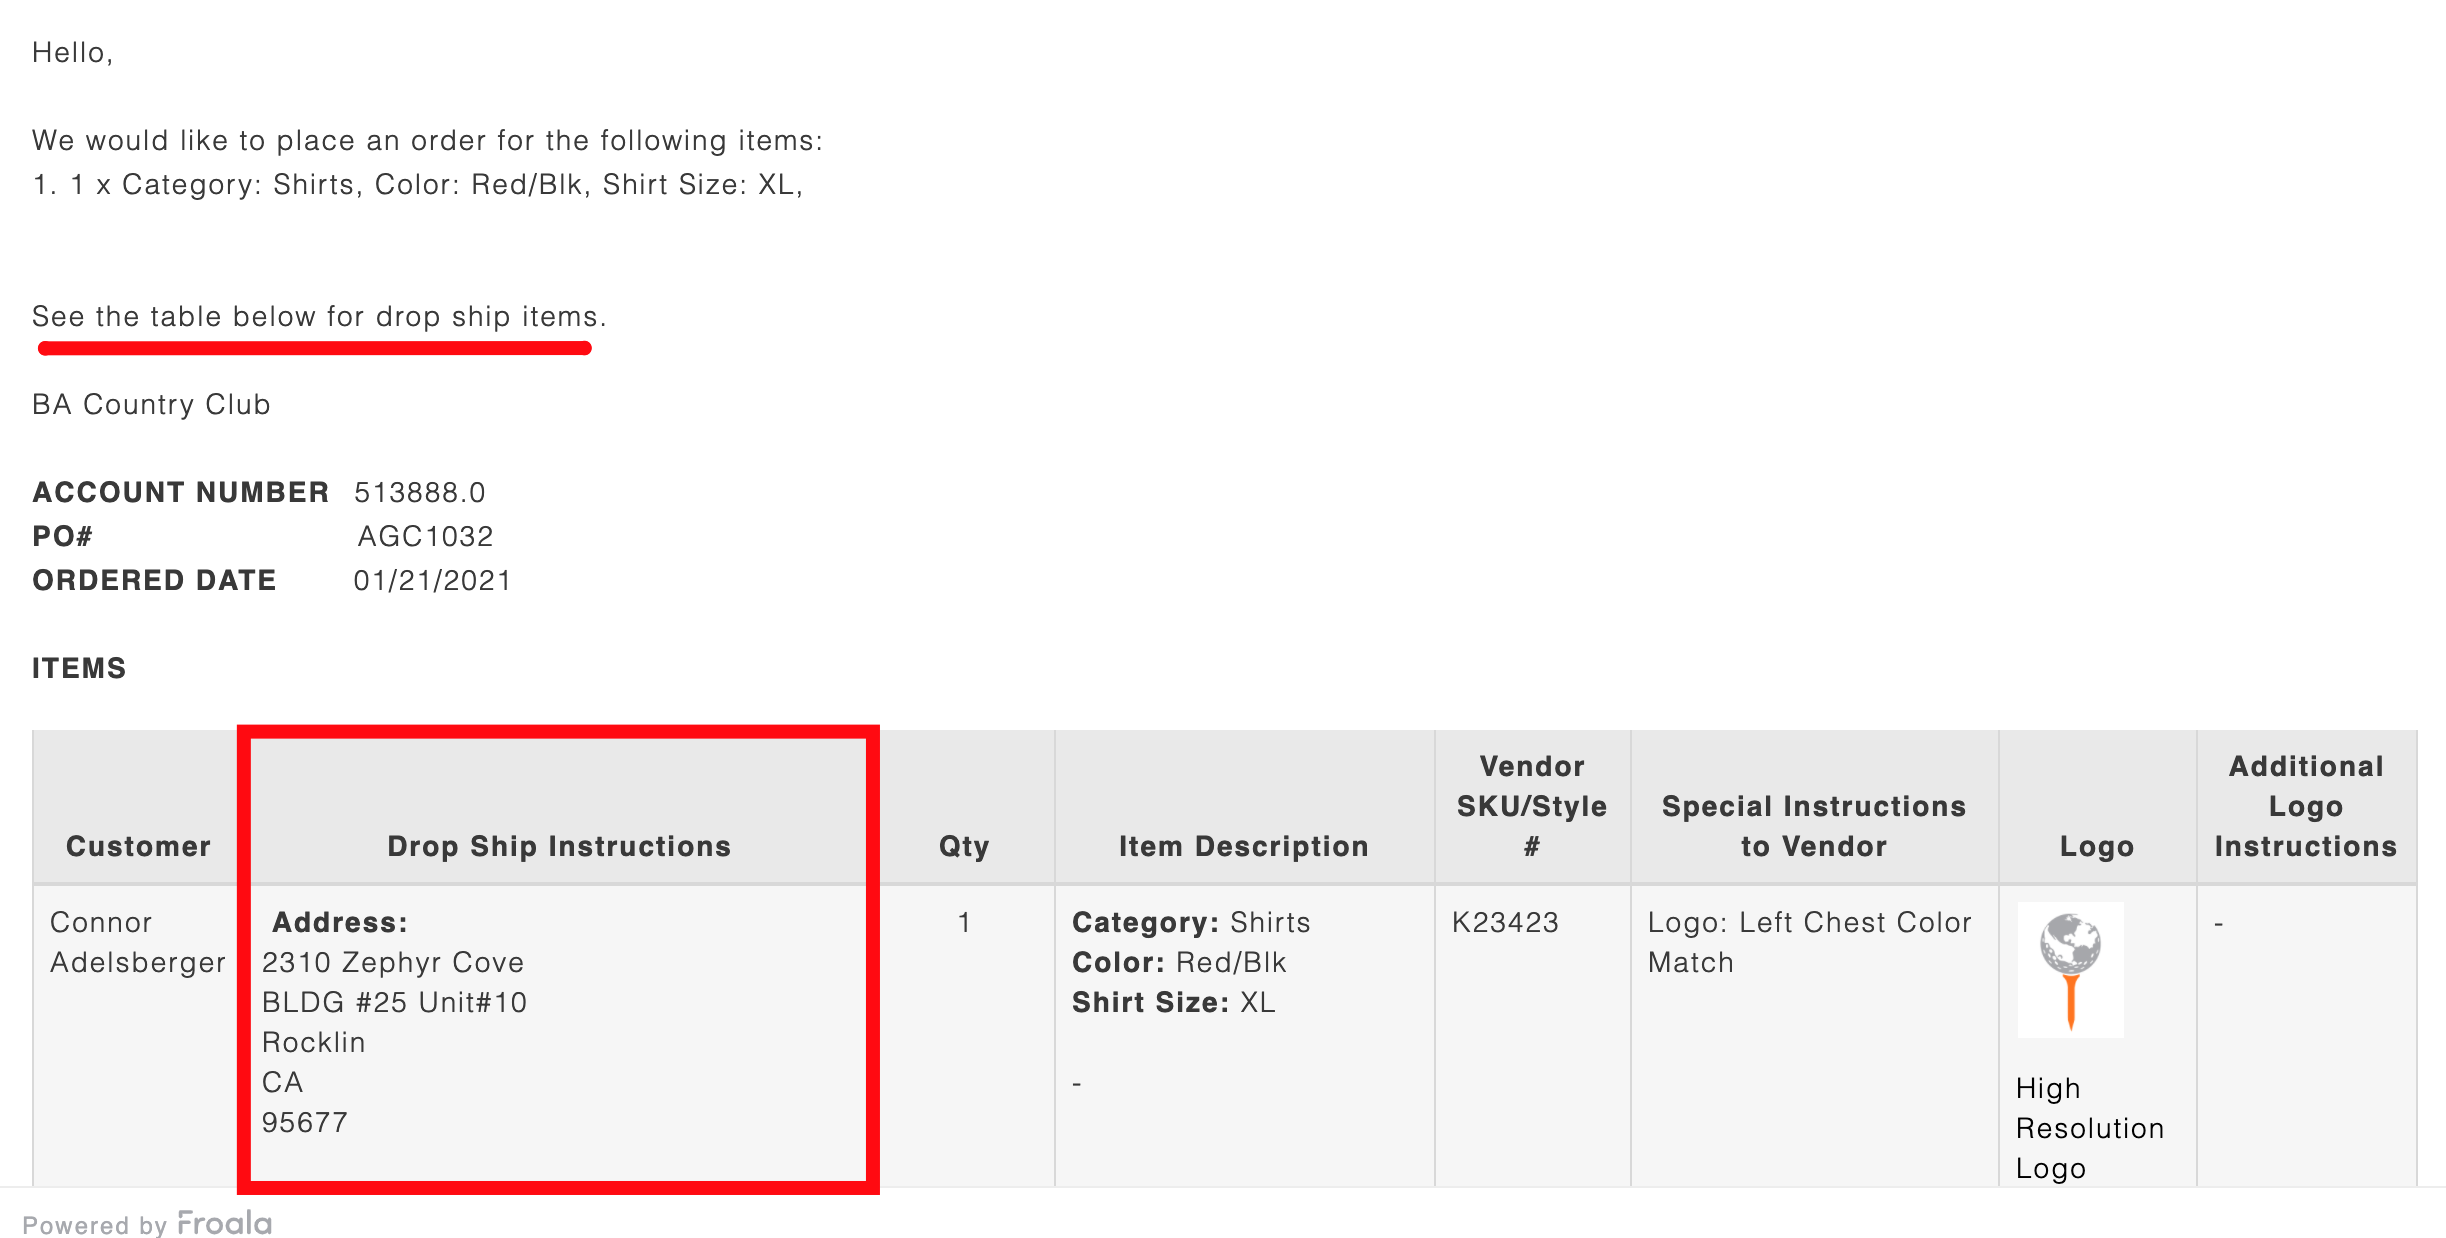
Vendor Emails will contain a Drop Ship announcement and Drop Ship address in the table (as shown below).

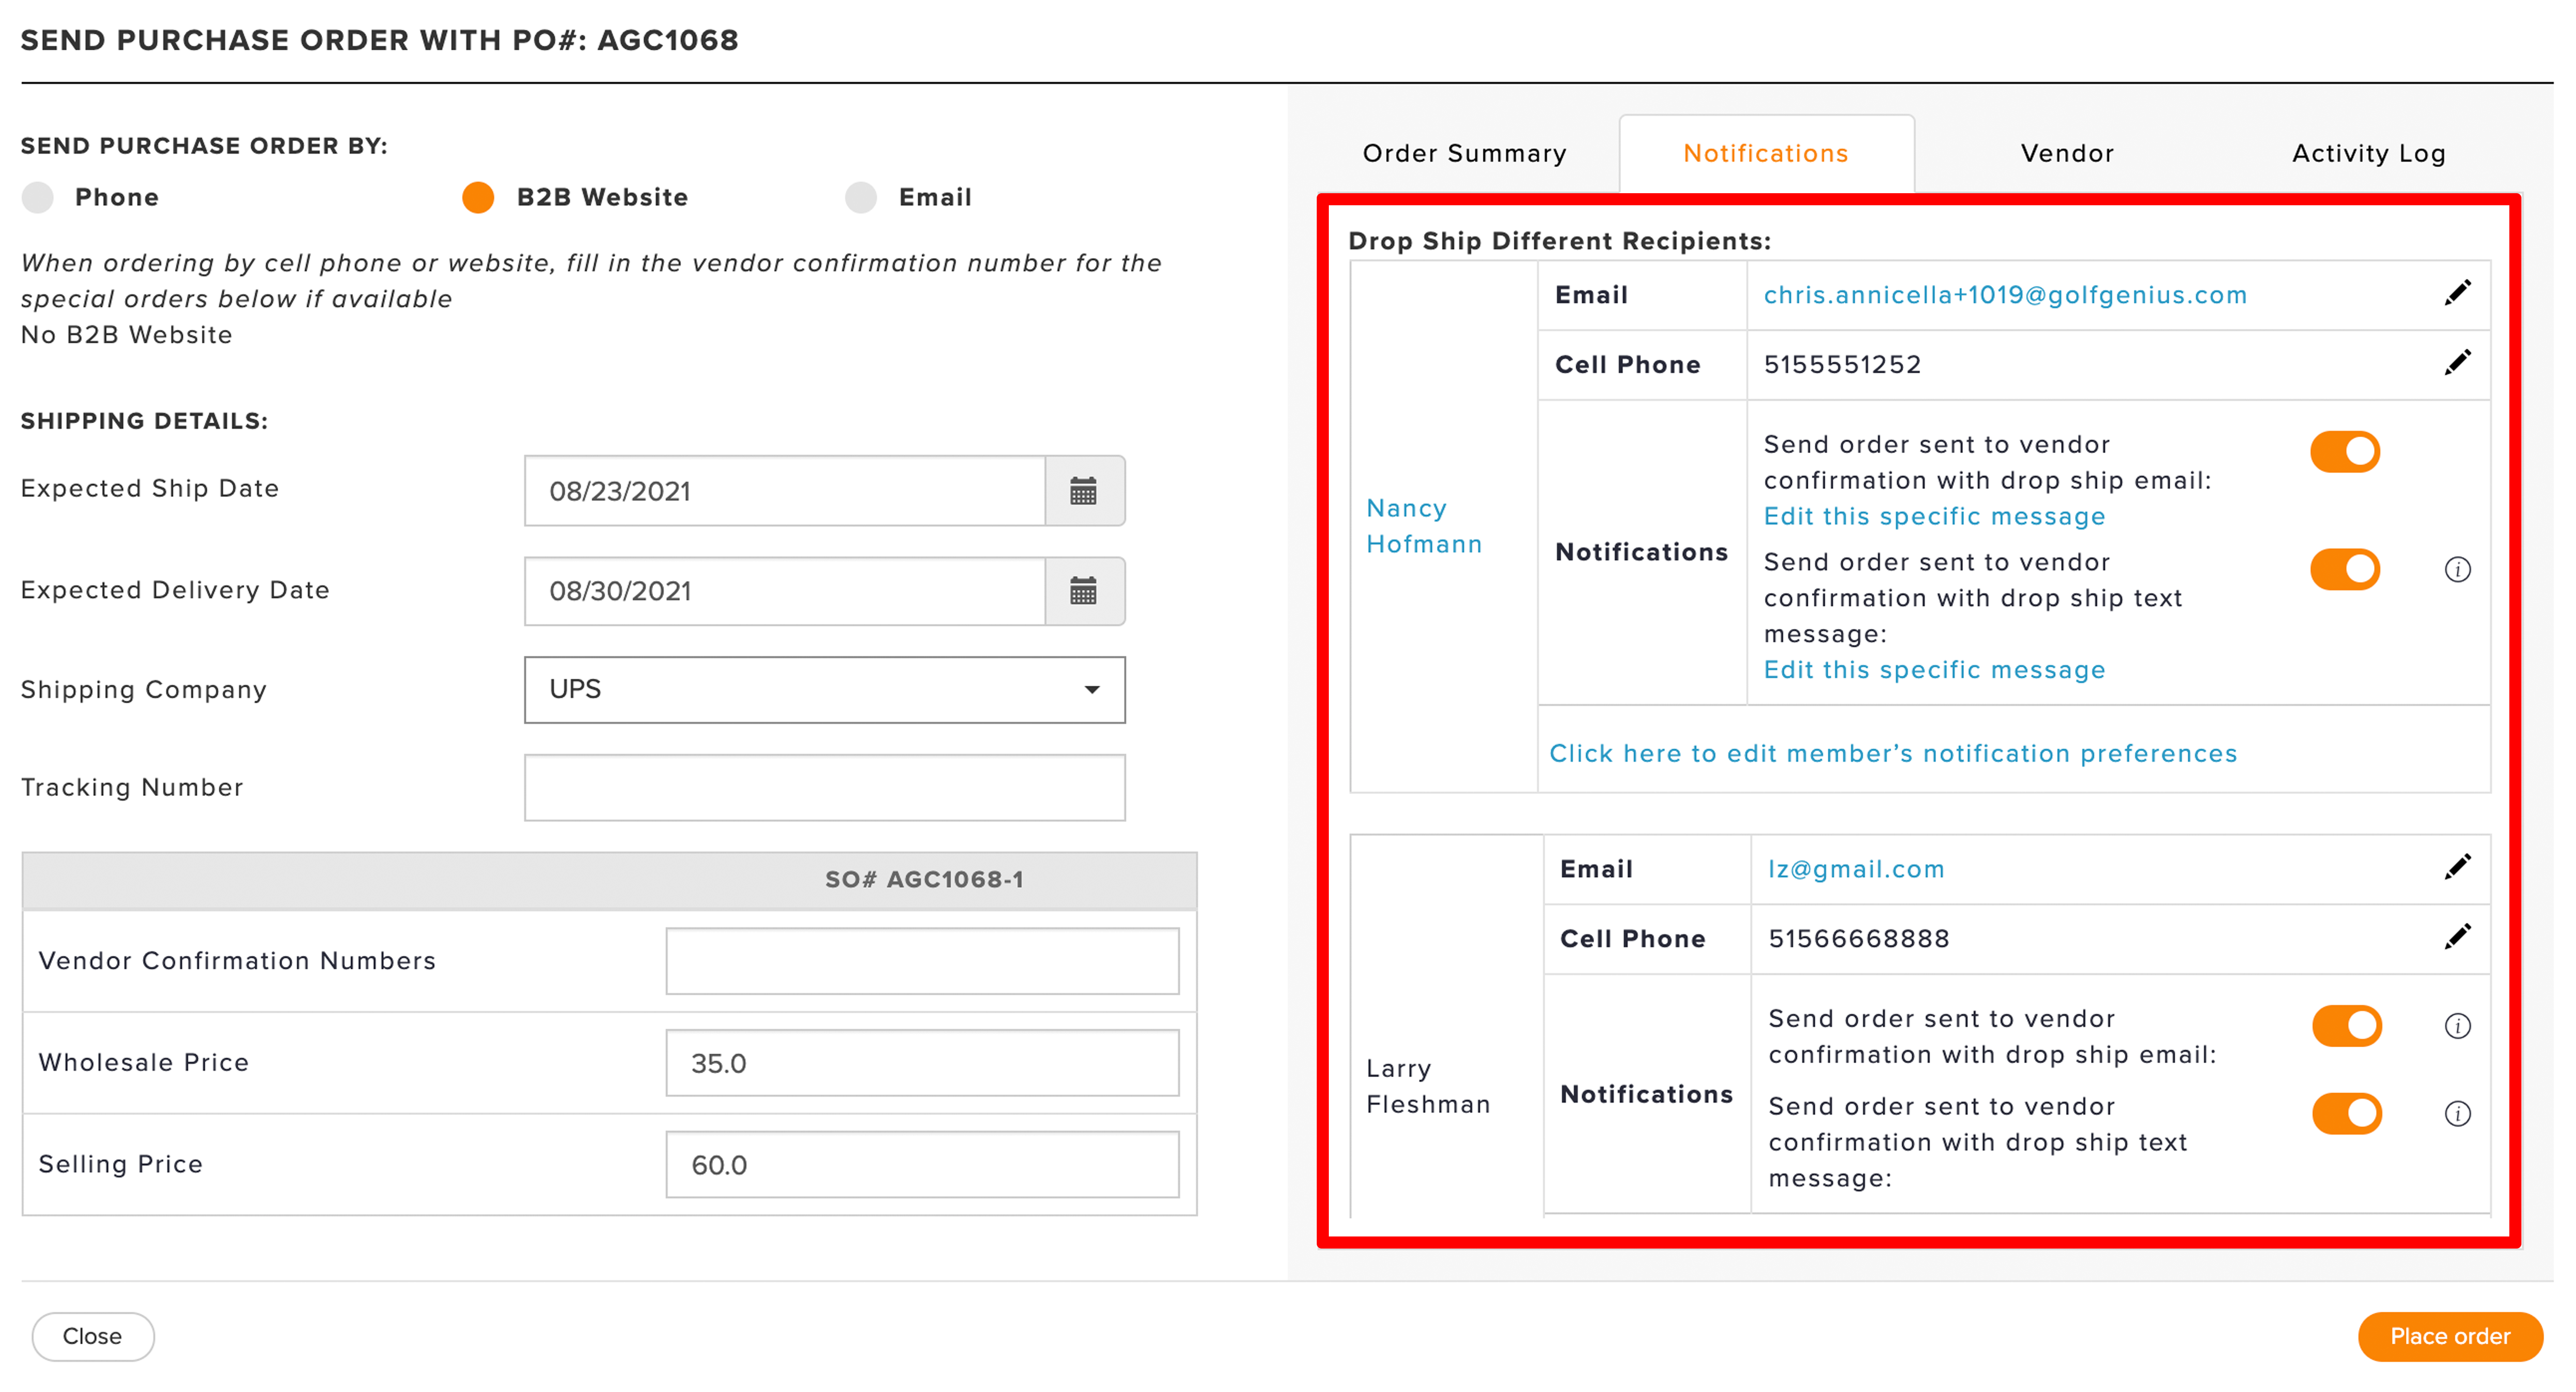
When shipping to a "different recipient," you can enable or disable notifications in the Notification Tab on the right for the member/guest and the "different recipient" when an order is placed or shipped (as shown below).

You can further customize the automated notification to include a personalized message to the individual who placed the order by clicking on "Edit this specific message." For more details on customizing notifications on the fly, Click Here.
Use Existing Address to Populate Drop Ship Address:
Suppose you already have address information in your member profiles, synced from your Golf Genius TM Roster, or a spreadsheet upload during the onboarding process. In that case, you can use these addresses as Drop Ship addresses.
To use the existing addresses as a Drop Ship address, you need to create a Drop Ship Member Profile Category. To do this, follow these instructions:
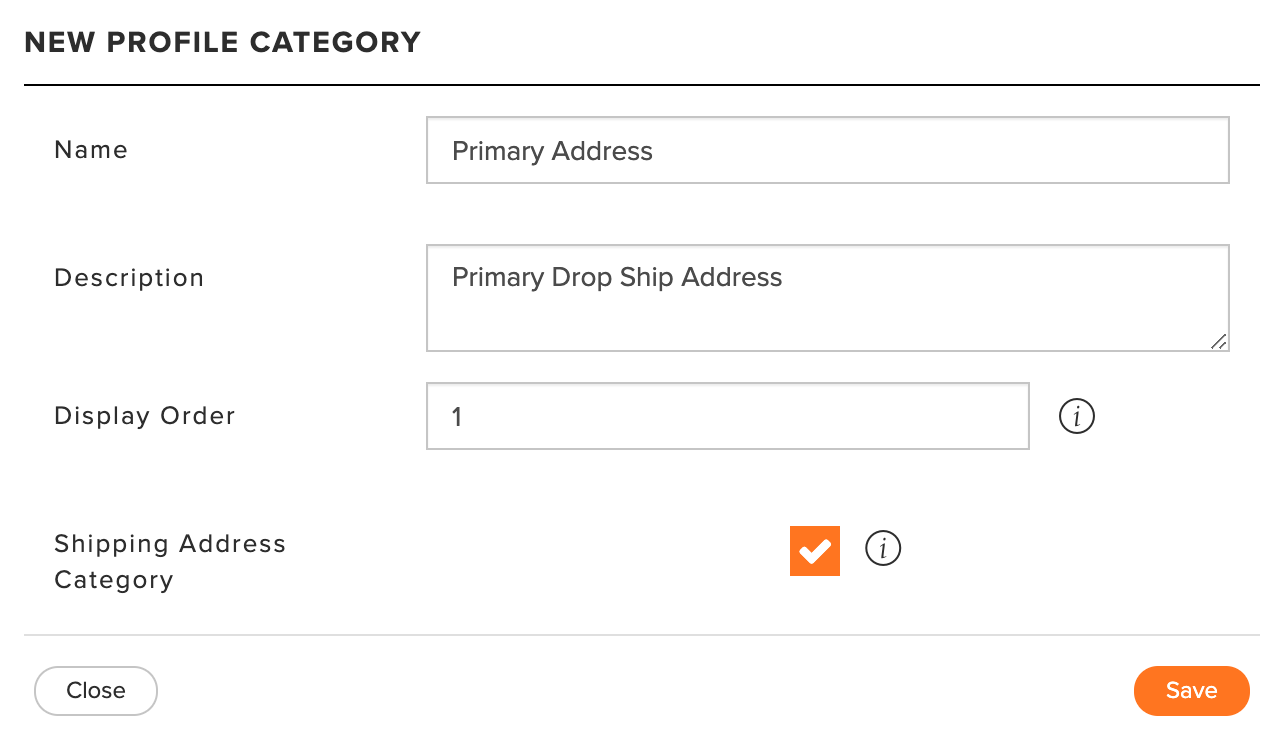
Go to Club Details > Members > Profile Categories > New Profile Category (as shown below).

Provide a Name for the address (e.g., Primary Address, Secondary Address) and, optionally, enter a description and set the display order.
Check the Box for "Shipping Address Category."
Click "Save."
Once the Drop Ship Address Category has been created, you can now assign the existing Member Custom Fields to this new category. When you assign the profiled fields to the category, those fields will populate the Drop Ship address. To do this, follow these instructions:
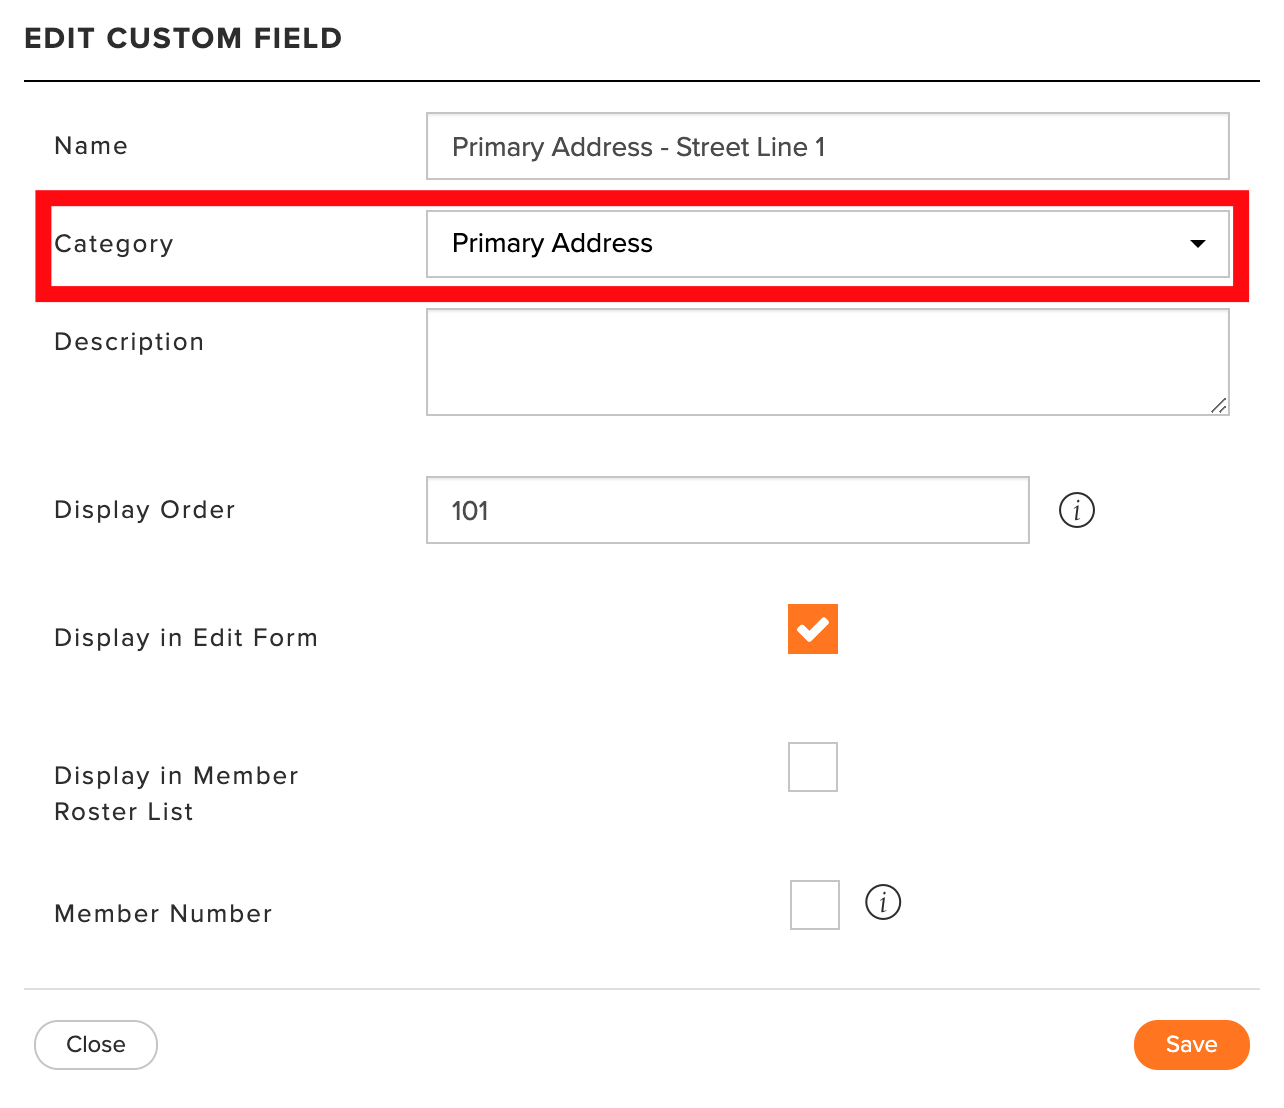
Go to Club Details > Members > Custom Fields > Edit.
Edit the Custom Field that needs to be assigned to the Drop Ship Category.
Designate the "Category" of the Custom Field to the Drop Ship Category you have created (as shown below).

Click "Save."
Repeat these steps for each Custom Field that needs to be assigned.
Note: Custom Fields added to a Drop Ship address should contain the following keywords to be displayed:
Address
City
State
Zip
Description (Nickname or location identifier)
Adding Drop Ship Addresses Manually
Suppose you do not have current address information in your member profiles. In that case, you can add Drop Ship addresses manually within a member profile or enter a special order (discussed in the next section).
When creating a Drop Ship address, you will need the member's or guest's address details (e.g., Street Address, City, State, Zip). There will also be a description line available for the address. You can use the description line to signify how the member or guest might refer to a particular address (e.g., Summer Home, Winter Home, Work, Shop).
To add a Drop Ship address manually, follow these directions:
Go to Club Details > Members
Select the Action dropdown.
Click "Edit."
Click "Add New Drop Ship Address" in the bottom bar.
Fill in the fields for the address details (as shown below).

Click "Save."
Repeat these steps for additional addresses or members.