This feature is only available with the following products:

If you use Event Registration, you can schedule email and/or text campaigns to promote your future events. This is a great way to increase event participation and revenue.
When setting up campaigns, you can do the following:
Set up custom email or text message campaign templates that include a "mini-directory" of targeted events.
Schedule email or text message campaigns to be sent to all (or some) of the members on your master roster. These campaigns can be recurring or one-time.
Schedule email or text message campaigns to be sent to all (or some) of the golfers on your event roster for a post-round/event wrap-up. These campaigns can be recurring or one-time.
Monitor campaign activity (e.g., open rate, click rate, delivery reports, etc).
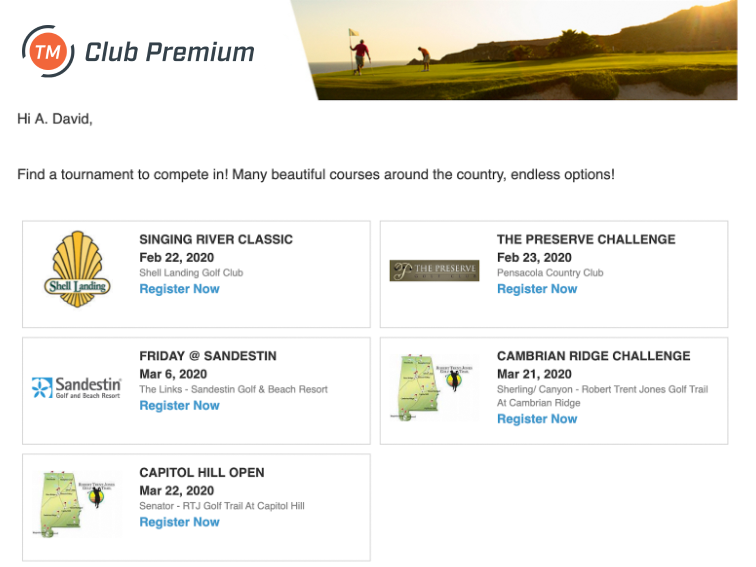
Below is an example of an email campaign.
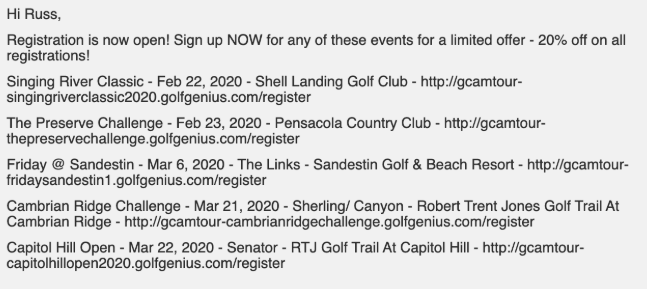
Below is an example of a text message campaign.
In this article, we will discuss how you can set up and manage campaigns.
Marketing Campaign Event Links:
When running Marketing Campaigns, you can include a mini directory of future events/leagues that you want to promote. For each event/league, a More info / Register Now link to the Event/League Portal is included. The link provided will depends on some customer registration settings:
Customer using Master Roster Registration: The link provided will be a direct link to the Event/League Portal, where players can log in with their email and password.
Customer using SSO: The link provided will be a SSO link to the Event/League Portal. Note: Customers integrated with Jonas, Northstar, and Flexscape cannot use this functionality due to limitations from their provider.
Customers without Master Roster Registration or SSO: The link provided will be a GGID link to the Event/League Portal.
Creating Email and Text Message Templates:
The content of your email and text message campaigns are created using the Email Composer and Text Message Composer. Before setting up a campaign, you will first need to create your template(s).
To create an email template, follow these instructions:
Go to Master Roster > Manage Emails > Compose Email.
Draft the email template. Some notes:
Disregard the recipient list. The recipients for your campaign will be selected when setting up the campaign later.
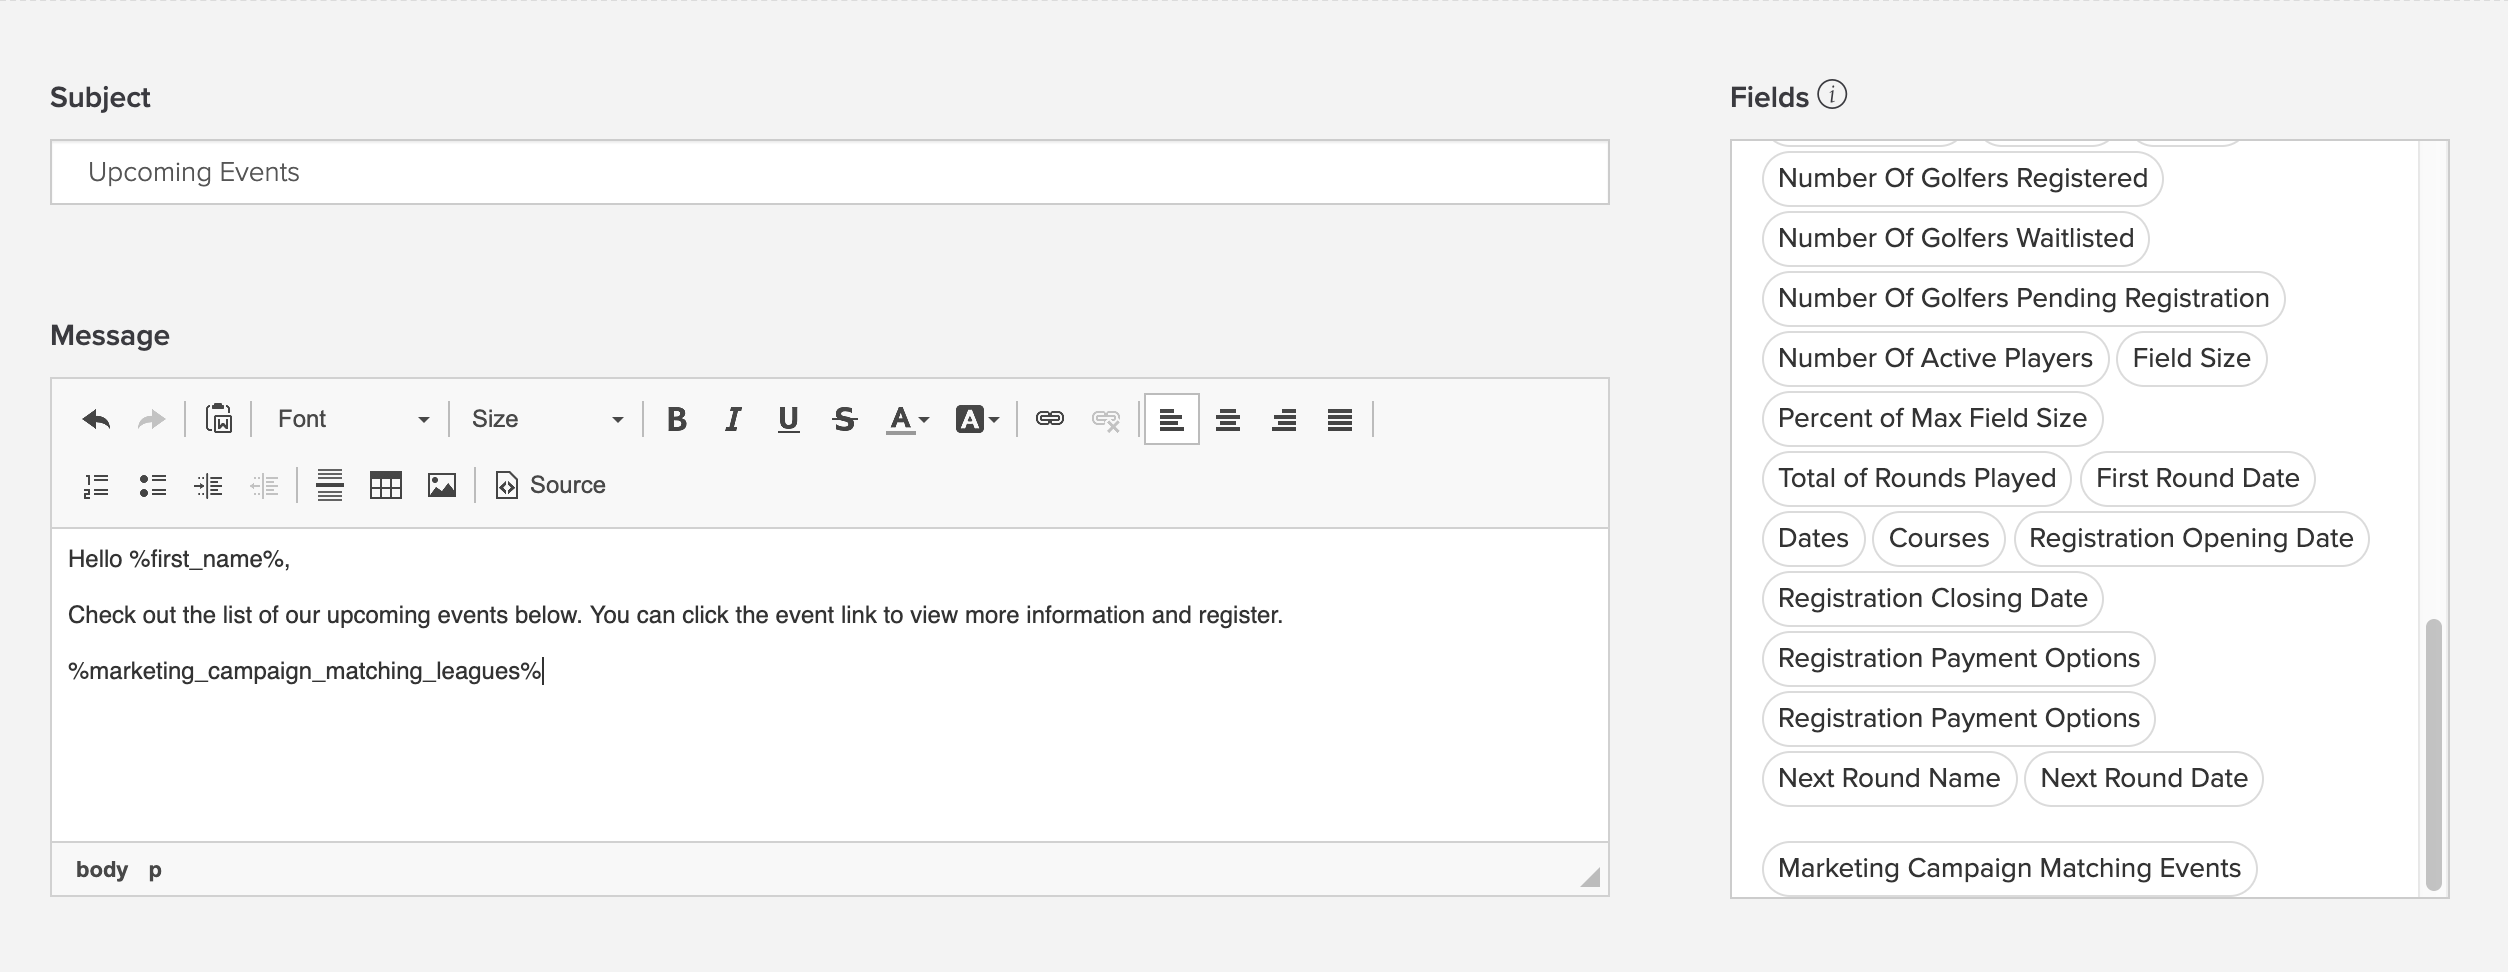
Enter the email subject and message (body of the email). By default, the mini-directory will be placed at the bottom of the email. However, if you would like the mini-directory placed in another area of the email, add the "Marketing Campaign Matching Events" data field where you would like to include the mini-directory.
Once the email template is complete, click "Save as Template".
Name the template.
Click "Save Template".
The template will then be saved. Below is an example email template.
For more details on using the Email Composer to draft templates, Click Here.
To create a text message template, follow these instructions:
Go to Master Roster > Manage Text Messages > New Text Message.
Draft the text message template. Some notes:
Disregard the recipient list. The recipients for your campaign will be selected when setting up the campaign later.
Select the field that includes the cell phone numbers.
Enter the message. By default, the link to the mini-directory will be placed at the bottom of the text message. However, if you would like the link placed in another area of the text message, add the "Marketing Campaign Matching Events" data field where you would like to include the link.
Once the text message template is complete, click "Save as Template".
Name the template.
Click "Save Template".
The template will then be saved. Below is an example text message template.

For more details on using the Text Message Composer to draft templates, Click Here.
Setting Up a Campaign:
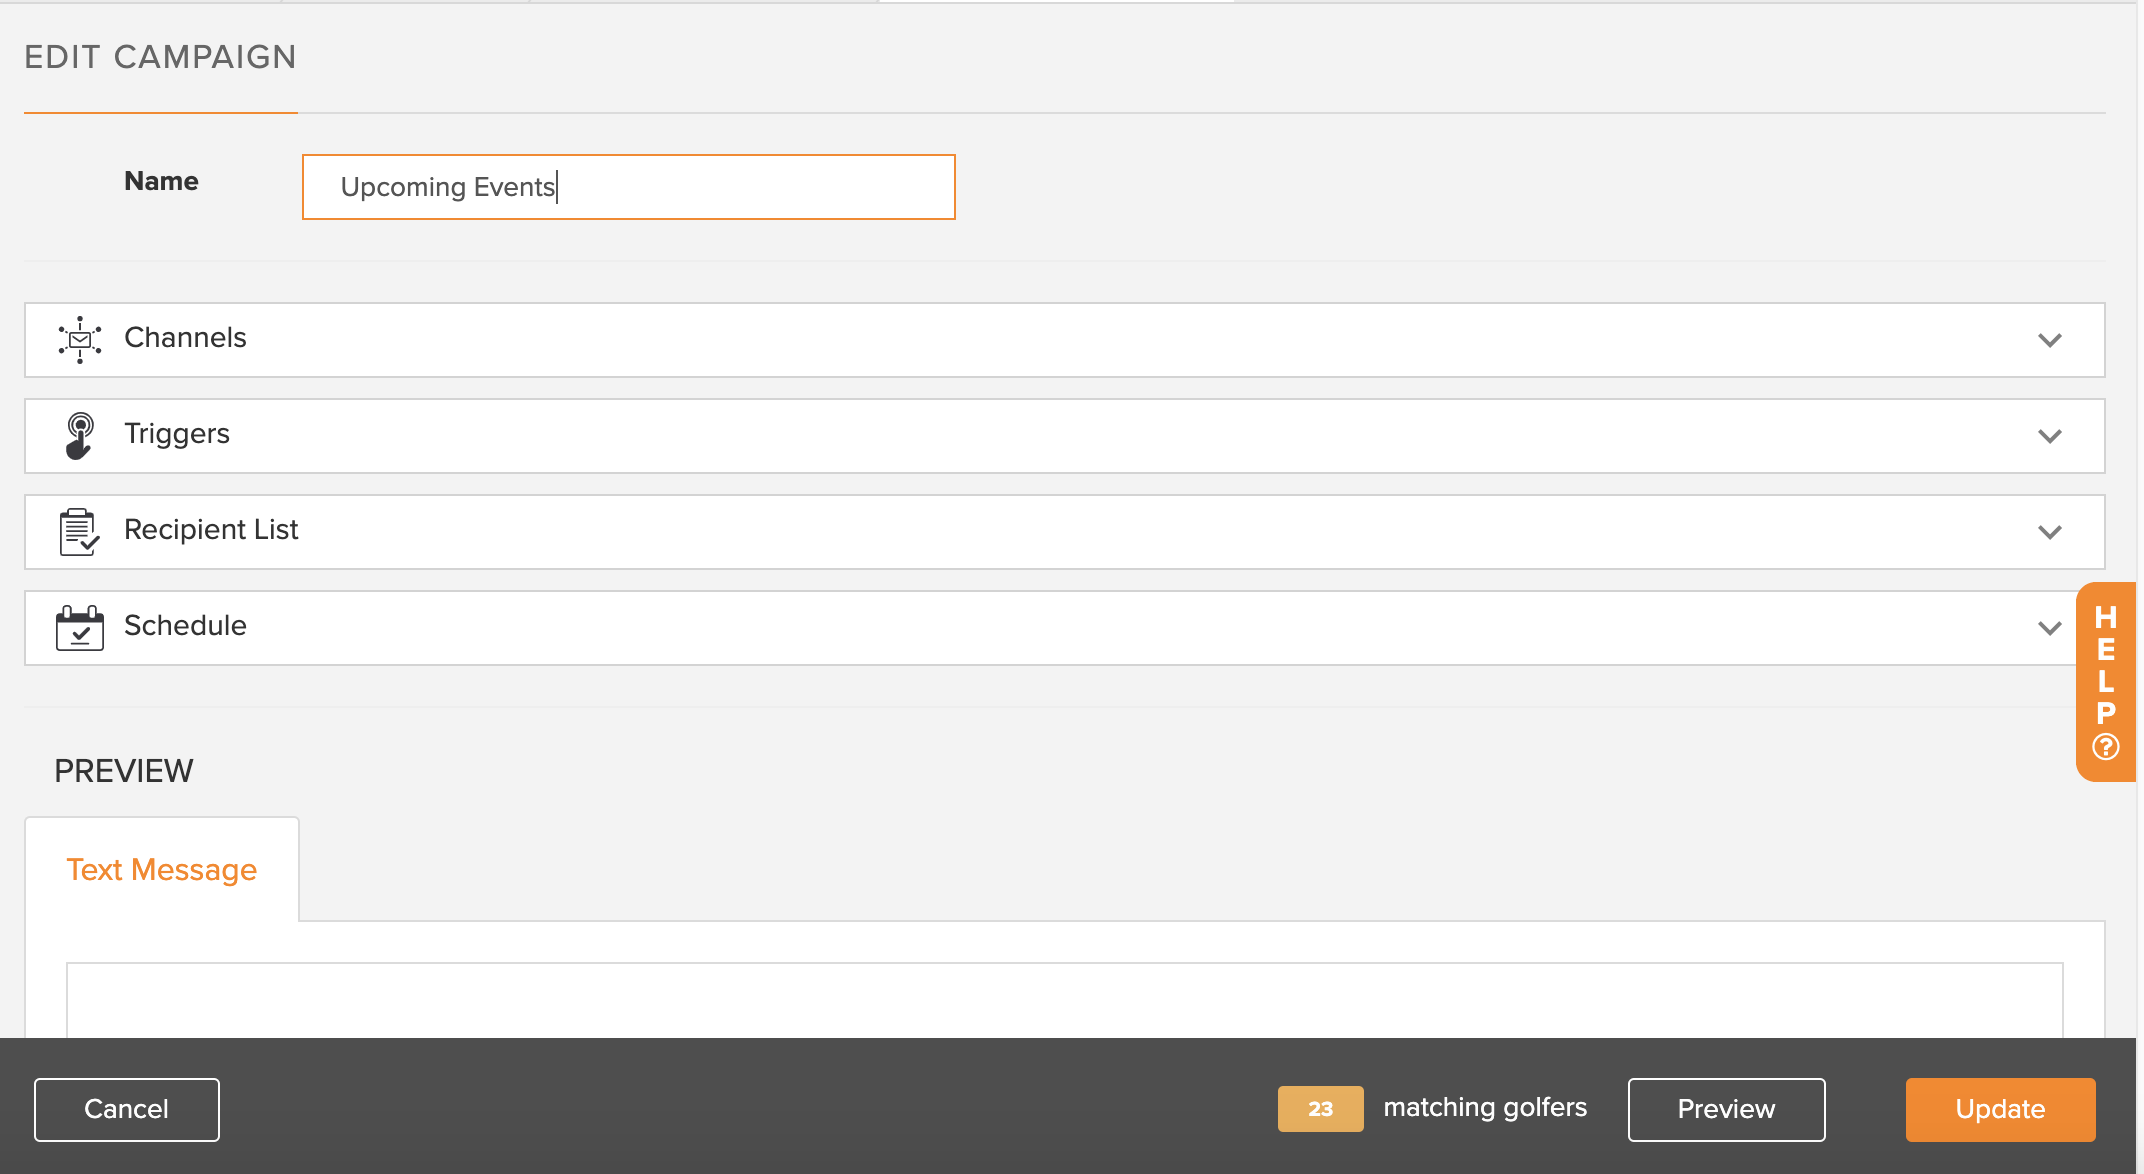
When setting up a marketing campaign, you will need to select the channels of communication, triggers that will activate the campaign, recipients, and scheduling settings (as shown below).
To set up a marketing campaign, follow these instructions:
Go to Customer Center > Master Roster > Manage Marketing Campaigns > New Campaign
Name the campaign (e.g., Upcoming Women's Events Reminder, Last Chance Registrations, etc).
Channels: Select the channels of communication (email and/or text campaign).
Email: If setting up an email campaign, you will need to select an email template created using the Email Composer. You can edit the selected template or go to "Manage Email Templates" to create a new template.
Text Message: If setting up a text message campaign, you will need to select a text message template created using the Text Message Composer. You can edit the selected template or go to "Manage Text Message Templates" to create a new template.
Triggers: Triggers represent a set of conditions that will kick start the campaign. The following triggers are available:
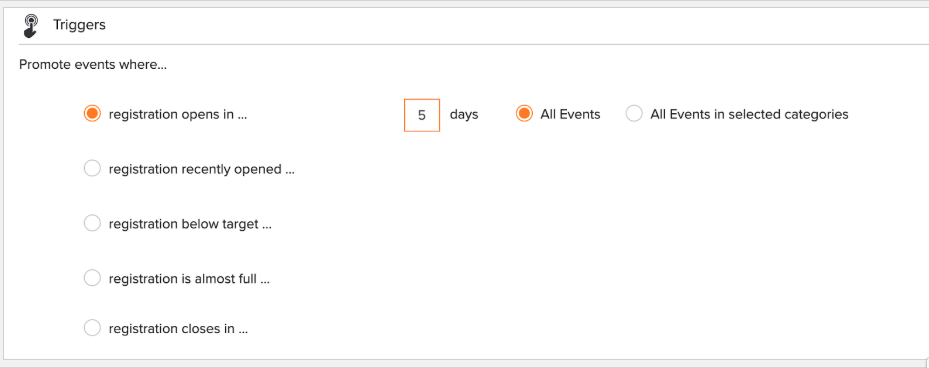
Registration opens in: Any upcoming events where registration opens in X number of days will be included in the campaign (as shown below).

You can also filter the events by category. For instance, you can focus the campaign on women by selecting the "women's" category.
Registration recently opened: Any events where registration opened in X number of days ago will be included in the campaign. You can also filter the events by category.
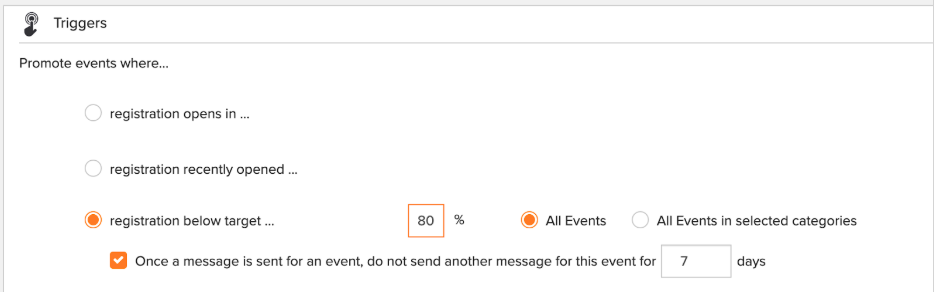
Registration below target: This trigger allows you to promote events where registration is slow. Only events with a player limit set will be used for this trigger. The roster must be filled less than the percentage entered. For instance, if 80% is the value entered (as shown below), all events where less than 80% of the player limit has been met will be included in the campaign.

Additionally, you can filter the events by category. You can also choose to exclude events that were already included in previous emails for this campaign. For instance, if Men's Opening Day was included in the campaign's previous email blast because it was below target, it can be excluded from future emails from this campaign for X number of days.
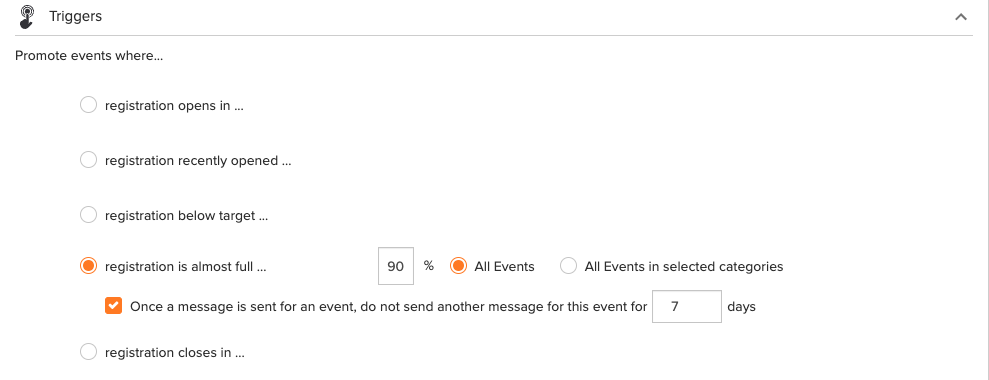
Registration is almost full: This trigger allows you to promote events where registration is almost full. Only events with a player limit set will be used for this trigger. The roster must be filled more than the percentage entered. For instance, if 90% is the value entered (as shown below), all events where more than 90% of the player limit has been met will be included in the campaign.

Additionally, you can filter the events by category. You can also choose to exclude events that were already included in previous emails for this campaign. For instance, if Men's Opening Day was included in the campaign's previous email blast because it is almost full, it can be excluded from future emails from this campaign for X number of days.
Registration closes in: Any upcoming events where registration will close in X number of days will be included in the campaign. You can also filter the events by category.
Event ended days ago (Email Template Only): This trigger allows you to promote an event after it has finished (the last scheduled round has been finalized) X number of days after the last round. For instance, if you want to send a post-event wrap-up to players that participated in a sponsored event, this trigger will automate that email. You can send to all events or filter events by category.
Round ended days ago (Email Template Only): This trigger allows you to promote an event, X number of days after a round has been finalized. For instance, if you want to send a post-round wrap-up to players that participated in an event, this trigger will automate that email after every round. You can send to all events or filter events by category.
Recipients: In the case of pre-event triggered campaigns (e.g., Registration Opened/Closes), the recipient list will include all players on the master roster except those who have unsubscribed from marketing campaign emails or text messages, registered for the selected events in the campaign, or do not have a valid email address or phone number.
In the case of post-event triggered campaigns (e.g., Event/Round ended days ago), the recipient list will include players on the event roster except those who have unsubscribed from marketing campaigns emails or do not have a valid email address.
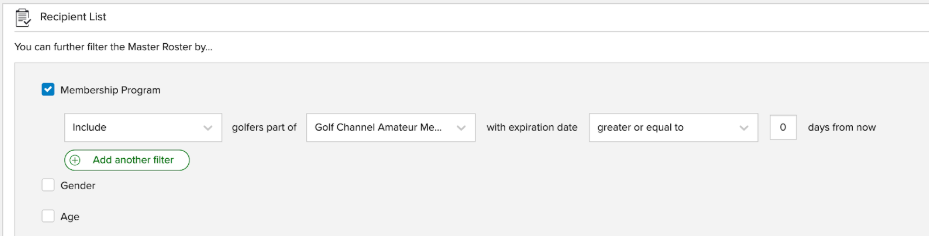
If necessary you can filter the recipient list further by one or more of the following filters:Membership Program: If using membership programs, you can filter the recipient list to include or exclude members of membership programs (as shown below).

Gender: Filter by men or women.
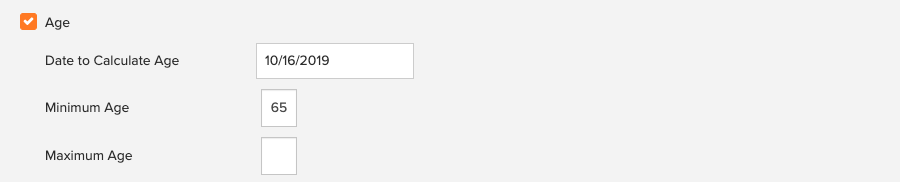
Age: Filter by minimum and/or maximum age of the recipients (as shown below).

You will also need to enter the date to calculate the age of the recipients. In order to use this filter, birthdates must be stored in the master roster.
Handicap Index: You can apply a maximum or minimum Handicap Index that must be required to qualify as a recipient (as shown below). You can also enter a maximum and minimum Handicap Index to establish a range.

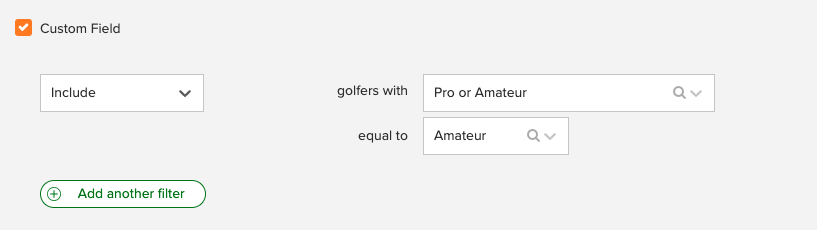
Custom Field: Filter the recipient list by one or more custom fields (as shown below). Custom fields that have a reasonable number of values to filter by will be available.

Campaign Activity: To reduce the chance of overloading marketing emails to your members, you can filter the recipient list to exclude players who have received the marketing campaign in the last X number of days.
Round Attendance (Round/Event ended days ago ONLY): Filter Event Roster recipient list on an Event Roster based on round attendance. The available options include “Confirmed Players”, “Guests”, “Waitlisted Players”, “Invited Players”, “Not in Playing Divisions”, “Players Not Attending”.

Schedule: You can schedule the campaign to be sent right now, every day, once a week, or once a month. If scheduling the campaign to be sent "right now", it may take up to an hour to send. If scheduling the campaign daily, select the time. If scheduling the campaign weekly, select the day of the week and time. If scheduling the campaign monthly, select the day of the month and time.
Click "Preview" to view a preview of the campaign below. You can also view how many players match the recipient list.
If the campaign is finalized, click "Save and Schedule" to schedule the campaign to be run. If you are not ready to schedule the campaign, click "Save". You can then come back to the campaign later to edit and schedule when ready.

Viewing and Managing Campaigns:
To view and manage your campaigns, go to Customer Center > Master Roster > Manage Marketing Campaigns (as shown below).

Your campaign list will display the following information for all of your campaigns:
Campaign running or paused
Campaign schedule
Campaign recipient total
Email or Text Message template being used
% of recipients that opened the email
% of recipients that opened the email and clicked on any links within the message.
You can also click the "Actions dropdown" for a campaign to:
Edit the campaign
View the delivery report to see if specific members received the text messages or emails
Run or pause the campaign
Delete the campaign
Unsubscribing to Marketing Emails and Text Messages:
Your members have the ability to unsubscribe to the marketing emails by clicking the "Unsubscribe" link at the bottom of any marketing campaign email (as shown below).
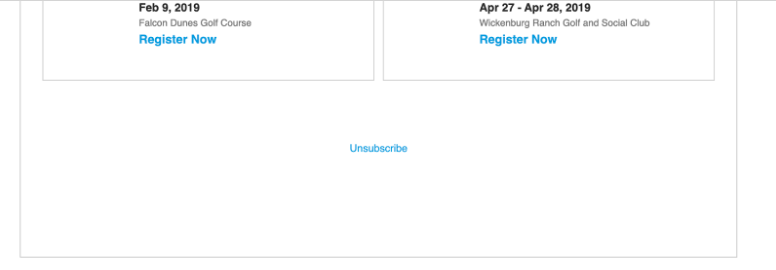
Keep in mind that if they unsubscribe from the marketing campaign emails, they will still receive non-marketing emails (e.g., Event Registration confirmations, Round Signup invites, general emails sent from the Customer Manager, etc).
Your members also have the ability to unsubscribe to text messages by replying "STOP" to the text message. Keep in mind that if they unsubscribe from text messages, they will also no longer receive any text messages sent from TM. To resubscribe, the member must reply "UNSTOP" to any TM generated text message. Click Here for more details on unsubscribing to text messages.
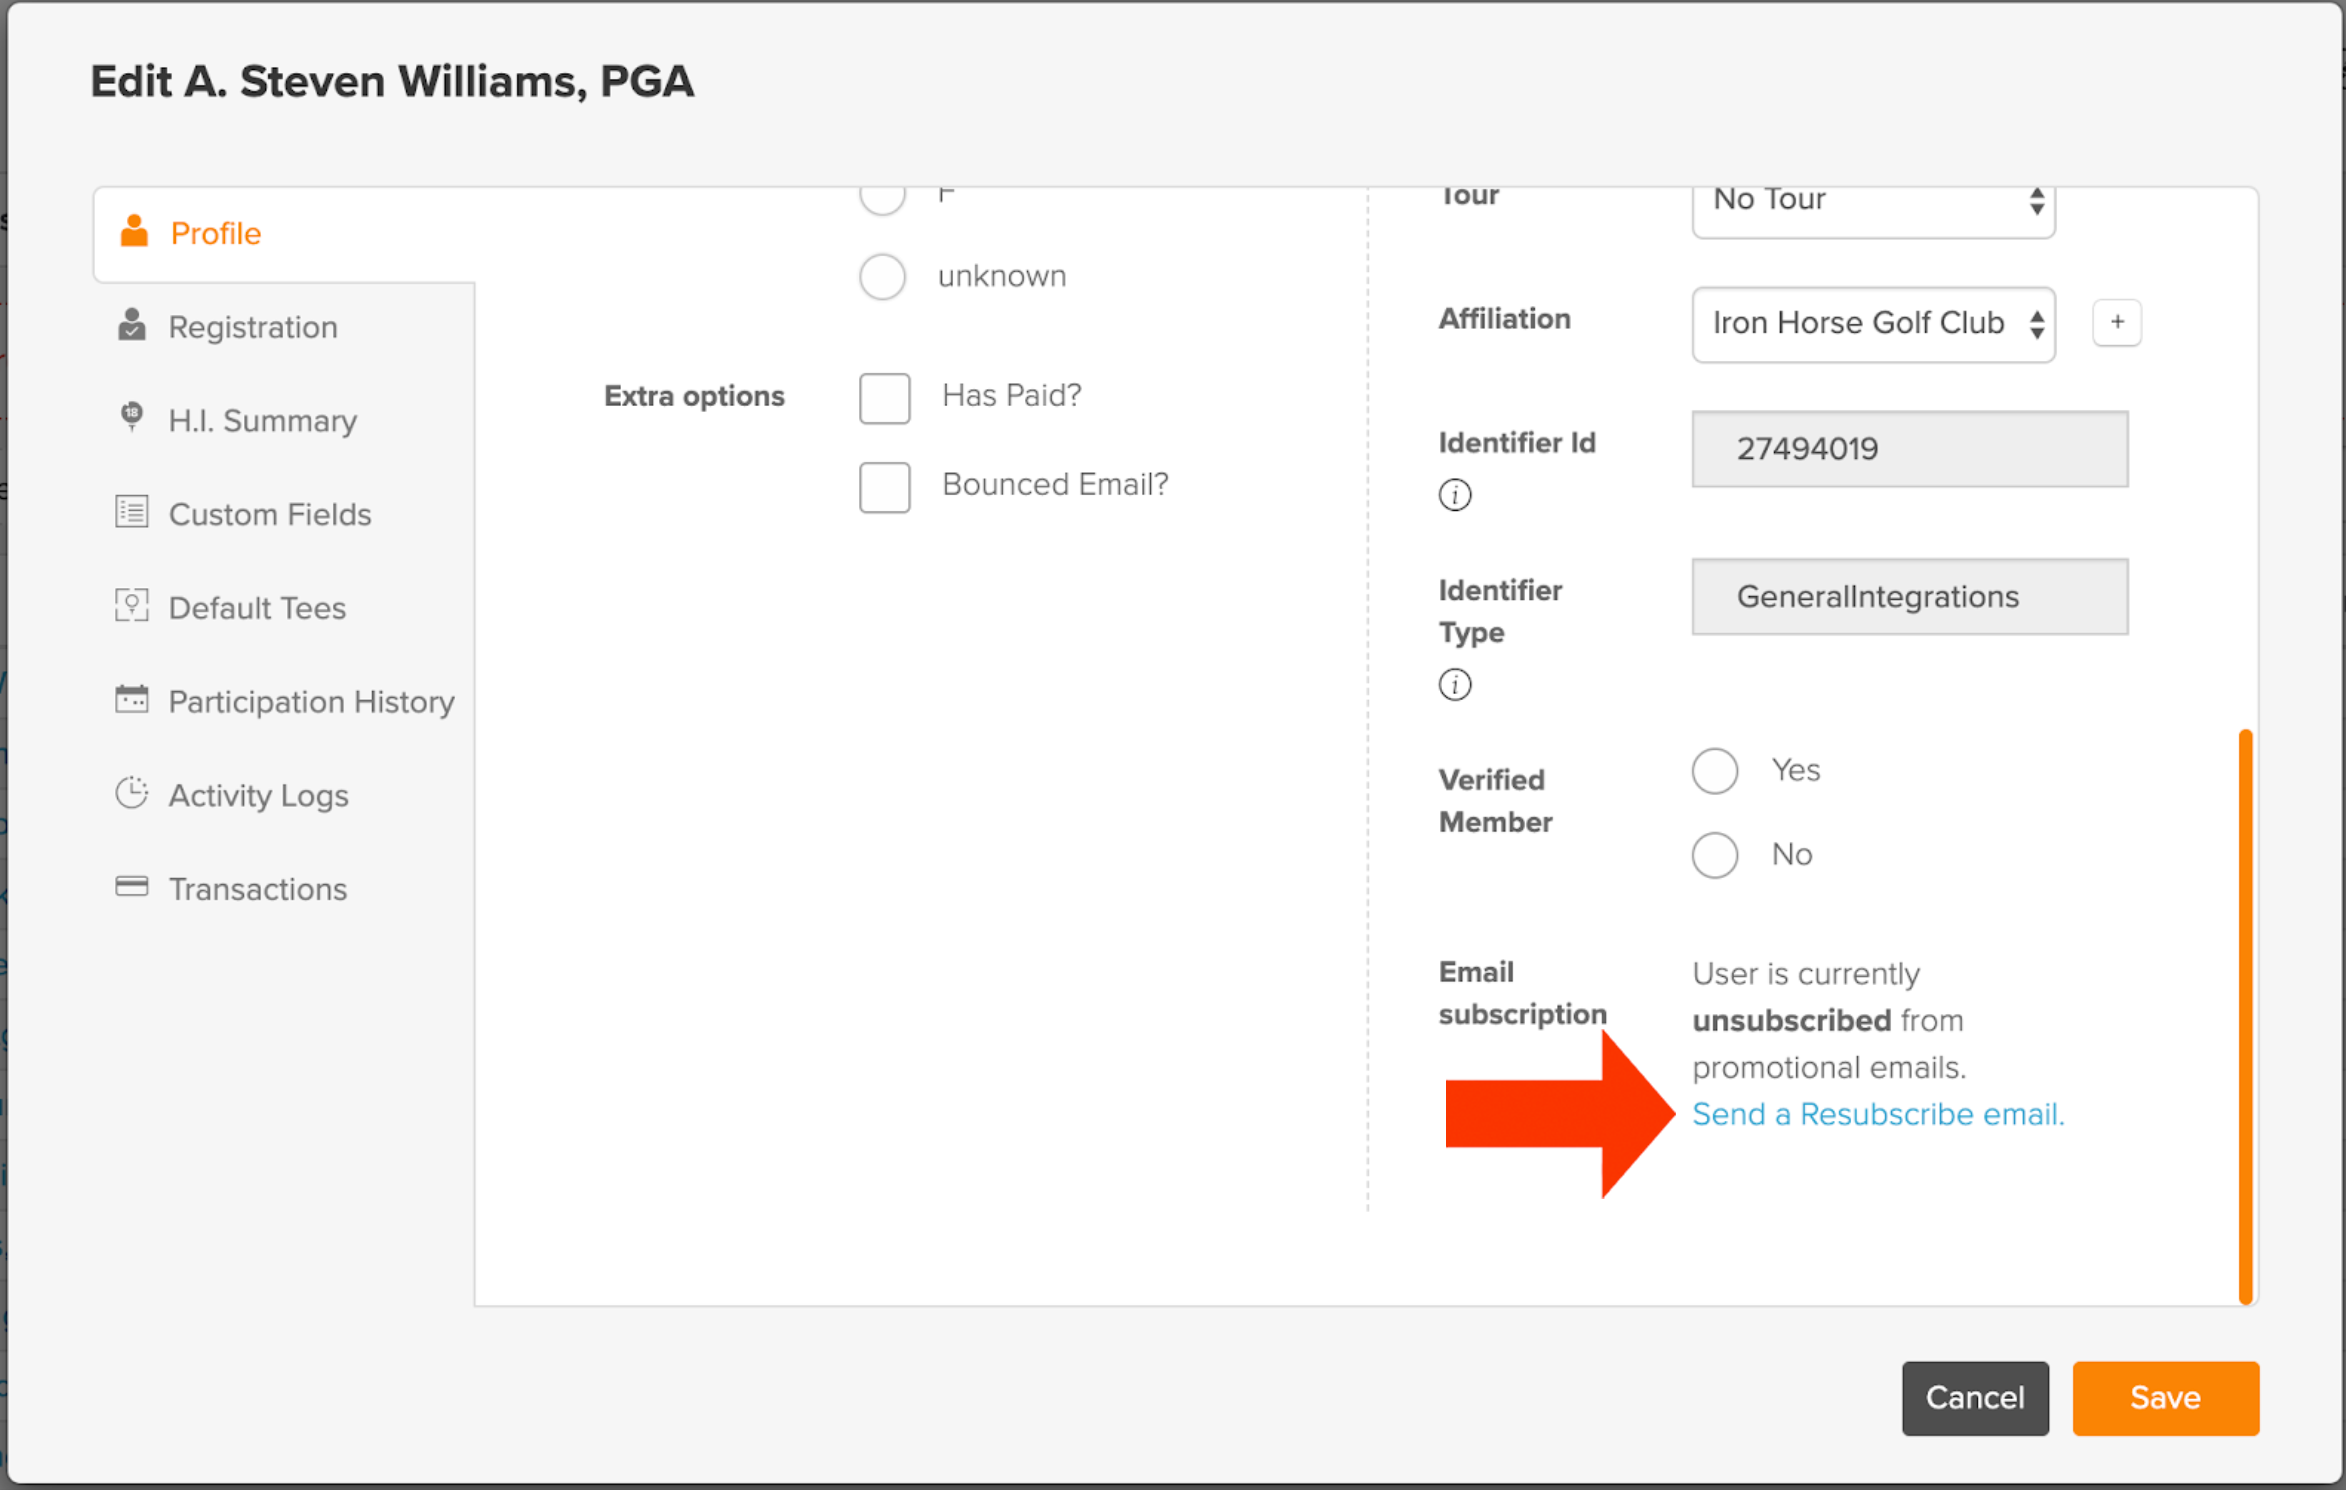
Re-subscribing Members to Marketing Emails:
As a manager, you can also send an email to members allowing them to resubscribe to marketing campaigns (both emails and text messages) by going to Customer Center > Master Roster > View Master Roster, clicking on a member, and selecting the option to "Send a Resubscribe email" (as shown below).