We understand that you use Power as your primary practice management system.
Please follow the below steps to set up Google Calendar Integration for Power Diary and then how to sync it with Avaana's Platform:
1. Setting up Power Diary with Google Calendar
1. Setting up Power Diary with Google Calendar
Google Integration will synchronize all your PPMP appointments into Google Calendar, when you remove an appointment from PPMP it will also update in Google Calendar.
IMPORTANT: We recommend first creating a new google account before proceeding & not using your personal google account.
Step 1: First open your PPMP & go to options > diary layout & color > diary times > ensure you set your current time invervals:
Example: If you have times 10:00AM, 10:15AM, 10:30AM - Then your usual intervals between these times are 15 minutes.

Step 2: Login to your google account (via www.google.com) & open the google calendar.

Step 3: Then go to settings to add a new calendar:

Step 4: Select new calendar:

Step 5: Enter in the practitioner name & any description (Repeat this process for all practitioners):

Step 6: Once you have created a calendar in your google account for each practitioner, go to PPMP > Setup > Computer Resource Usage:

Step 7: Under the Program Links tab, select activate Google Calendar Link then press OK.

Step 8: Next go to Setup > Staff.

Step 9: Select the practitioner > Go to Google Calendar tab > Refresh List
IMPORTANT: A google API confirmation will now popup in your web browser, please first check that it is linking to the correct google account and then press allow.
Step 10: From the Google Calendars drop down list in PPMP, now set the correct google calendar for the practitioner and press Rebuild Google Calendar button. (Repeat process for all practitioners)

IMPORTANT: After pressing "Rebuild Google Calendar" button, please give the process some time to migrate to the google calendar as this may take a few minutes.
Google Calendar is now successfully synced with PPMP.
Everytime you remove or add an appointment in PPMP, it will update in Google Calendar.
(Deleting an appointment from Google Calendar will not remove it from PPMP)
2. Set the Google Calendar Sharing Setting
2. Set the Google Calendar Sharing Setting
To ensure Avaana can read the Google calendar's availability and correctly block out your already booked appointments, you will need to share this calendar with our admin@avaana.com.au email address. Please follow instructions below on how to do so.
Open Google Calendar settings via: https://calendar.google.com/calendar/u/0/r/settings
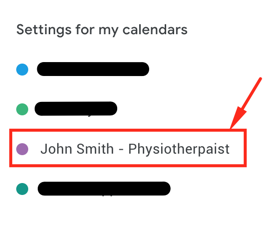
In the left side-menu under “Settings for my calendars” select the calendar you want are syncing with Avaana
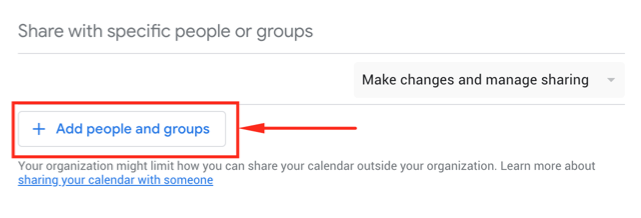
Click “+ Add people and groups” button
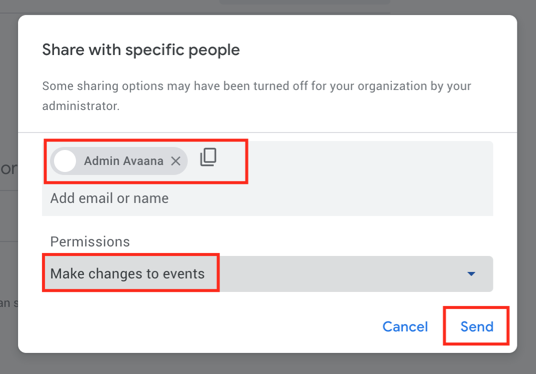
In the email field, enter admin@avaana.com.au
In the permissions field, select Make changes to events
Click Send
3. Adding the Google Calendar into Avaana
3. Adding the Google Calendar into Avaana
Now that your calendar is connected and syncing with Google, we will connect this Google calendar with the practitioner it belongs to in Avaana.
Open Google Calendar settings via: https://calendar.google.com/calendar/u/0/r/settings
In the left side-menu under “Settings for my calendars” select the calendar you want to sync
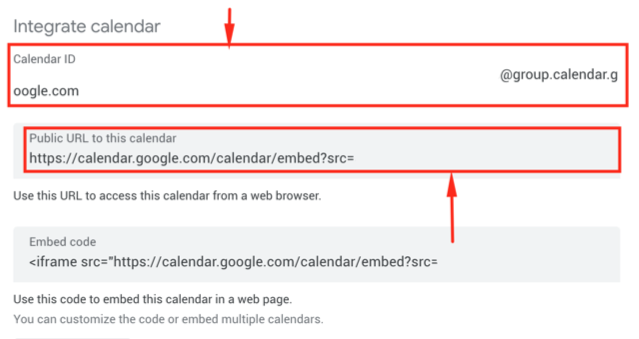
Scroll down to the heading “Integrate calendar”, this will have the Calendar ID and Public URL fields required to sync into Avaana.
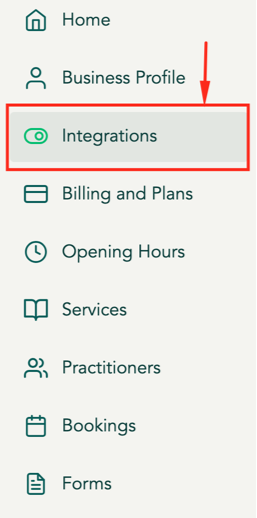
Open your Avaana provider dashboard in another tab or window, and go to the “Integrations” page
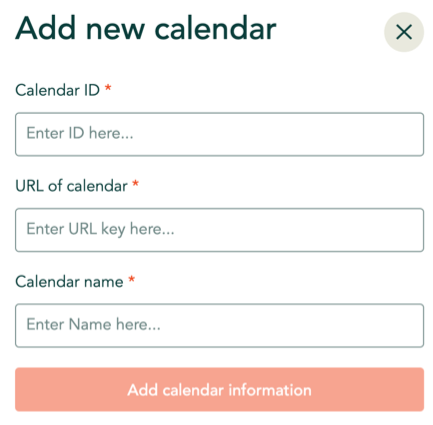
Click the “+ Add … Calendar” button in the Calendars section
A popup window will appear with the following fields
Calendar ID
URL of Calendar
Calendar Name
Copy and paste the Calendar ID from Google calendar into the Calendar ID field
Copy and paste the Public URL to this calendar from Google calendar into the URL of calendar field
Enter the practitioner’s name this calendar belongs to into the Calendar name field
Click “Add calendar information”
The calendar will now appear in the Calendars section

4. Connecting the Calendar to the Practitioner
4. Connecting the Calendar to the Practitioner
Now go into the Practitioners page of your dashboard
Select the practitioner this calendar belongs to
In the field Link calendar from Google
Select the calendar name that matches this practitioner
Click Save


If multiple practitioners work at your venue, you will need to do these steps for each practitioner.