The first step in the stock order process is entering the order information and placing it in the "Orders to Place" stage. This process can be done manually, as outlined in this article, or can be done with an AI assistant if you have a PDF of a stock order already placed by the vendor. For details about uploading a stock order with AI assistance, Click Here.
In this article, we will discuss the process for entering stock orders and creating similar stock orders.
Entering Stock Orders:
To enter a Stock order, follow these instructions:
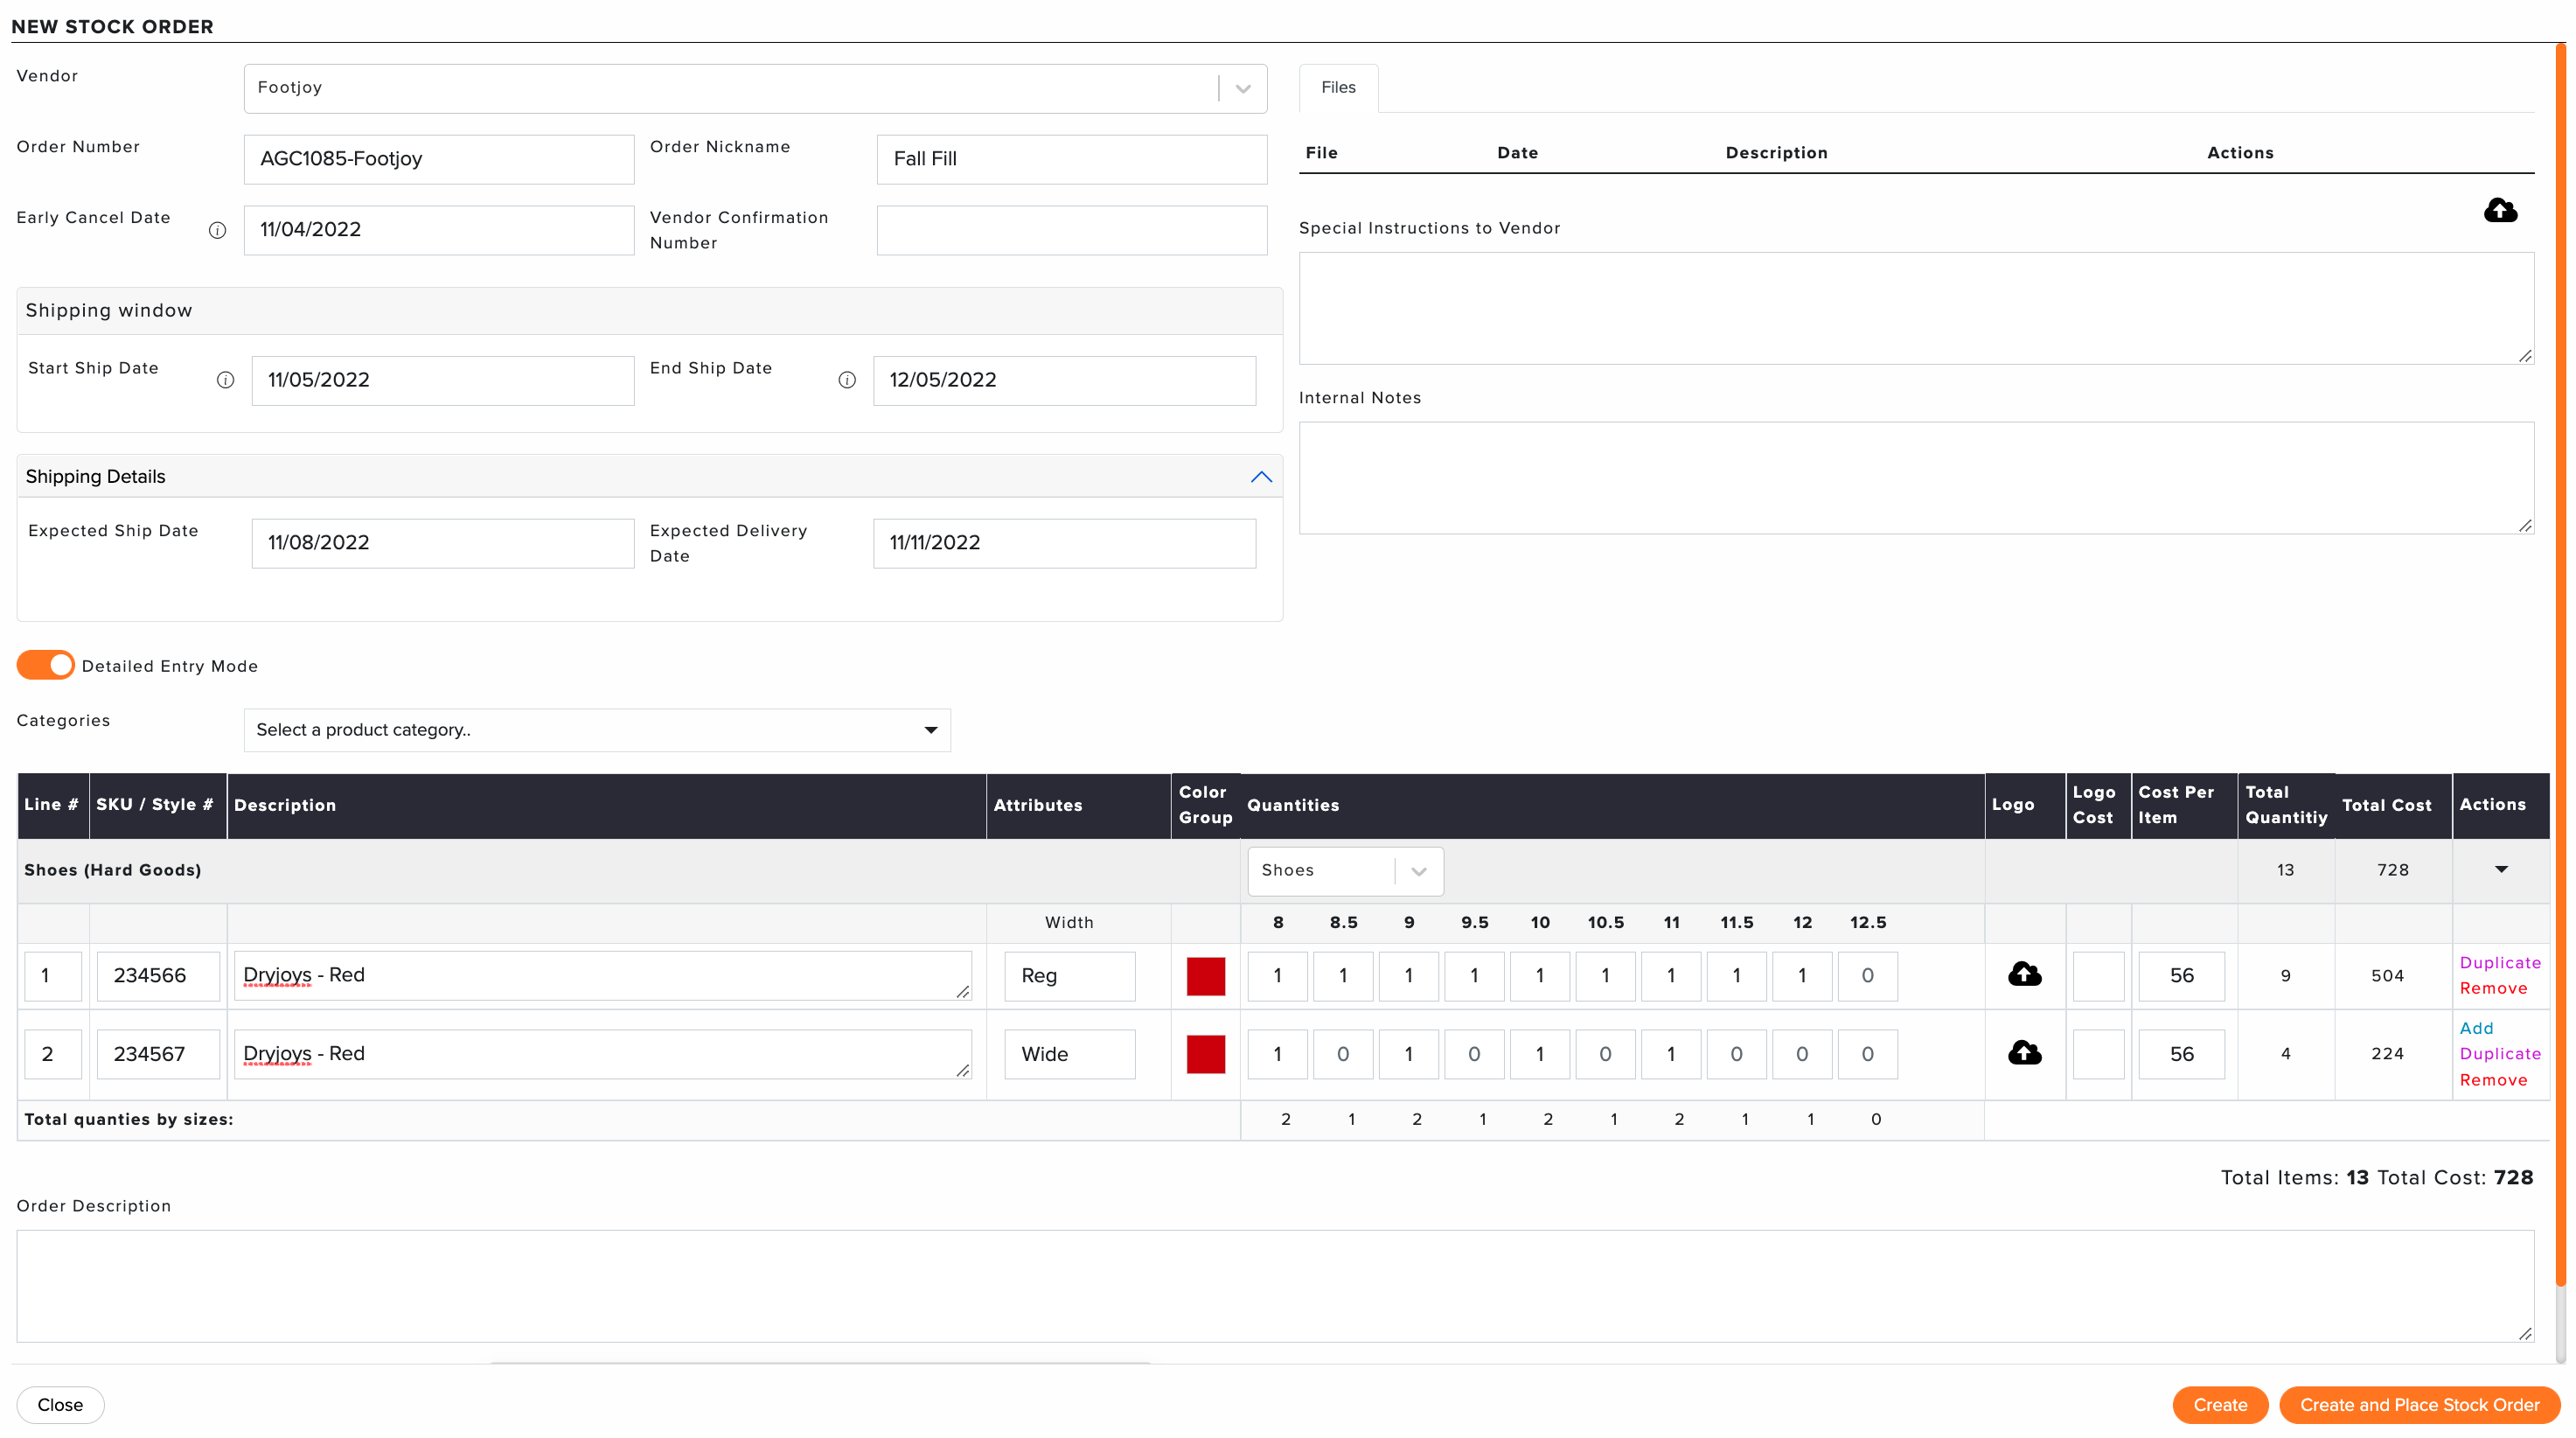
Go to Orders > Stock Orders > Dashboard > New Stock Order.
Enter or select the following stock order details:
Vendor: Select the vendor of the product being ordered.
Order Number: A new stock order will be created. You can edit the order number (if necessary).
Order Nickname: A short description of the order. For example, if it is a spring pre-order for Peter Millar, the short description might be "PM S22 Pre-Order."
Early Cancel Date: An agreed cut-off date with the vendor, which clubs can cancel on their terms.
Vendor Confirmation Number: The confirmation number provided by the vendor.
Shipping Window: A window in which an order will be delivered.
Start Ship Date: The earliest day the vendor will ship an order.
End Ship Date: The last day the vendor will ship an order. Vendors are not supposed to ship the order after this date. After this date, the order is expected to be canceled automatically without the club receiving an invoice. Usually 30 days from the start ship date.
Shipping Details: The expected ship dates.
Expected Ship Date: The date you expect an order to be shipped by the vendor.
Expected Delivery Date: The date you expect a package to arrive from the vendor.
Detailed Entry Mode: Enable or disable Detailed Entry Mode.
Quick Entry (Detailed Entry Mode Disabled): With Quick Entry mode, you can enter a line per category and include the following details per category:
Number of Items: Displayed once a category is chosen. The number of items for this category. For example, if you order 20 shoes with FootJoy, you enter 20 in the number of items.
Total Cost: Displayed once a category is chosen.The total cost of the items in that category. For example, if you order 20 shoes with FootJoy that cost $45 each, the total cost entered would be $900.
Actions: The following actions can be taken on each line:
Remove: The ability to remove a category from the stock order.

Detail Entry Mode (Detail Entry Mode Enabled): With Detailed Entry mode, you can enter multiple line items per category and include the following details per line:
Line #: Order of the items within a category. Number can be changed to reorder items.
Move Items: A sub feature of the Line # column. Allows you to move items between categories. For complete details on moving items between categories, Click Here.
SKU / Style#: Line Item SKU Number.
Description: Line Item vendor description.
Attributes: Available attributes will be displayed based on the custom form for the selected category. For details on customizing the attributes for the selected category, Click Here. Note: Any custom fields with the word "size" in the name will not be displayed in the attributes column of a stock order. If you need a size field for a stock order, utilize the Quantities column as outlined below.
Color Group: Generic color groups used for reporting purposes. For more detailed color entry, include a color custom field for the selected product category.
Quantities: Total number of items for each size you wish to order. If you have assigned a default sizing table to the selected category, the default sizing table will be displayed, otherwise, the general default sizing table is One Size. One Size allows you to enter a total quantity, or you can select one of the available sizing tables for more sizing attributes. For more details on sizing tables, assigning default tables, and creating your own, Click Here.
Logo: Select an existing logo from your logo library, or upload a new logo to be used for this order. After selecting a logo, you will have two options:
Select and Apply Logo to All Items in this Category: If selected, the logo image will apply to all items in that category.
Select: The logo image will only be applied to the item you're editing the logo for.
Logo Cost: Cost to include the logo per item.
When a Logo Cost is entered, an option to “Apply to All” will appear. If clicked, the cost entered will be applied to the other items in that category.
Cost Per Item: Item cost.
Total Quantity: Total number of items.
Total Cost: (Logo Cost + Cost Per Item) * Quantities = Total Cost
Actions: The following actions can be taken for each line:
Duplicate: Duplicating the line item within a category is available at the line level.
Remove: Available at the line level, remove the line item from the category.
Add: Available at the line level, add a new line item to a category. Available once details for the previous line item have been entered.
Remove All: Available at the category level with the drop-down. Remove the entire category and all nested line items.

Categories: The list of product categories and subcategories items fall under. All Stock orders will be organized into categories. You can add each category only once per stock order.
Order Description: A detailed description of the order. Details to include here would be SKU #'s, size runs, color, logo details, and more.
Calendar Color: The color of the order to be displayed on the Stock Order Dashboard.
Files: Add any files (e.g., logo, pictures, order confirmation, etc.) that pertain to the order by clicking "Choose File" and adding through the popup.
Special Instructions to Vendor: Enter any special instructions that need to be assigned to the order. These instructions will be sent to the vendor if placing the order via email.
Internal Notes: Enter any internal notes (only managers can view) specific to the order. The internal notes can be viewed and edited anytime during the stock order process.
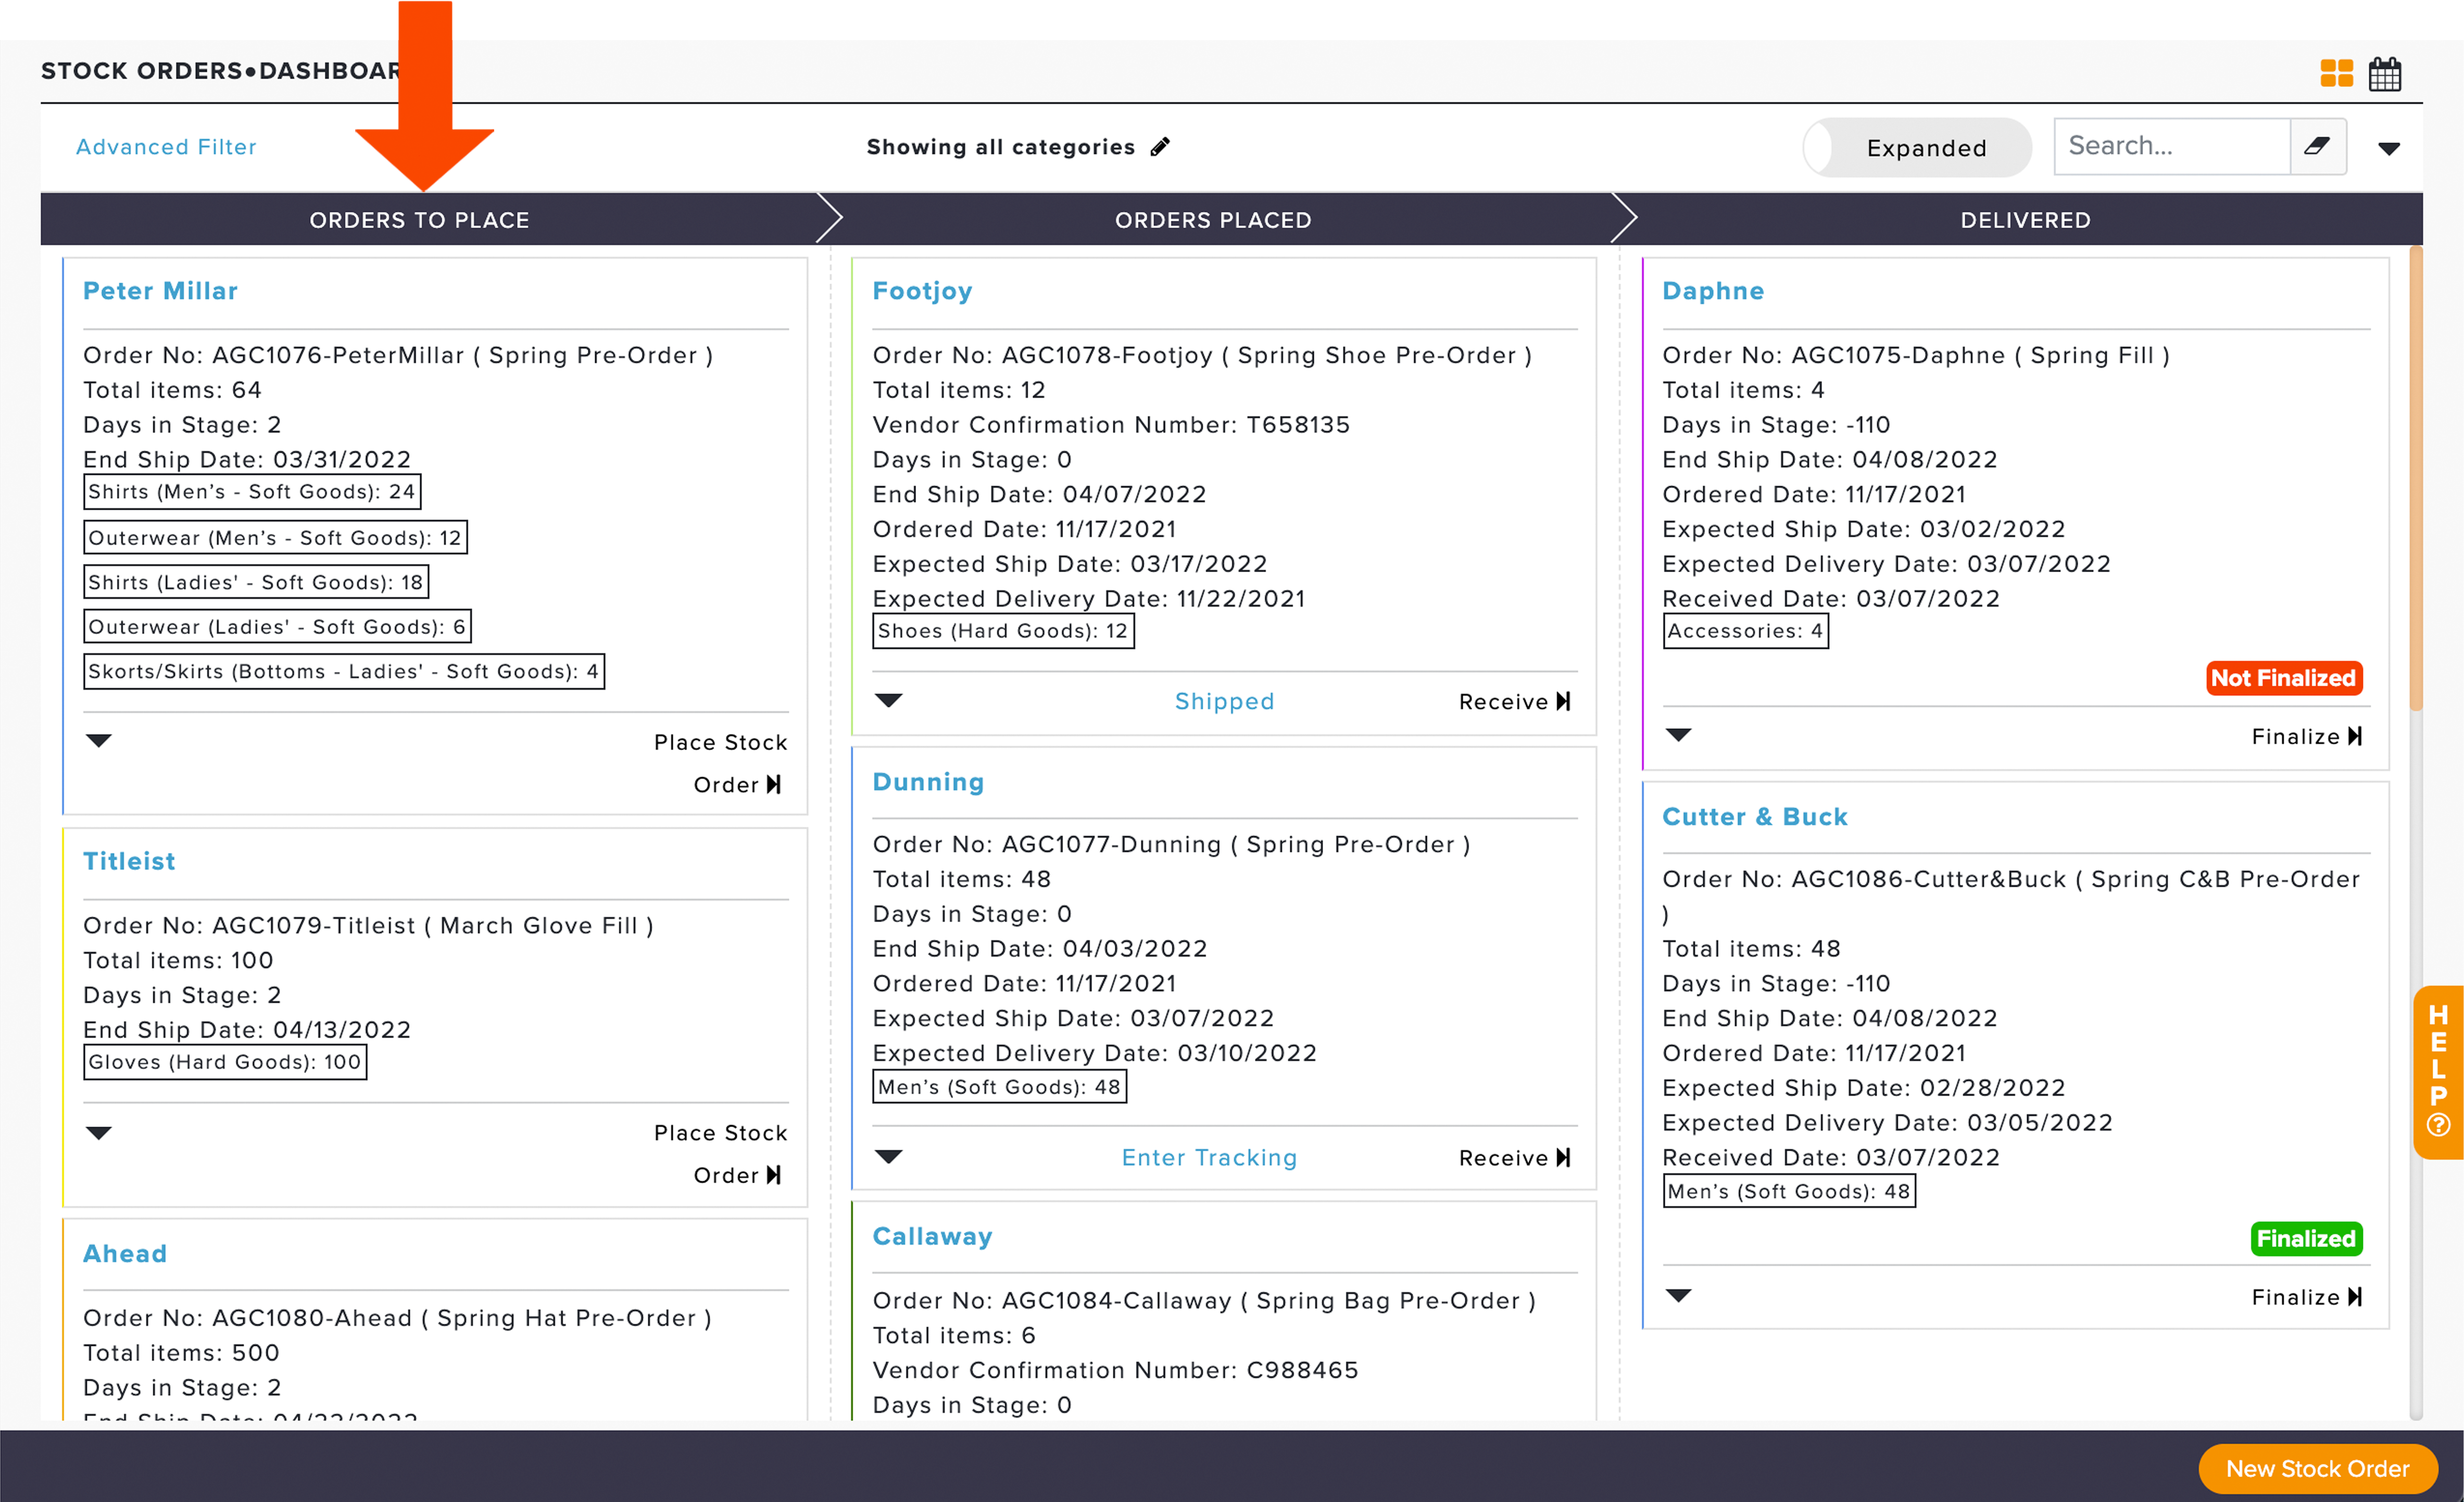
Click "Create" if you intend to wait and place the order with the vendor later. The order will then be placed in the "Orders to Place" stage (as shown below). At this stage, the information has been entered, and the stock order is ready to be placed with the vendor.

For orders you intend to place immediately, or that have already been placed, click "Create and Place Stock Order." This will take you to the place order screen. Once the order is placed, it will move from the "Orders to Place" stage to the "Orders Placed" stage on the dashboard (as shown below). For more details about placing an order, Click Here.


Entering Similar Stock Orders:
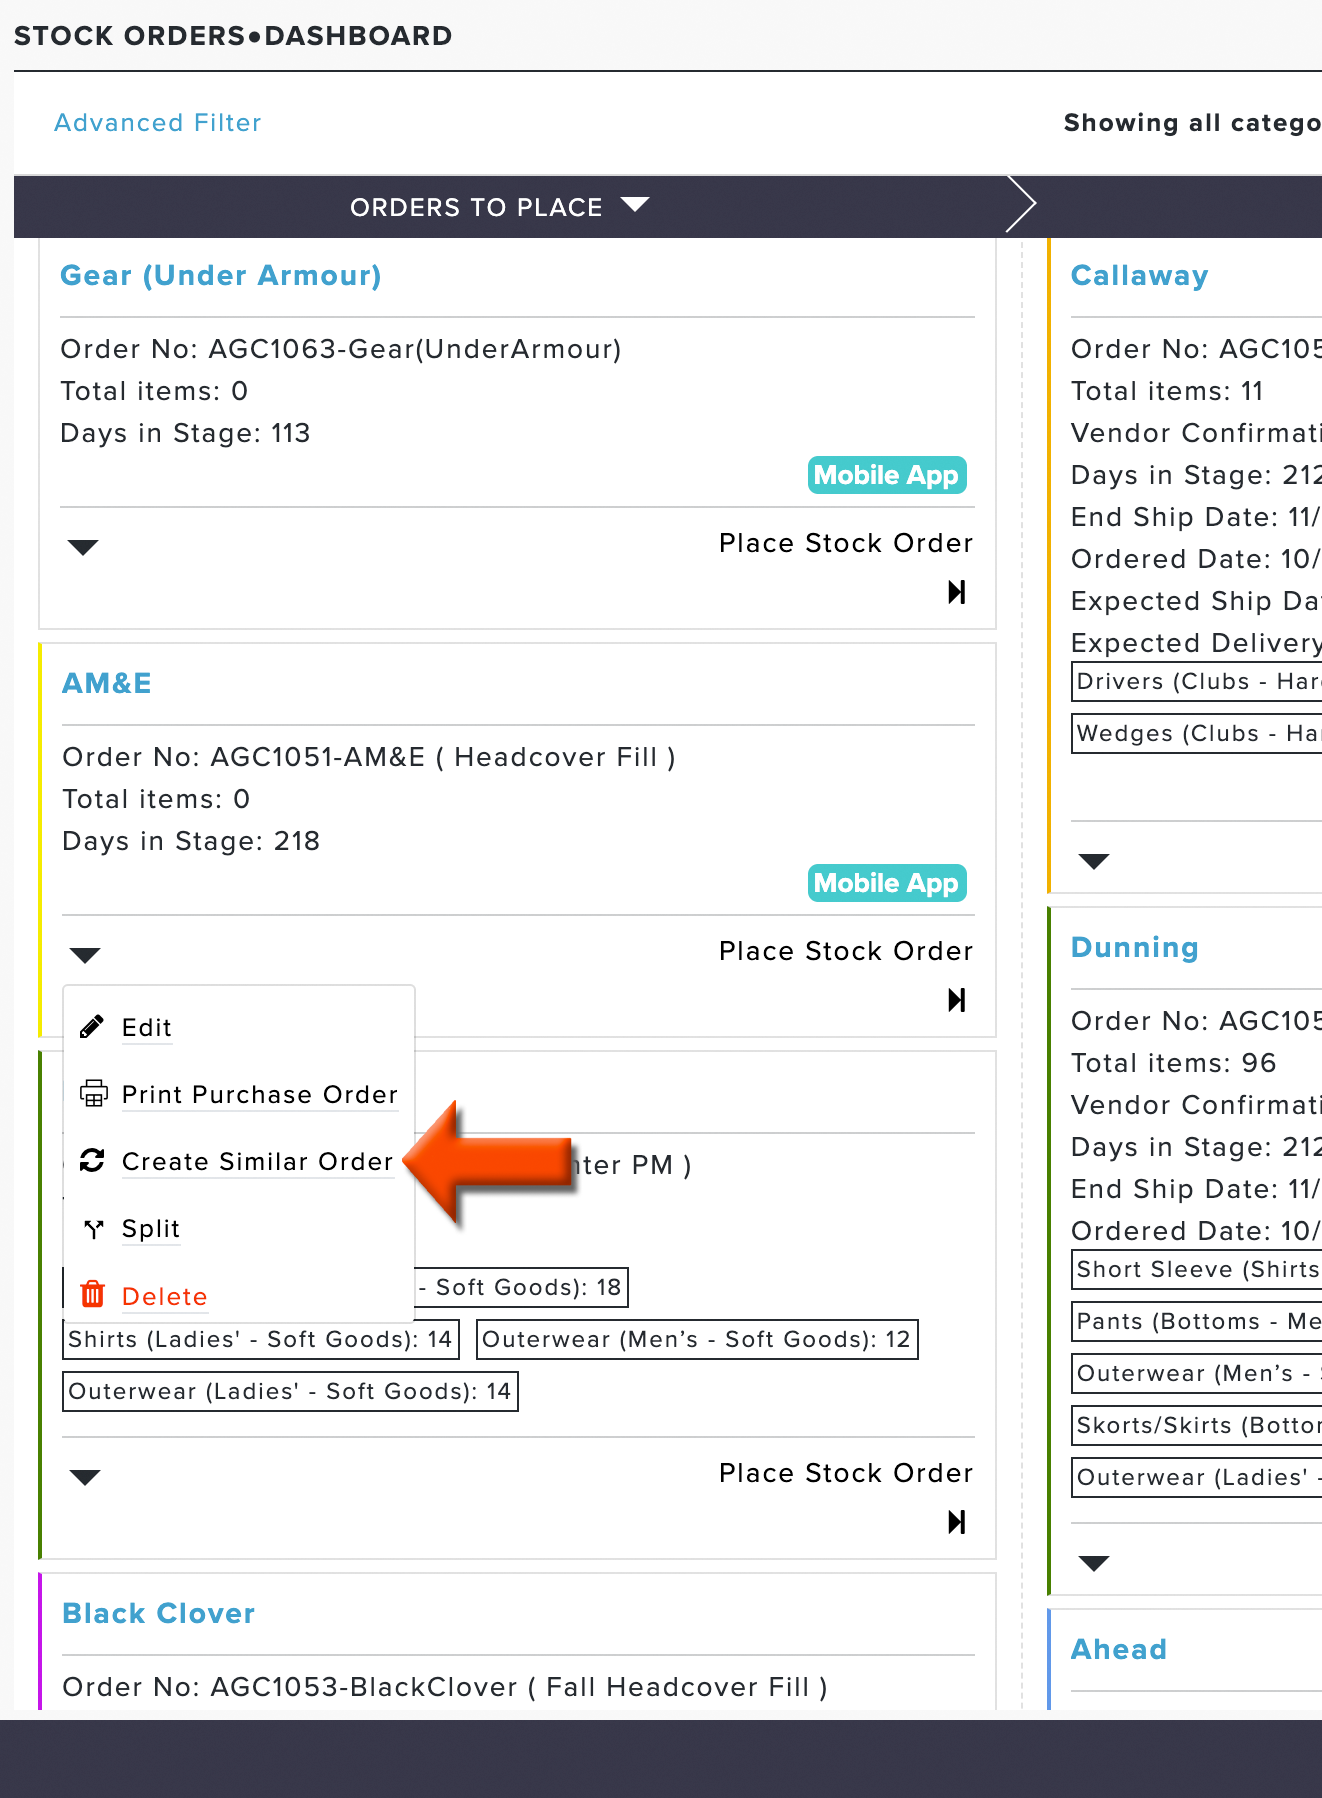
If you have an existing stock order that you would like to duplicate or create a similar stock order for, you can copy that order from the stock order dashboard. To create a similar stock order, follow these directions:
Go to Orders > Stock Orders > Dashboard.
Find the order you would like to create a similar order for, click the action dropdown, and select "Create Similar Stock Order" (as shown below).

Update the order details as necessary.
Click "Create" or "Create and Place Stock Order."