This feature is available for the following products:

Divisions are often used in events and leagues to separate players. You may want to create divisions to:
Create a tournament competition separated by Divisions: Maybe not all the players in the field compete in the same competition. Often, there may be a Senior Division, Women's Division, etc.
Create pairings separated by Division: Group players on the tee sheet by division. Maybe have the Senior Division tee off first, followed by the Regular Division.
Assign Divisions to a Round: Group the players by division, and choose playing division(s) for the round (Rounds > Choose Playing Divisions).
You can alternatively create flights to accomplish the two scenarios above. However, both have advantages and disadvantages. To help you determine if you should create divisions or flights, Click Here.
In this article, we will discuss how to create and manage divisions. To watch a short instructional video instead, Click Here.
Accessing Divisions
There are two locations to manage divisions, each having a different use:
Event/League Divisions: If the division(s) are used for the entire league or event, go to Golfers > Divisions/Flights/Teams.
Round Divisions: If the division(s) are only used for a specific round within a multi-round event, go to Rounds > Round Divisions/Flights/Teams. (Note: For one-round events, go to Golfers > Divisions/Flights/Teams). You will see that an "All Golfers Division" is automatically created for you. This includes all the players in your event and league.
Adding New Divisions
To add a new division, click "Add New Division" (as shown below).

You will then have several methods of creating division, divided into two groups:
Can select one or more: These options can be used as a single criterion or in conjunction with other criteria.
Single selection only: These options can not be used in conjunction with other criteria.
Creating Division using Single Selection Only
You can use any of these options individually to create a division:
Manual
Copy division
By Course used in Pairing
By Handicap Index/Playing
By Gender
By Age
Using a custom field
In this section, we will cover creating divisions using each of these options separately to create a division.
Add New Division Manually
When selecting this option, you can manually create divisions by choosing the player names one at a time. To create a division manually, follow these instructions:
Select "Manual"
Name the division.
Click "Next."
Select the players to be placed in the division.
Click "Save" (as shown below).

Now you can select which player will be part of the division (as shown below).

After selecting the player part of the division, click "Save" to create the division.
Repeat these steps to create additional divisions manually.
Copy Division
If you already have a division created and would like to copy it to create another, follow these instructions:
Select "Copy Division."
Name the new division.
Select where to copy the division from. It can either be a division from:
Event/League: If selecting this option, define the following:
Select the Event/League Division
Select Specific Round (round division): If selecting this option, define the following:
Select a specific round.
Select Division in the Selected Round.
Click "Next" to create the division.

Creating Division(s) By Course Used in Pairings
When using this option, you can automatically create divisions by the courses used in pairings. This option is only available after pairings have been created in one round. Otherwise, it will be disabled.
To create divisions by course used in pairings, follow these instructions:
Select "By Course used in Pairings."
Select the round to use the pairings to determine the courses.
Enter the name of the division based on the course.
Click "Next" to create the divisions.

Creating Division(s) By Handicap Index
When using this option, you can automatically create divisions by player Handicap Indexes. When using this option, you will first need to determine which round the Handicap Indexes will be based on (as shown below):

First Round: If set to First Round, the first value from the golfer's Past Rounds Summary in the member profile is used (as shown in the example below).

Current Round: If set to Current Round, the value from Current H.I.™ on the member profile is used for division matching (as shown below).

Notes:
If First Round is selected but a golfer has no past rounds recorded in their Past Rounds Summary, the system assigns the players Current Handicap Index to that golfer for the purposes of division matching.
When the event has no rounds defined, the First Round option is displayed but disabled, and the Current Round is selected automatically.
After selecting which round the handicaps will be based on, you can decide which method you want to utilize to determine how the divisions will be created (each option is discussed in greater detail below):
By entering the number of golfers per division
By entering the number of divisions (optional max Index per division)

Number of Golfers per Division
To create divisions by Handicap Index by entering the number of golfers per division, follow these instructions:
Select "By Handicap" drop-down.
Choose "By Handicap Index."
Enter the number of golfers you'd like to be in each division (as shown below). They will be split as evenly as possible.

Click "Next."
Rename the divisions and change the number of players in any of the divisions, if necessary (as shown below).

Note: If there are players who have the same Handicap Index, and you would like them placed in the same division, check the box "Players having the same Handicap Index® should be placed in the same division." When this box is not checked, and players have the same Index, they are split between divisions based on the order in which they were added to the roster.Click "Next" to create the divisions.
Number of Divisions
When creating divisions by Handicap Index, you can select the number of divisions to create, and the system will automatically distribute players as evenly as possible. You will also have an additional option to:
Specify the maximum Handicap Index for a division. When choosing this option, you can also:
Automatically re-fill the division when adding golfers or updating Handicap Indexes in the event roster. Note: Auto-refill of divisions can be set up before players are in your roster. As players are added, the divisions will be updated accordingly.
To create divisions by Handicap Index by entering the number of divisions, follow these instructions:
Select "By Handicap" drop-down.
Choose "By Handicap Index."
Enter the total number of divisions you'd like to have created (as shown below). This will determine how many players will be assigned to each division.

Optionally select the following:
I would like to specify the maximum Handicap Index for each division: This option allows you to enter the maximum Handicap Index for every division, establishing a Handicap Index range.
I would like divisions to automatically re-fill when adding golfers or updating handicap indexes in the Event Roster: This option allows the system to automatically re-fill divisions when adding golfers or updating handicap indexes in the event roster (as shown below).

Click "Next."
If you are entering the Maximum Handicap Index for every division, enter the values on the right and rename the divisions, if necessary, on the left (as shown below). Also, you can set an autofill end date so the division stops autofilling after a specific date.

If you did not select the option to enter the Maximum Handicap Indexes, change the division names and division sizes, if necessary (as shown below).

Note: If there are players who have the same Handicap Index, and you would like them placed in the same division, check the box "Players having the same Handicap Index® should be placed in the same division." When this box is not checked, and players have the same Index, they are split between divisions based on the order in which they were added to the roster.Click "Next" and The divisions will then be created after following the prior instructions (as shown below).

Once divisions are created, you will have several actions that you can take:
Edit Division Settings: To modify an existing Division Set, click the pencil icon directly to the right of the Division Set's name. When selecting this option, all other available functions are temporarily hidden. After updating the division creation settings and saving the new settings, the division is automatically refilled. This refill process ensures that all golfers are accurately updated and assigned in accordance with the new configuration criteria. Note: This is identified by the blue pencil.
Show/Hide All Boundaries on Leaderboard: Show or hide the Leaderboard boundaries (the parameters that define the divisions) for every division in the group at once.
Auto Fill Report: To review how the divisions were created, you can print the "Auto-Fill Report," which is discussed later in this article.
Refill: Manually force a refill for the division using the original fill method.
Disable/Enable Auto-Refill: When creating the division, if you specified the maximum Handicap Index for each division. You can enable/disable auto-refill division when adding golfers to the roster or updating Handicap Indexes in the event roster.
Delete: Delete all divisions associated with the fill method. Note: This is identified by the red trash can.
Creating Division(s) By Playing Handicap
Using this option, you can automatically create divisions by players Playing Handicaps from certain tees.
When using this option, you can automatically create divisions by players Playing Handicaps. When using this option, you will first need to determine which round the Playing Handicaps will be based on (as shown below):

First Round: If set to First Round, the first round a player participated in will be used to determine their Playing Handicap.
Current Round: If set to Current Round, the round with the next upcoming date will bsed used to determine their Playing Handicap.
Notes:
If First Round is selected but a golfer has no past rounds recorded in their Past Rounds Summary, the system assigns the Current Playing Handicap to that golfer for the purposes of division matching.
When the event has no rounds defined, the First Round option is displayed but disabled, and the Current Round is selected automatically.
After selecting which round the handicaps will be based on, you can decide which method you want to utilize to determine how the divisions will be created (each option is discussed in greater detail below):
By entering the number of golfers per division
By entering the number of divisions (optional auto-fill)
Number of golfers per division
To create divisions with Playing Handicaps by entering the number of golfers per division, follow these instructions:
Select "By Handicap" drop-down.
Choose "By Playing Handicap."
Select which round it will be based on.
Define the following:
Set Course and Default Tee:
Select the course to determine the Playing Handicaps to create divisions. If the players have default tees assigned, you can use the "Default Tee" for the course.
Define the hole selection.
Select the tee to be used to determine the Playing Handicaps for all of the players. (Note: If you have selected the "Default Tee" course, this selector will not be available.)

Enter "Handicap Allowance Adjustments":
% golfers with no gender set
% F/M gender

Player's Custom Tees / Match Course Tees to Player Tees (Player's Custom Tees vary based on the information in your roster):

Enter the number of golfers you'd like to be in each division (as shown below). They will be split as evenly as possible.

Click "Next"
Rename the divisions and change the number of players in any of the divisions, if necessary (as shown below).

Note: If there are players with the same Handicap Index and you would like them placed in the same division, check the box "Players having the same Playing Handicap™ should be placed in the same division." When this box is not checked, and players have the same Index, they are split between divisions based on the order in which they were added to the roster.
Click "Next" to create the divisions.
Number of Divisions
When creating divisions by Playing Handicap, you can select the number of divisions to create, and the system will automatically distribute players as evenly as possible. You will also have two additional options;
Specify the maximum Playing Handicap for a division. When choosing this option, you can also:
Automatically refill the division when adding golfers or updating Handicap Indexes in the event roster. Note: Auto-refill of the division can be set up before players are in your roster. As players are added, the divisions will be updated accordingly.
To create divisions with Playing Handicaps by entering the number of divisions, follow these instructions:
Select "By Handicap" drop-down.
Choose "By Playing Handicap."
Select when it will be based on.
Define the following:
Set Course and Default Tee:
Select the course to determine the Playing Handicaps to create divisions. If the players have default tees assigned, you can use the "Default Tee" for the course.
Define the hole selection.
Select the tee to be used to determine the Playing Handicaps for all of the players. (Note: If you have selected the "Default Tee" course, this selector will not be available.)

Enter "Handicap Allowance Adjustments":
% golfers with no gender set
% F/M gender

Player's Custom Tees / Match Course Tees to Player Tees (Player's Custom Tees vary based on the information in your roster):

Enter the number of divisions you'd like created (as shown below). This will determine how many players will be assigned to each division.

Optionally select the following:
I would like to specify the maximum Playing Handicap for each division: This option allows you to enter the maximum Playing Handicap for every division, establishing a Playing Handicap range for every division.
I would like divisions to automatically refill when adding golfers or updating handicap indexes in the Event Roster: This option allows the system to automatically refill divisions when adding golfers or updating handicap indexes in the event roster (as shown below).

Click "Next."
If you are entering the Maximum Playing Handicap for every division, enter the values on the right and rename the divisions, if necessary, on the left (as shown below)

If you did not select the option to enter the Maximum Playing Handicaps, change the division names and division sizes, if necessary (as shown below).

If there are players with the same Course, select whether you'd like them placed in the same division or separated into different divisions. If separated, ties are determined by the order in which they were added to the roster.Click "Next."
The divisions will then be created (as shown below).

Once divisions are created, you will have several actions that you can take:
Edit Divisions Settings: To modify an existing Division Set, simply click the pencil icon that appears directly to the right of the Division Set's name. When selecting this option, all other available functions are temporarily hidden. After updating the division creation settings and saving the new settings, the division is automatically refilled. This refill process ensures that all golfers are accurately updated and assigned according to the new configuration criteria. Note: This is identified by the blue pencil.
Show/Hide All Boundaries on Leaderboard: Show or hide the Leaderboard boundaries (the parameters that define the divisions) for every division in the group at once.
Disable/Enable Auto-Refill: When creating the division, if you specified the maximum Playing Handicap for each division, you can enable/disable auto-refill division when adding golfers to the roster or updating Handicap Indexes in the event roster.
Refill: Manually force a refill for the division using the original fill method.
Auto Fill Report: To review how the divisions were created, you can print the "Auto-Fill Report," which is discussed later in this article.
Delete: Delete all divisions associated with the fill method. Note: This is identified by the red trash can.
Creating Division(s) By Gender
You can create divisions by the gender of the players on the roster. To use this option, you must enter the gender for all your players. To create a division by gender, follow these instructions:
Select "By Gender."
Enter the name of the division.
Select the gender to include in the division. Note: All player will need a gender defined in their profile, otherwise they will not be added to the M/F divisions.
If adding more divisions, click "Add Another Division" and repeat steps 2 and 3 above.
Click "Next" to create the divisions.

Creating Division(s) By Age
You can create divisions based on players' ages and genders on the roster. To use this option, the date of birth for all your players must be entered in the player roster if it hasn't already been done. Otherwise, it will be disabled.
To create a division by age, follow these instructions:
Select "By Age."
Select the date to calculate the age. This is the cut-off date to determine the player's age.
Enter the name of the division.
Select the age range for the division.
If adding more divisions, click "Add Another Division" and repeat steps 3 and 4 above.
Click "Next" to create the divisions.

Create Division(s) Using a Custom Field
If you have a custom field that defines the division(s), you can use it to generate divisions instantly. To do this, follow these instructions:
Select "Using a Custom Field."
Select the custom field.
Click "Next," and the divisions will then be created.

Creating Division Using Multiple Criteria
Divisions can also be created using multiple selections. When creating divisions using multiple criteria, at least 2 options must be selected. The following option can be used to create a division with multiple criteria selection:
By Handicap Index/Playing
By Gender
By Age
Using a custom field
A few examples of creating divisions with multiple criteria:
Age and Gender: When selecting age and gender, you can create multiple divisions by specific age and gender (as shown below).

Playing Handicap and Gender: When selecting Playing Handicap and gender, you can create multiple divisions, with specific Playing Handicaps and genders (as shown below).

When creating the divisions, you can also auto-fill the division (as shown below). When creating the divisions, you will have two options:
No, fill manually: If you wish to refill divisions, you must do it manually. More details on refilling divisions are available later in this article.
Yes, fill automatically: When selected, divisions will automatically be refilled based on your defined criteria. The auto-fill can be enabled/disabled manually. You can find more details on manually enabling or disabling later in this article.
Further, you can also set an AutoFill End Date. Once set, auto-fill will be disabled, and you must manually enter the divisions after that date.

After creating the division(s) by multiple selections, the divisions are displayed and grouped under the same tab (as shown below).

Once divisions are created, you will have actions that you can take:
Edit Division Settings: To modify an existing Division Set, click the pencil icon directly to the right of the Division Set's name. When selecting this option, all other available functions are temporarily hidden. After updating the division creation settings and saving the new settings, the division is automatically refilled. This refill process ensures that all golfers are accurately updated and assigned according to the new configuration criteria. Note: This is identified by the blue pencil.
Show/Hide All Boundaries on Leaderboard: Show or hide the Leaderboard boundaries (the parameters that define the divisions) for every division in the group at once.
Refill: Manually force a refill for the division using the original fill method.
Disable/Enable Auto-Refill: When creating the division, you can enable/disable auto-refill division when new golfers are added to the roster. Note: If you would like to set an autofill end date, do so when creating or editing the division, as outlined in the first bullet point.
Delete: Delete all divisions associated with the fill method. Note: This is identified by the red trash can.
Changing Division Name(s)
After initially creating a division, you can always go back and change the name. To do this, click "Edit Name" (as shown below), change the name, and click "Save."

Show/Hide Division Boundaries on the Leaderboard
Each division can display its boundaries on the Leaderboard once the round is complete — for example, a handicap range ("Max. H.I.: 12"), an age range ("Min. Age: 18"), gender ("Gender: M"), or a custom field answer. This helps players and viewers understand how a division was defined.
Boundaries are shown on the Leaderboard only when all of the following are true:
The division has boundaries configured, based on how it was created.
The Show Boundaries option is enabled for that division.
The round's status is set to Completed.
If any of these conditions is not met, the division's boundaries are not shown on the Leaderboard. Note: Divisions without configured boundaries, such as a manually created "All Golfers" division, will not show a Show/Hide Boundaries option, since there is nothing to display.
To show or hide a division's boundaries, follow these directions:
Navigate to Golfers > Divisions/Flights/Teams (or Rounds > Round Divisions/Flights/Teams for round-specific divisions).
Click on one of the following options:
Individual Divisions: Click the Show/Hide Boundaries on Leaderboard button next to the division you'd like to update to display it for all divisions in the set (as shown below).

Note: This setting is shared across linked divisions. Updating it on an event division updates every round, and updating it on a round division updates the event and other rounds too. A division that isn't linked to any others only affects itself.All Divisions in a Group Set: To show or hide boundaries for every division in a group at once, click the Show All Boundaries on Leaderboard button next to the division group. Once all divisions in the group are showing boundaries, the button switches to Hide All Boundaries on Leaderboard.

When you sync divisions (Sync All D/F/T) on the Round Divisions page, any divisions copied over from the event will start out matching that division's current boundary display setting.
Once enabled, division boundaries also appear on the Portal, TV Display, and TV Shows pages (when the %division.name% field is used in a header or footer text box).
Ordering/Sorting Divisions
When multiple divisions are created, you can establish a division order. The division order controls the following:
The scheduling order of the divisions on the tee sheet (if pairings are organized by division).
The tournament leaderboard order (if multiple divisions are used in a tournament).
Dropdown menu on the player portal page.
To change the order, go to Manage Divisions/Flights/Teams and use the elevator bars to drag and drop the order (as shown below).

Changing Division Membership
After divisions are created, you can manually add or remove players from divisions, if necessary. This is often needed when changes occur after the initial creation of the divisions.
This can be done by going to Divisions/Flights/Teams > Manage Division Membership (as shown below).

The players and their currently selected divisions will be listed on the division table (as shown below).
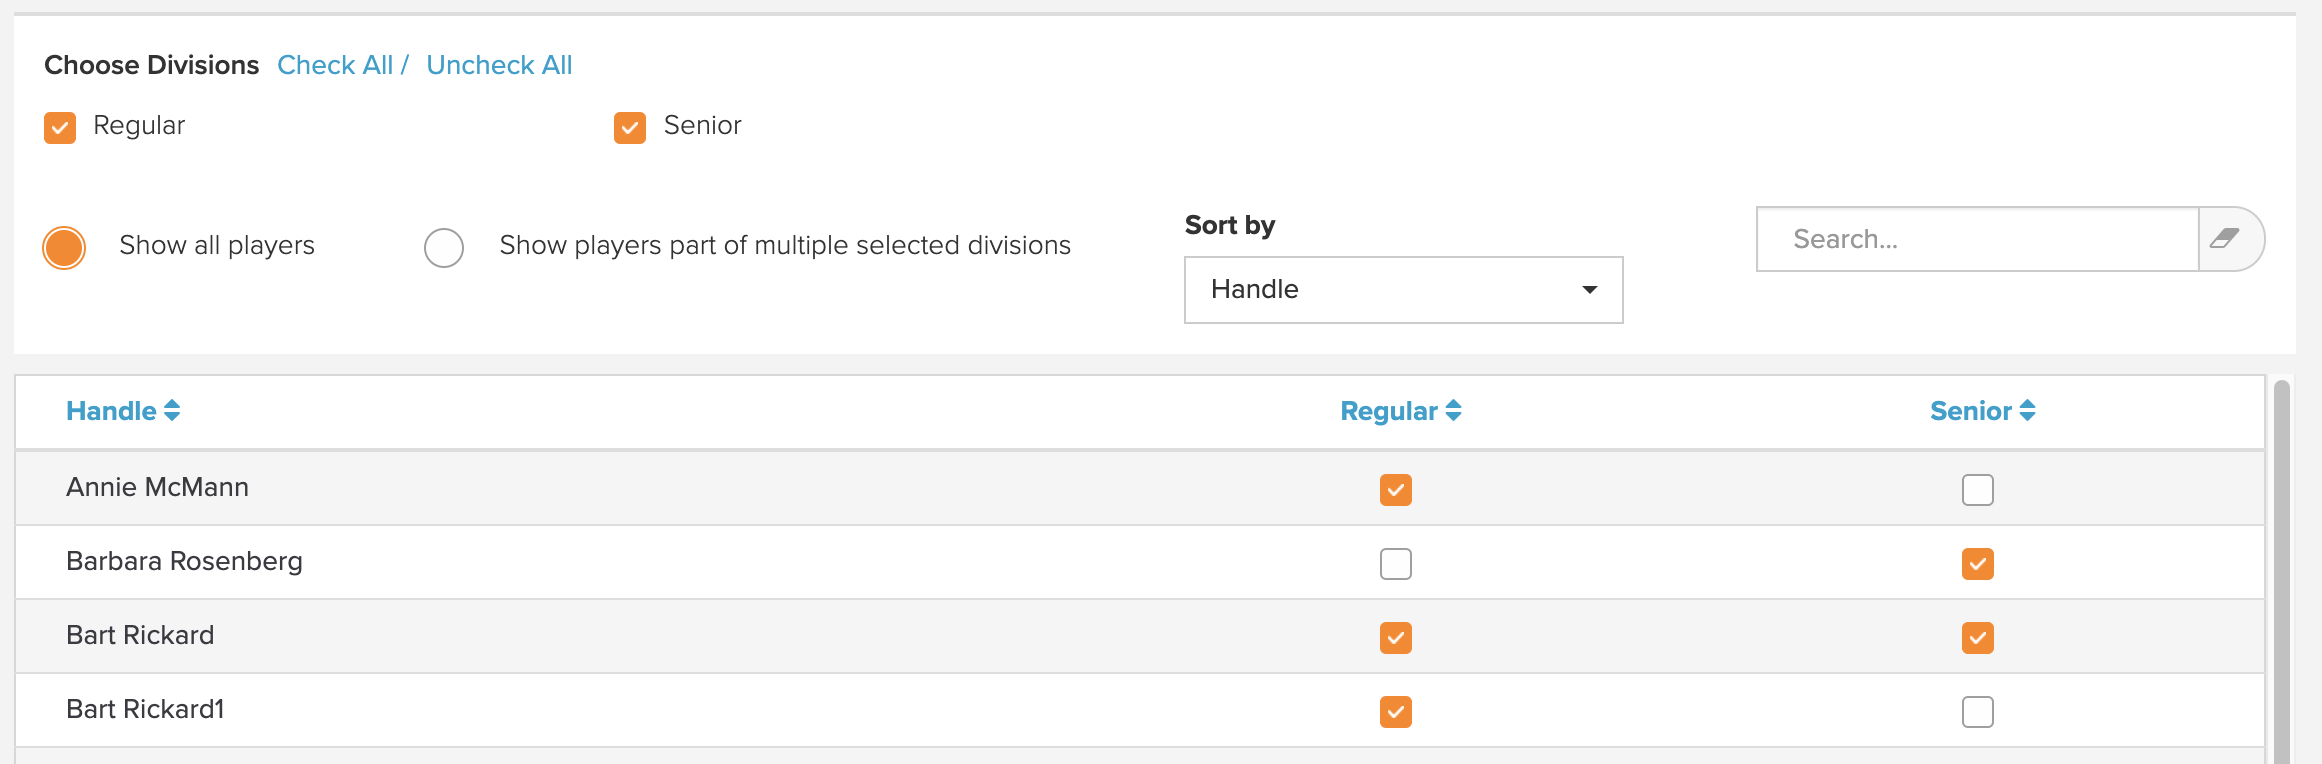
You can change their division membership by selecting or deselecting their divisions. At the top, you can:
Select the division(s) to manage membership
Display all players or only players part of multiple divisions
Select a player sort method
Search for a specific player
After making division membership changes, click "Done" to save them.
Choose Playing Divisions (For A Round)
Sometimes a league will have multiple divisions, and only a specific division should be allowed to participate in the round. When you choose a playing division or multiple divisions for a selected round, only those players will be added to the "Round Roster." Furthermore, any round communication will be sent only to players in the selected divisions.
Enable/Disable Auto-Refill of Division(s)
If you have divisions that can be auto-filled based on the selected criteria, you can enable/disable the auto-refill of these divisions.
To do this, click "Enable/Disable Auto-Refill" (as shown below). When new golfers are added, the divisions will be refilled if enabled; if disabled, they will not be refilled.

Refill Division(s)
If you have divisions that were initially created using an auto-fill option (e.g., by Playing Handicap, Handicap Index, etc.), you can re-fill these divisions if there have been changes. For instance, you may have added new players to your roster at the last minute and need to refill the divisions to include them.
To do this, click "Re-fill" (as shown below) and repeat the auto-fill process.

If you run a weekly league, create the division using Playing Handicap or Handicap Index, and after every handicap index update you re-fill the flight, this can quickly be done using our Automatic Re-Fill feature. For more details, Click Here.
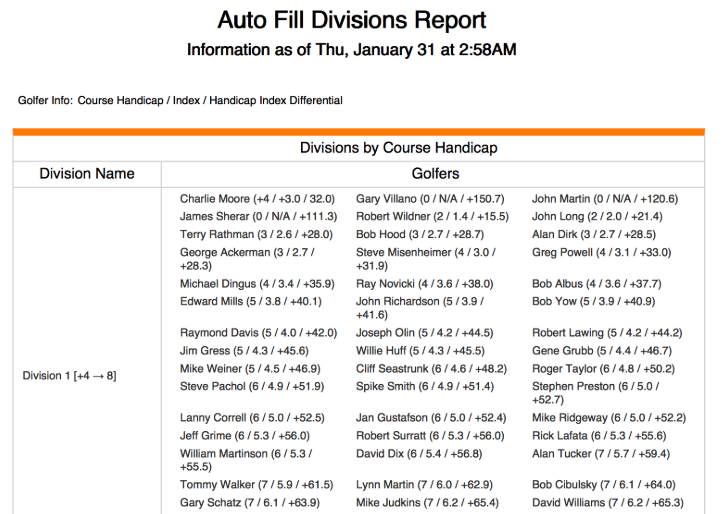
Auto-Fill Report
If you created divisions by Handicap Index or Playing Handicap, you could run an Auto-Fill Report that summarizes how the divisions were created using your selected parameters. You can do this by clicking "Auto-Fill Report" (as shown below).

The report will be generated using the information computed when the divisions are created. Any changes made to the divisions or Playing Handicaps/Handicap Indexes will not reflect on this report unless you refill the divisions. See below for an example report.