
The Demo Club Dashboard on the Mobile App is like the Demo Club Dashboard found on a web browser. This is where you will go on the mobile app to view existing or past demo orders and view your demo inventory. Further, you will be able to issue, edit and finalize demo orders. If you are in a hurry, you will still be able to issue and finalize demo clubs using the mobile app barcode scanner or use the Member/Guest Search to view current and past demo details by member.
The Demo Club Dashboard will be organized into two tabs:
Demos: Demo order details for current and past demos.
Inventory: A detailed list of all demo clubs and components.
In this article, we will discuss the Demo Club Dashboard, the available tab, editing demos, and searching orders on the mobile app.
For complete details on managing demo orders, Click Here.
Demo Club Dashboard - Demos Tab
When going to the Demo Club Dashboard, you will land on the "Demo" Tab. Here, you will be able to view and edit all existing demo club orders, Issue a Demo Club Orders, Finalized Demo Club Orders, and search and filter.
Viewing Demo Club Orders
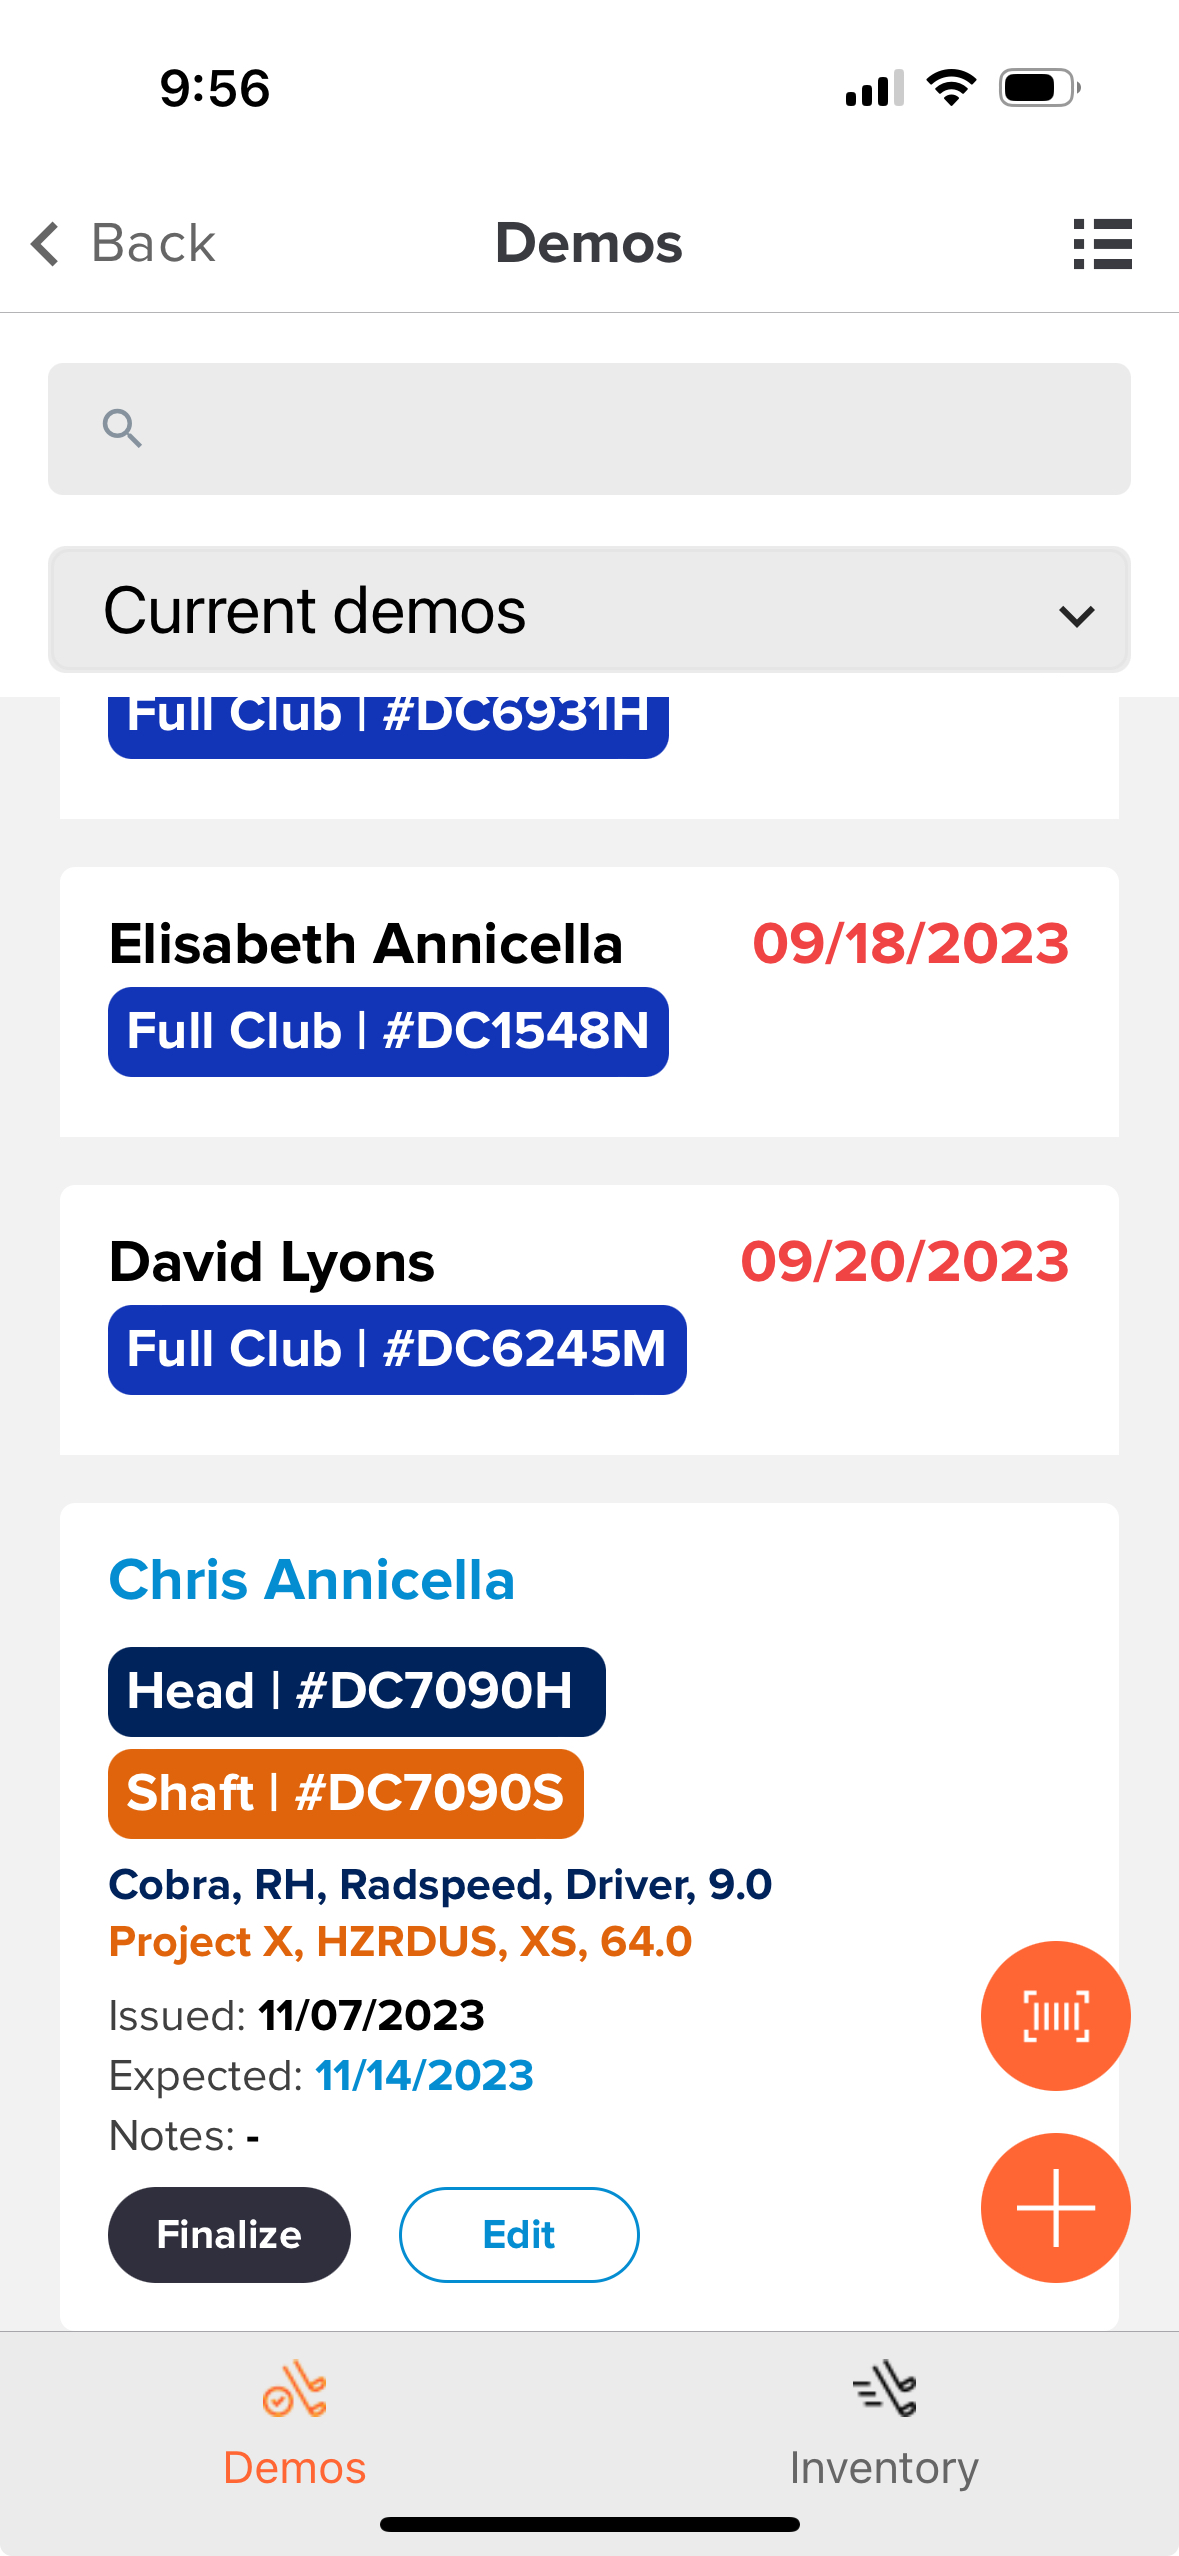
On the "Demo" tab, you will first see all current demo club orders displayed in a compact view, showing the Member/Guest information, demo details, and expected return date. Clicking on any demo order will expand the order and display more information(as shown below).
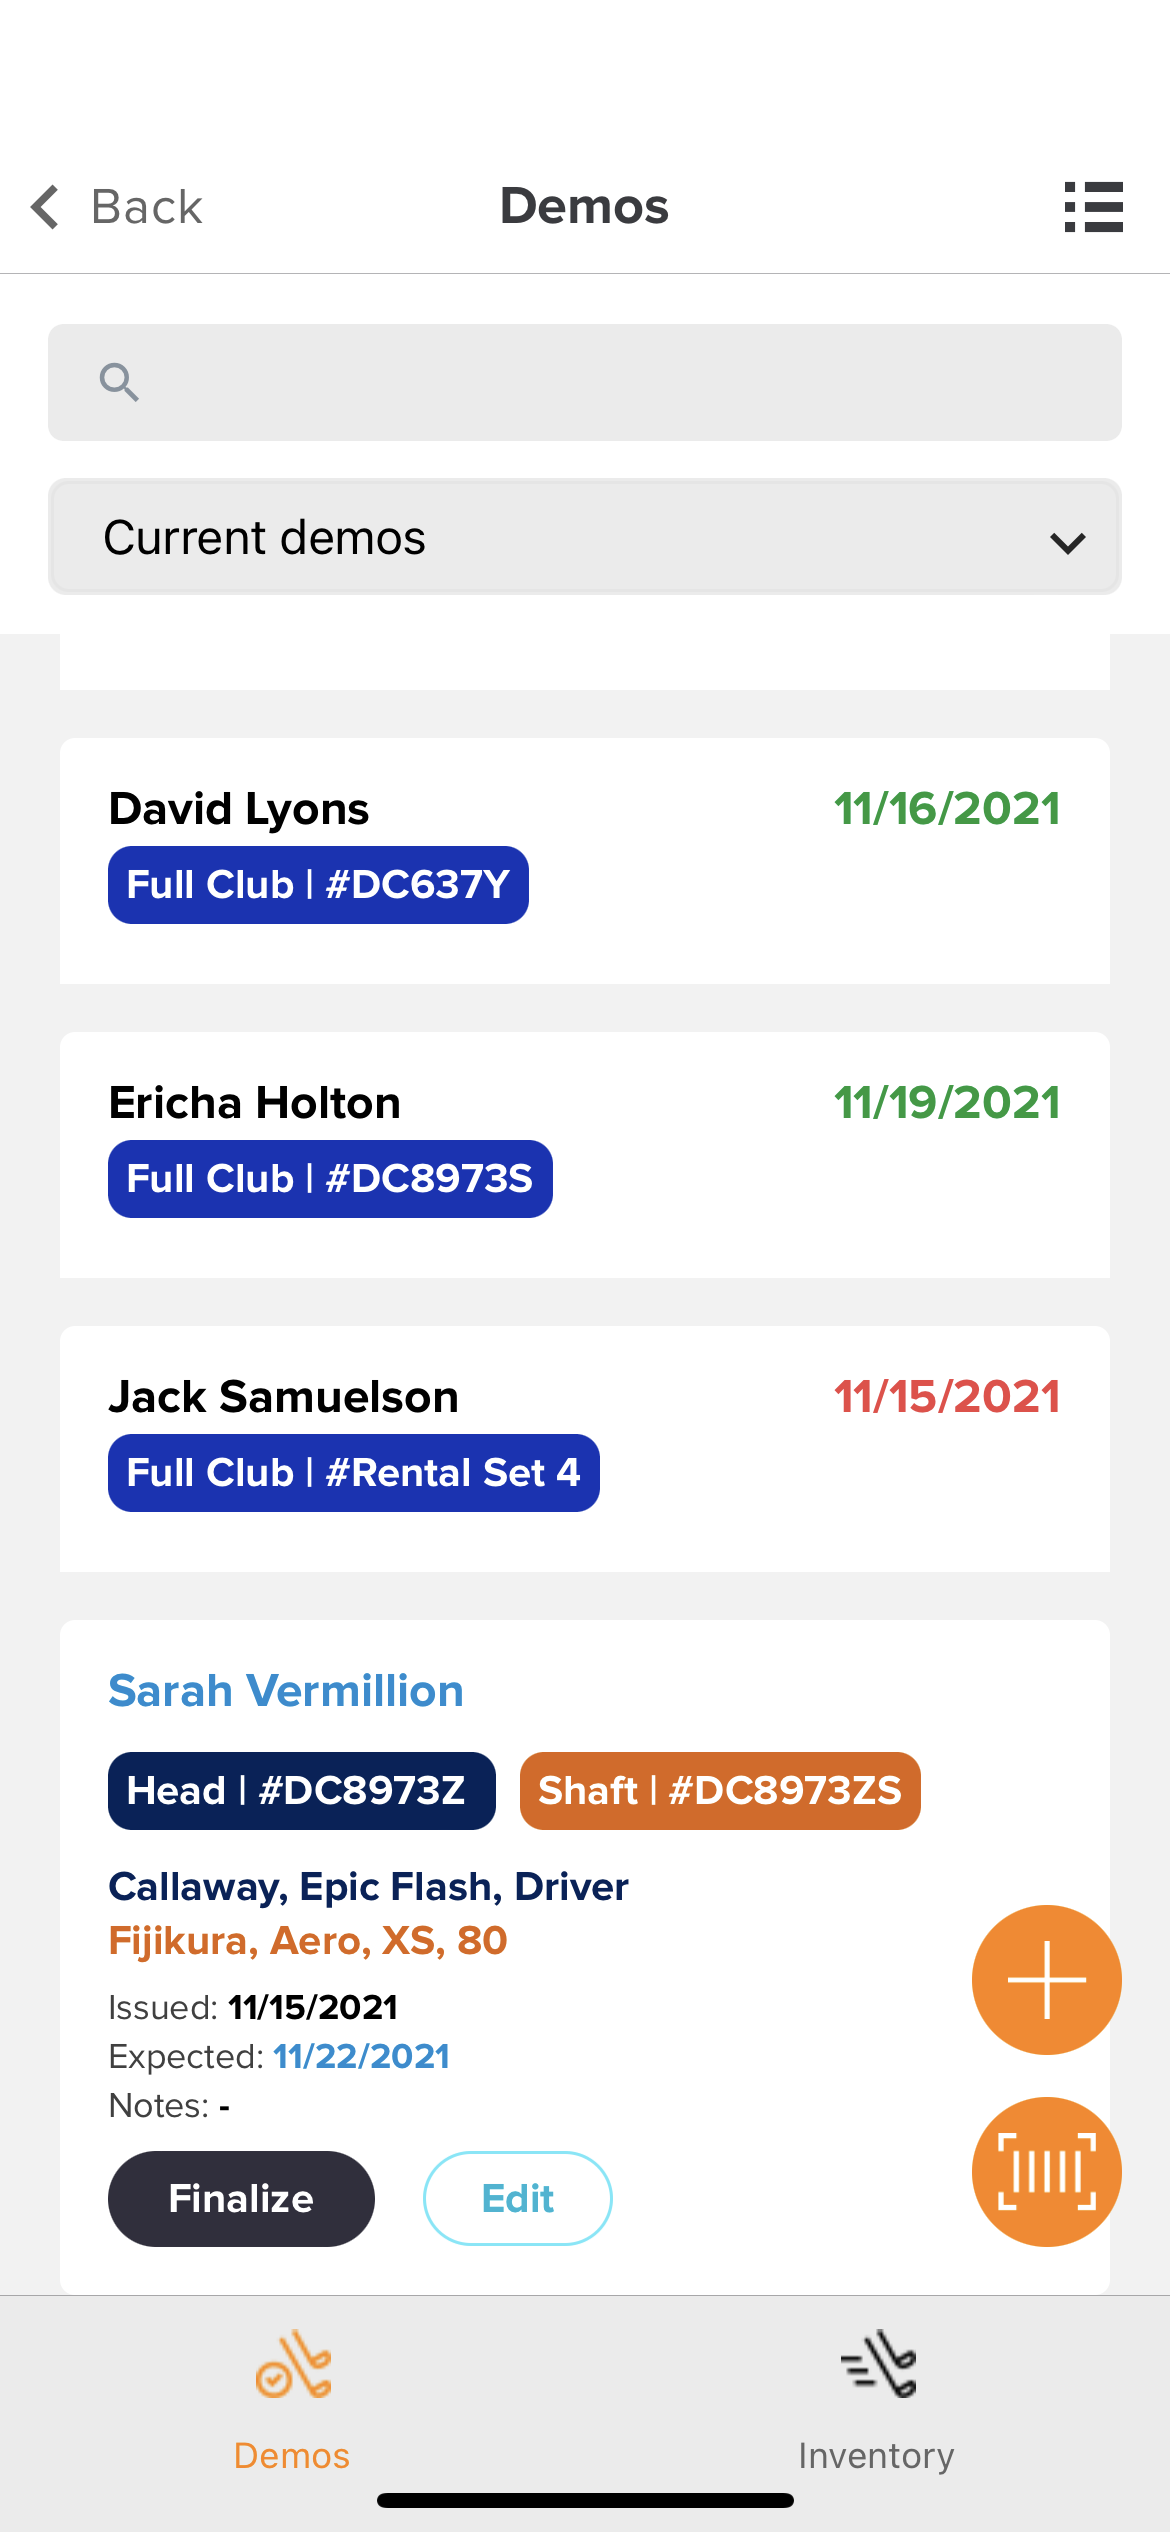
The fields displayed include:
Customer name
Kind
Tracking ID
Short Description
Issue Date
Expected Return Date
Notes
Actions (Finalize and Edit).
Search and Filter Demo Club Orders
The "Demo" tab features a search function that enables you to locate demo orders by matching the search term with the customer's name or demo details. Further, you will be able to filter by:
Current Demos
Overdue Demos
Past Demos
Sold Demos.
The search field and filter option will be available at the top of the "Demo" tab.
Issuing New Demo Club Orders
There are multiple ways you can issue demo clubs:
From the Demo Club Dashboard on the mobile app (Details below)
You will be able to enter new demo orders manually or by scanning a barcode. To enter a new demo order, follow these directions:
On the mobile app, go to "Demo Clubs." You will have two options to start your order:
Manually: If you are not using barcodes simply click the "+" button. If you selected this option you will have to manually enter the demo club details.
Barcodes: If you are using demo club labels with barcodes, click the "barcode" icon, and this will allow you to scan the demo club barcode and pre-populate the club details.
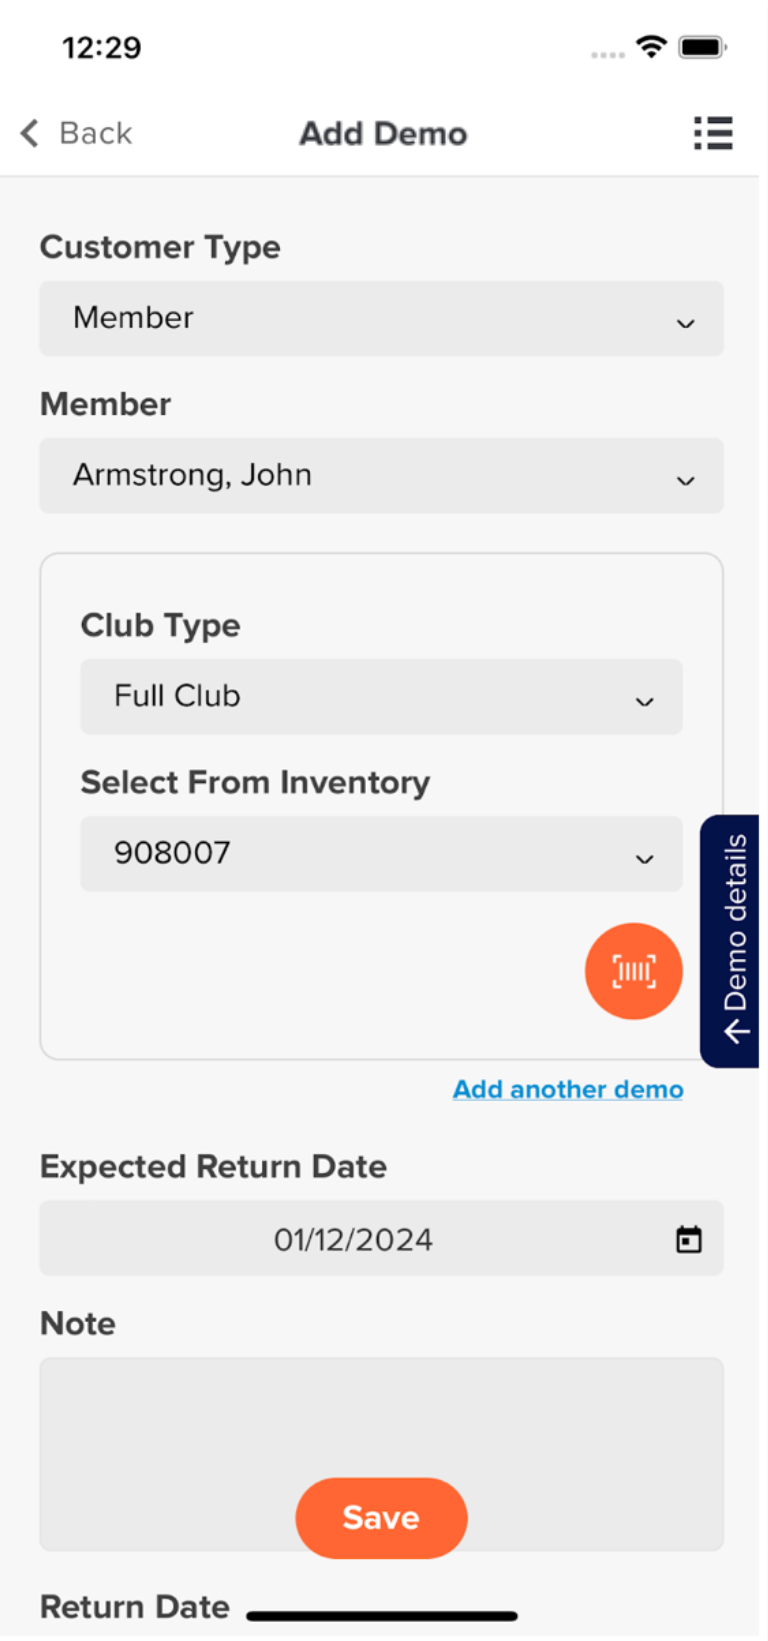
After scanning the barcode or clicking the "+" button, enter the order details (i.e., customer type, member or guest details) (as shown below).

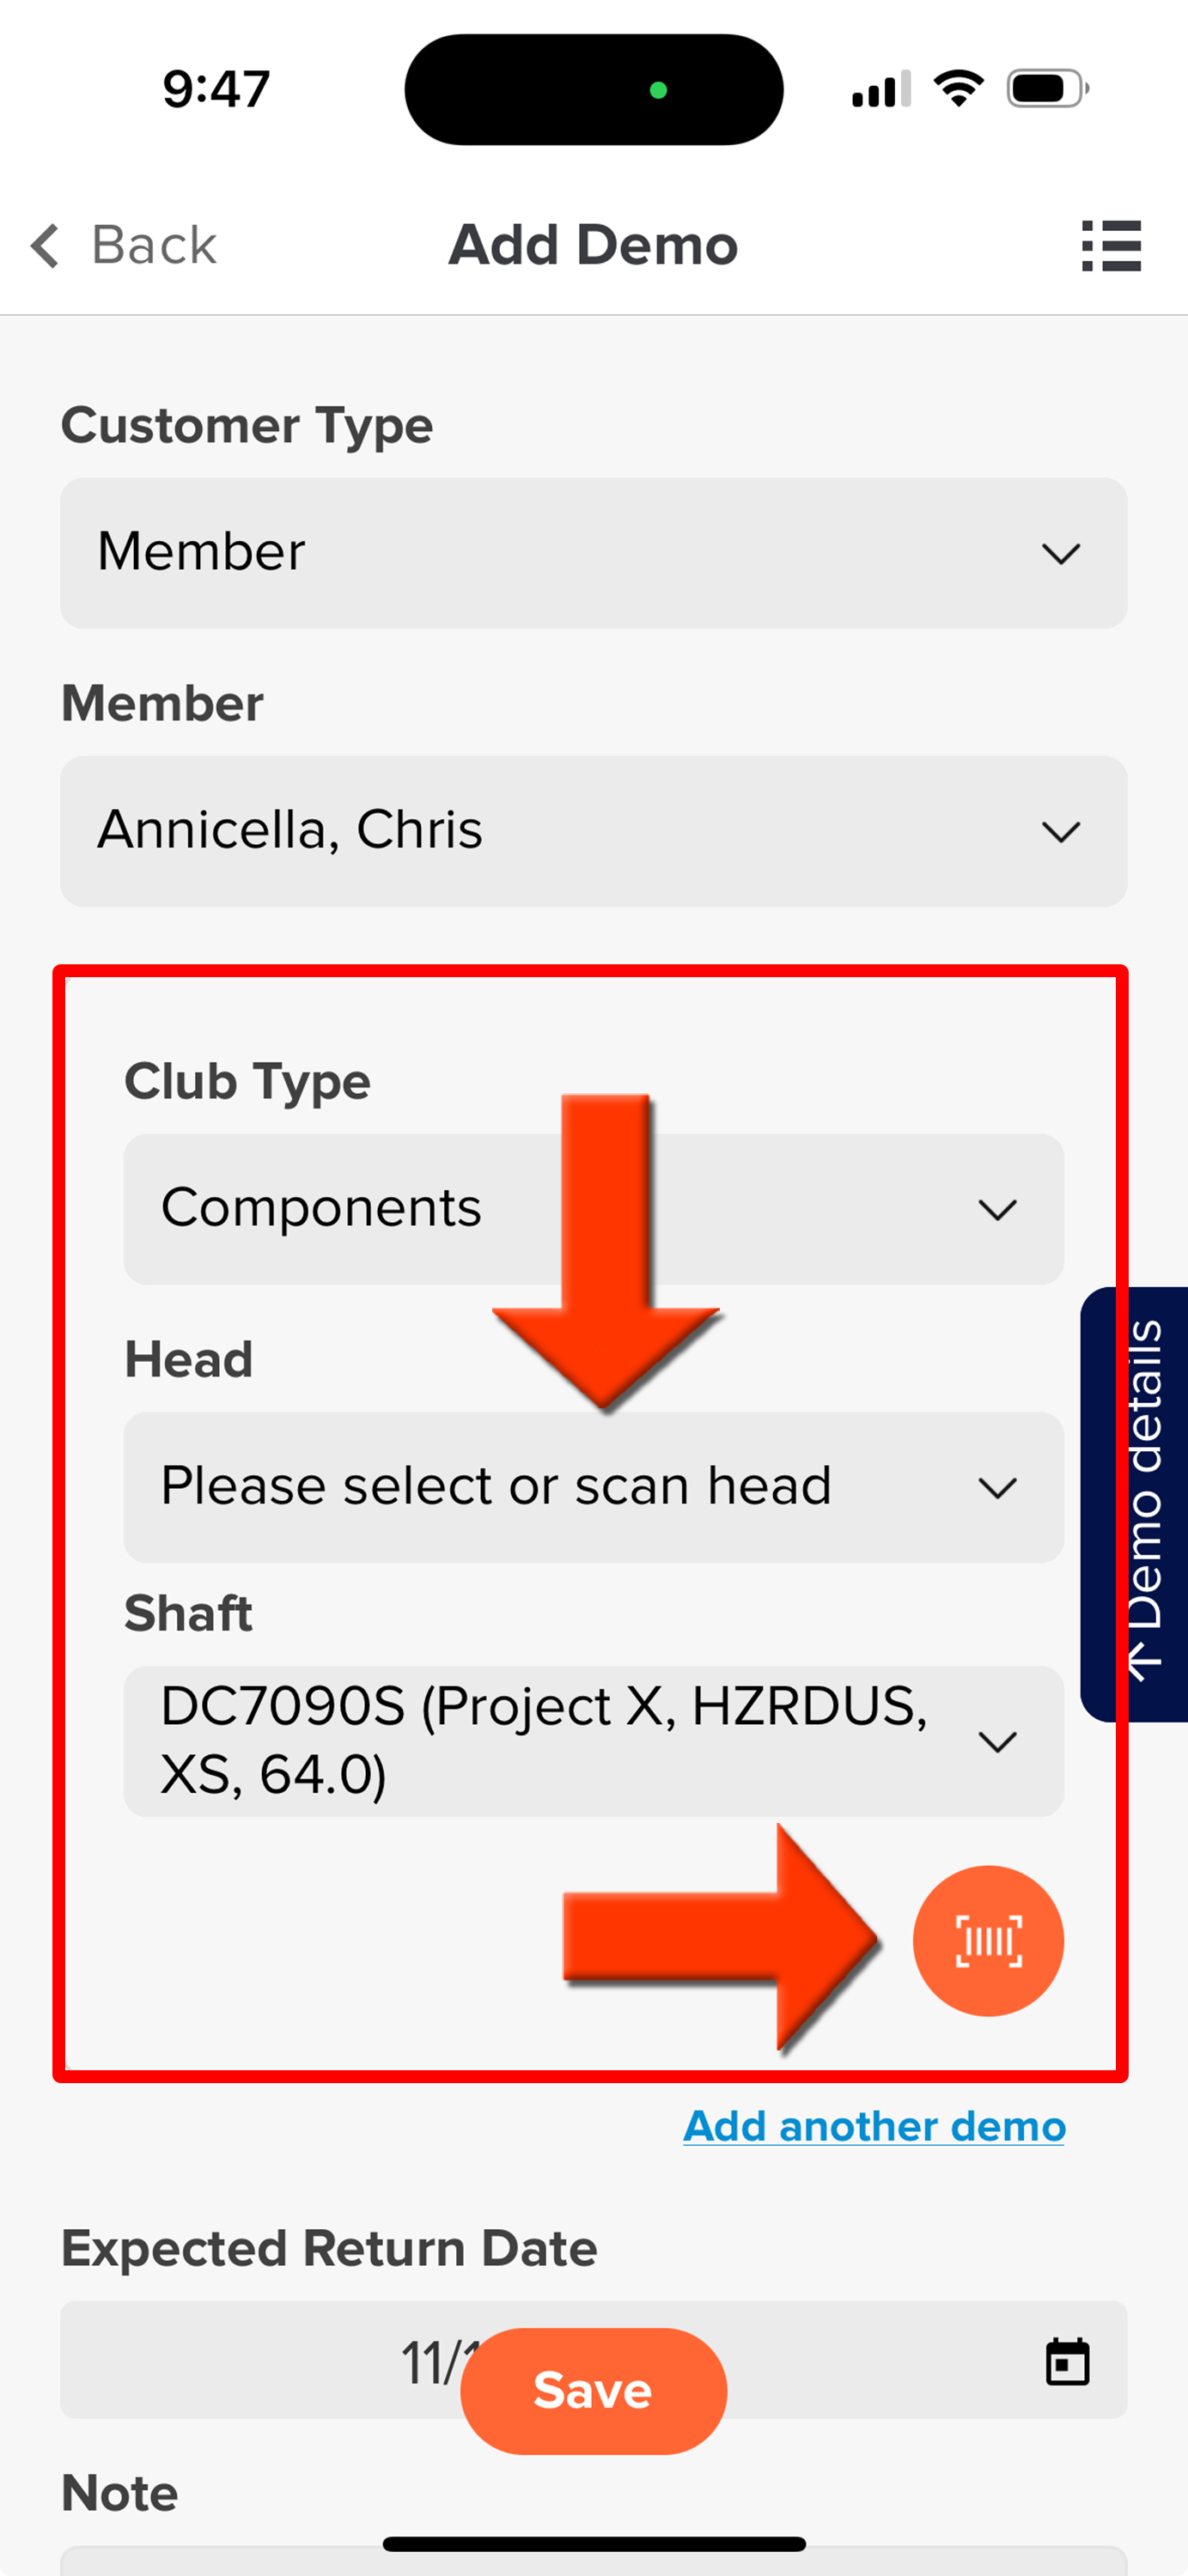
Select the first club or component if one is not already selected.
If you scan or select a component, scan or select the second component within the demo club details area (as shown below).

If you wish to add additional demo clubs for components, click "Add Another Demo" (as shown below). When adding additional components, use the dropdown or the scanner to add the additional components.

Set the "Expected Return Date" and add notes if necessary.
Click "Save," and the demos will be added to your current demos list.
If additional updates are needed for the demo, they can be made from either the mobile app or a computer.
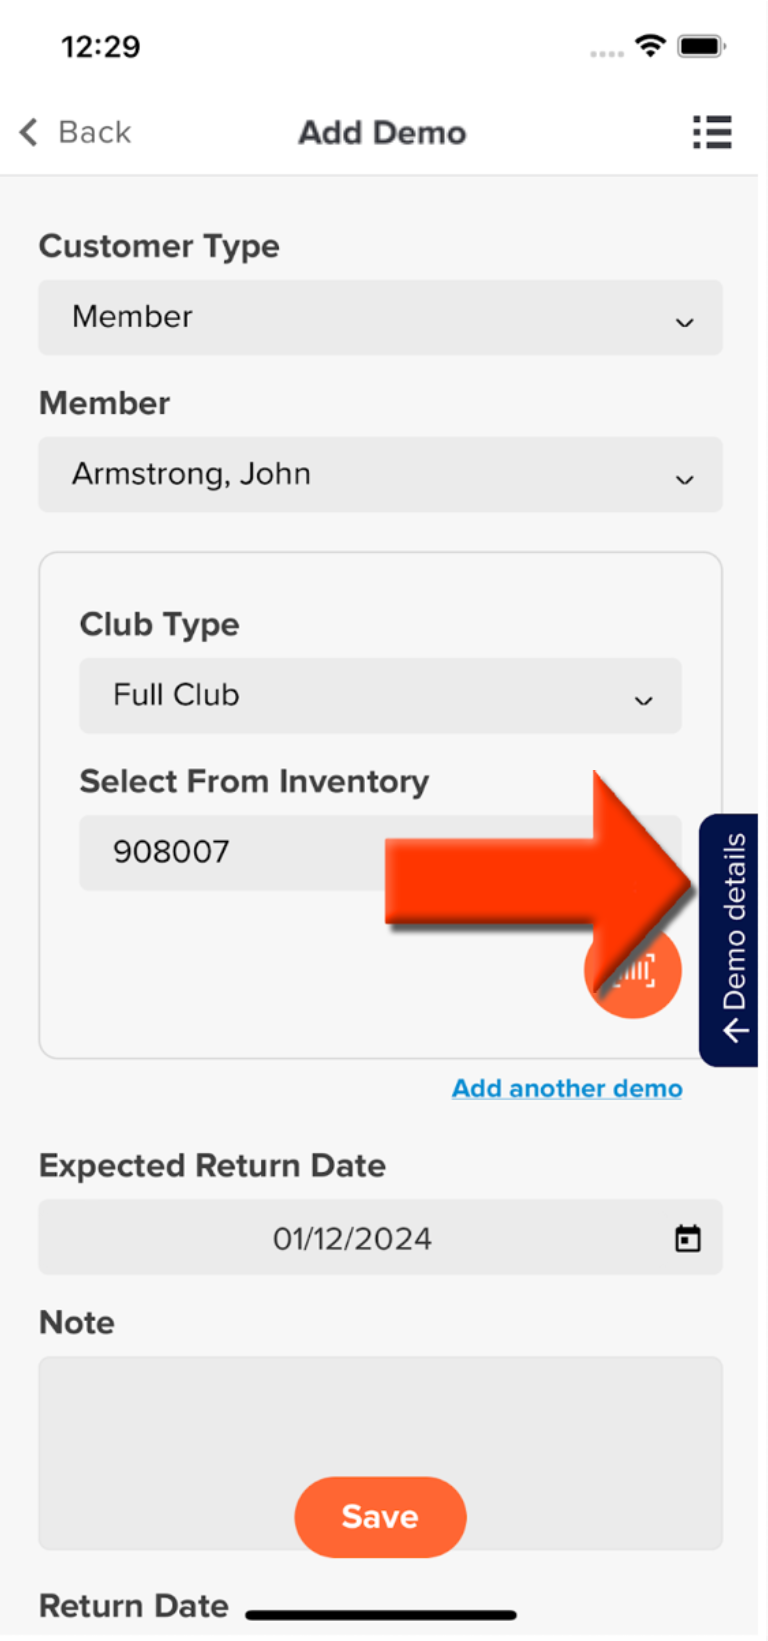
Demo Details
When entering or editing an order, click on "Demo Details" (as shown below) to see a summary, notification settings, and activity logs.
For more details on issuing a demo club, Click Here.
Editing Demo Club Orders
It happens all the time, a member catches you at the front door, and they want to extend their demo order. You can make edits to the demo order right in the mobile app. To edit an order, search for and click to expand the order you wish to edit (as shown below), then click "Edit." You will have access to the same fields and order details outlined in the section above, "Entering New Demo Club Orders."
Finalizing Demo Club Orders
When a member or guest returns a demo club, you are ready to finalize the demo club order. This can be done within the mobile app. To finalize an order, follow these directions:
Ssearch for the demo that needs to be returned.
Expand the order.
Click "Finalize."
After you have clicked "Finalize," you can enter the following:
Return Date
Finalize Option
The item has been returned
Customer purhased this itme
This itme has been returned an customer wants to place a special order
The item has not been returned
Select another active demo for the customer to be finalized
Notes (as shown below).

Review the customer notification by clicking on "Demo Details" (as shown below). In the "Demo Details," you will also see the order summary and activity log.

Click "Finalize Demo" and the demo will be marked as finalized and removed from the dashboard. For more details on finalizing a demo club order, Click Here.
Inventory Tab
On the Demo Club Dashboard, you will also have access to your demo club inventory on the "Inventory" tab (as shown below). Here, you will be able to view your demo inventory, Issue a Demo Club, and search or filter the inventory.

Viewing Inventory
On the "Inventory" tab, you will see all active demo clubs and components displayed in a compact view, showing the kind, tracking id, and short description of the demo club or component. Clicking on any demo will expand the demo and display additional information about the demo.
Search and Filter Demo Inventory
The "Inventory" tab features a search function that enables you to locate demo orders by matching the search term with specific demo details. Further, you will be able to filter by status (Active, At Club, Out, Sold and by kind (All, Full Club, Head, and Shaft). The search field and filter options will be available at the top of the "Inventory" tab.
Issuing New Demo Club Orders from the Inventory Tab
You can start a new demo order manually or by scanning a barcode. To manually enter a new demo order, locate the demo, expand it, and click "Start Demo." If you are using demo club labels with barcodes, click the "barcode" icon, and this will allow you to scan the demo club barcode and pre-populate the club details.
Deleting Demo Inventory
If you find you have demo inventory that should not be available any longer, you can delete that item from the Demo Inventory tab. To delete an item, select the item you want to delete, click the hamburger menu, and select Delete (as shown below) to remove it from inventory.
