
👋 Welcome to Tourmie!
The all-in-one Guest Experience Application designed to boost guest satisfaction, streamline your communications, and increase positive reviews.
This comprehensive guide will walk you through the first 6 essential steps to get you started with Tourmie and unlock its full potential.
Before you get started:
💁 Need a hand? Add a teammate to Tourmie to complete the setup with you.
✨ We are here for you. We provide clear instructions for each step and links to relevant resources like our Help Center and Blog for further assistance.
😌 Take your time! There’s no need to rush. Our 30-day free trial gives you plenty of time to explore and decide if Tourmie is the right fit for you.
Ready to get started? Let’s set up your Tourmie account!
Step 1: Add a property
This is where you’ll start creating your guest guide.
Go to Properties and click “Add new“. If you’ve already added a property, click on its title.
Save time by importing your properties directly from Airbnb or your Channel Manager/PMS. ✨
Save time by importing your properties directly from Airbnb or your Channel Manager/PMS. ✨
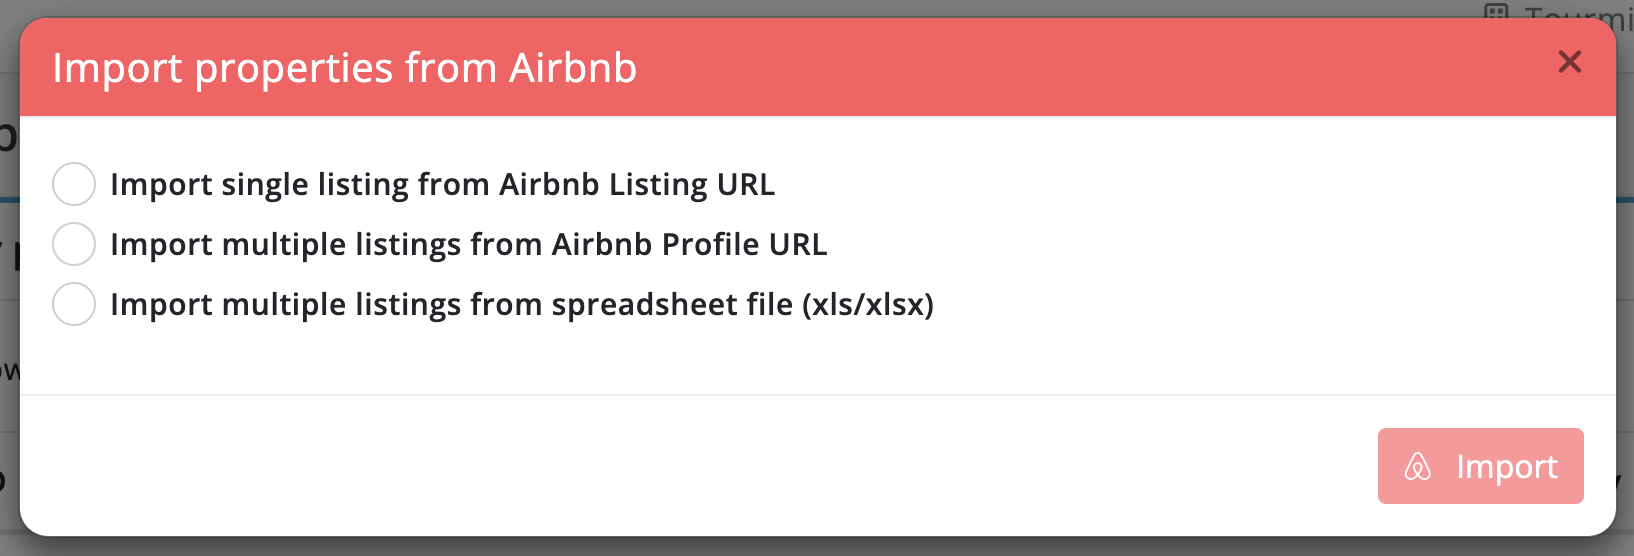
1. Import properties from Airbnb
Go to Properties and click “Import“.

Select the way you want to import your listings from Airbnb and follow the instructions.
2. Import properties from your Channel Manager or PMS
To connect your Channel Manager or PMS with Tourmie and import your properties, go to Integrations.
Find your Channel Manager or PMS and click Connect. Then, follow the instructions provided here. Each software has a unique connection guide.
😔 If you cannot find the Channel Manager or PMS that you use, contact us via chat.
Fill in property information like title, category, location, and amenities.
Provide clear instructions for check-in and check-out, appliances, WiFi, parking, house rules, and other important information.
Upload high-quality photos to give guests a great first impression.
Once you’ve filled in all the required information, click Submit.
ℹ️ Each property you create in Tourmie has its own unique URL. This is the link to your guest guide.

To add more properties, repeat this process.
These might interest you:
• Translate your property listing into other languages
• Secure sensitive information of your guest guide
• Create a unique lockbox and door code per booking
Step 2: Customize your online check-in form
Online check-in is a key feature of the guest guide, which can significantly streamline the arrival process for your guests.
It helps you collect all the necessary information (and documents) from guests before they even arrive at your property, such as their email address, ID number, VAT number, and details of additional guests.
While viewing your guest guide, you will see that the online check-in form is enabled by default.
To customize or disable the online check-in form, go to Online check-in.

✨ Online check-in is an easy way to collect guest emails and boost marketing efforts! Stay connected with guests after their stay, send them special offers, and encourage them to return.
If you’re not using a Channel manager or PMS, you can use the online check-in to capture bookings directly on Tourmie. Learn how to convert an online check-in to an accommodation booking.
🤔 Why should I import my bookings into Tourmie?
🤔 Why should I import my bookings into Tourmie?
Importing your bookings into Tourmie brings a range of practical and useful benefits that enhance your guests’ experience.
Personalized experience: For each booking, a personalized guest guide is automatically created, customized with the booking details.
Data security: Sensitive information in your guide is displayed only when needed, ensuring data security. Learn about field locking and key/door codes per booking.
Tailored recommendations: If you offer additional services in your guide, Tourmie creates tailored recommendations based on the guest’s profile.
Faster online check-in: The online check-in form is pre-filled with the guest’s information, saving them time.
Messages: You can send automated or direct messages to your guests via SMS, Email, or WhatsApp. Learn about Tourmie’s automated messaging and conversations.
Step 3: Create your area guide
Become a local expert for your guests! Create an area guide with the best restaurants, shops, and attractions worth visiting in your area, along with useful places they might need during their stay (such as pharmacies, ATMs, and medical centers).
Your guests will love it!


✨ You can collaborate with local businesses to offer exclusive discounts for your guests within your area guide!
🗺 Multiple properties, one area guide:
The area guide works seamlessly across all your properties. Each property guide will showcase the recommended places closest to that specific location, ensuring relevant suggestions for your guests.
These might interest you:
• Everything your guests need to know about your local area
• 4 tips for creating the perfect area guide
Step 4: Set up your brand identity
Customizing your guest guide with your property’s brand identity is essential for strengthening your recognition and building trust with guests. When guests see your logo and brand colors feel more comfortable opening and trusting your guide.
You can also:
• Connect your domain: Replace Tourmie’s default URL with your domain (e.g. www.example.com).
• Connect your business email: Send emails to guests from your email address (e.g. info@example.com).
Step 5: Add in-house or third-party services
Stand out from the competition and provide your guests with an immersive experience filled with unique local activities.
With Tourmie, you can provide additional services within your guest guide, making it a breeze for your guests to book everything they need for their vacation in one convenient place.
Promote your own services: Do you offer your own services, such as breakfast or spa treatments? Promote them directly through your guest guide and increase your bookings.
Invite existing partners: Invite your existing partners to Tourmie and showcase their services within your guest guide.
Connect with Tourmie’s trusted partners: Connect with Tourmie’s network of local service providers and offer a wider range of services to your guests, such as transfers, car rentals, and tours.
Connect popular services: Connect popular services to your guide, such as museum tickets and activities, providing even more options for your guests.
All services will appear in your own booking engine within the guest guide, where guests can view information and make their reservations, either with online payment or payment directly to the service provider.
Step 6: Go live! Share your guide with guests
It’s launch time! There are several ways to get your guest guide into your guests’ hands. Choose the method that best suits your needs.
Create automated messages (recommended): Set up automated messages on Tourmie or through your booking channels (such as Airbnb and Booking.com) to send your guide at various stages of your guests’ stay.
ℹ️ With Tourmie's automated messages, you can easily send each guest their personalized guide, tailored with their booking details.
Send direct message: Copy your guest guide URL and share it directly with guests via email, SMS, WhatsApp, or through your booking platforms.
Print QR code: Print the guest guide QR code and place it in guest rooms or common areas. Your guests will scan the QR code with their smartphones and get quick access to your guide.
Add to website: If your guest guide doesn’t contain sensitive information (such as door and lock box codes), consider adding the URL to your website.
✨ SMS messages boast an impressive open rate of around 98%, significantly higher than other communication channels. This ensures that your guests are almost guaranteed to see your messages!
Congratulations! You have completed the 6 basic steps to set up your Tourmie account.